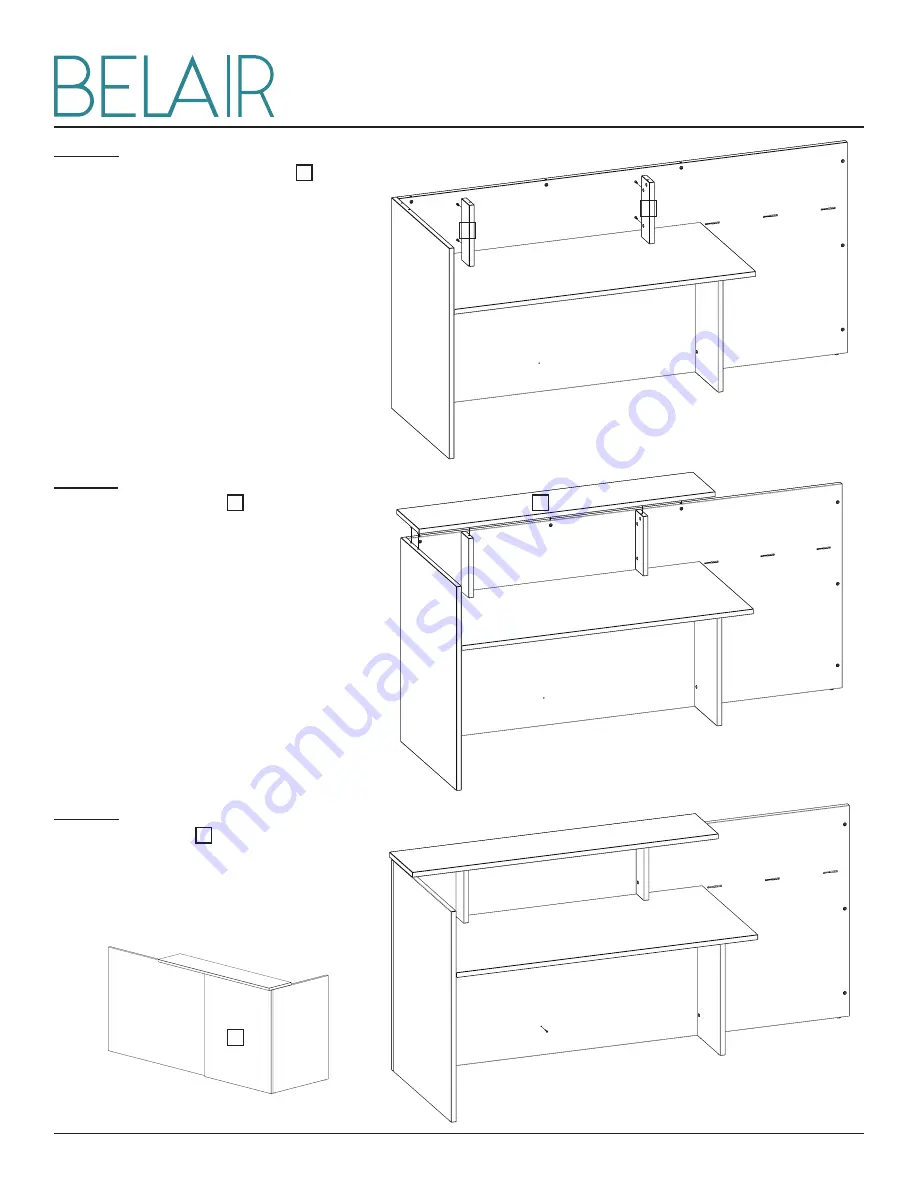
Belair W-03R Скачать руководство пользователя страница 11

W-03L

5

STEP 10

Attach small desk top supports  E  . 
Ensure cams are facing in as shown. 
Fasten pins and cams.

STEP 11

Attach transaction top  F . Fasten pins 
and cams.

STEP 12

Attach small back  G  as shown. Secure 
with screws provided through large 
return back.

E

E

F

G

Содержание W-03R

Страница 1: ...e provided and tools recommended to avoid any product faults Always assemble product on a clean soft surface to avoid scratching PARTS INCLUDED HARDWARE INCLUDED TOOLS REQUIRED 52X 52X 47X 8X 12X 3X 2X 2 Phillips screwdriver 2 Robertson screwdriver ASSEMBLY INSTRUCTIONS A B C D E F G H I J K ...

Страница 2: ...embling Attach small support gable D to desk top A as shown Fasten pins and cams STEP 2 Lay large desk back B flat and lower top and gable onto back as shown Fasten pins and cams STEP 3 Attach large left gable C as shown Fasten pins and cams Lift unit right side up A D B C ...

Страница 3: ...ll desk top supports E Ensure cams are facing in as shown Fasten pins and cams STEP 5 Attach transaction top F Fasten pins and cams STEP 6 Attach small back G as shown Secure with screws provided through large desk back E E F G ...

Страница 4: ...t gable K to return top H as shown Fasten pins and cams STEP 8 Lay return back I flat and lower top and gable onto back Fasten pins and cams STEP 9 Attach large right gable J as shown Fasten pins and cams Lift unit right side up H K I J ...

Страница 5: ... desk top supports E Ensure cams are facing in as shown Fasten pins and cams STEP 11 Attach transaction top F Fasten pins and cams STEP 12 Attach small back G as shown Secure with screws provided through large return back E E F G ...

Страница 6: ... inserted into the desk top Line the lockdowels with the slots in the return back Slide the return back into the desk back Fasten pins and cams STEP 14 Use flat connecting brackets to connect return top and desk top as shown STEP 15 Use cover caps to cover any visible cams and screws ...

Страница 7: ...e provided and tools recommended to avoid any product faults Always assemble product on a clean soft surface to avoid scratching PARTS INCLUDED HARDWARE INCLUDED TOOLS REQUIRED 52X 52X 47X 8X 12X 3X 2X 2 Phillips screwdriver 2 Robertson screwdriver ASSEMBLY INSTRUCTIONS A B C D E F G H I J K ...

Страница 8: ...embling Attach small support gable D to desk top A as shown Fasten pins and cams STEP 2 Lay large desk back B flat and lower top and gable onto back as shown Fasten pins and cams STEP 3 Attach large right gable C as shown Fasten pins and cams Lift unit right side up A D B C ...

Страница 9: ...ll desk top supports E Ensure cams are facing in as shown Fasten pins and cams STEP 5 Attach transaction top F Fasten pins and cams STEP 6 Attach small back G as shown Secure with screws provided through large desk back E E F G ...

Страница 10: ...t gable K to return top H as shown Fasten pins and cams STEP 8 Lay return back I flat and lower top and gable onto back Fasten pins and cams STEP 9 Attach large left gable J as shown Fasten pins and cams Lift unit right side up H K I J ...

Страница 11: ... desk top supports E Ensure cams are facing in as shown Fasten pins and cams STEP 11 Attach transaction top F Fasten pins and cams STEP 12 Attach small back G as shown Secure with screws provided through large return back E E F G ...

Страница 12: ...e inserted into the desk top Line the lockdowels with the slots in the return back Slide the return back into the desk back Fasten pins and cams STEP 14 Use connecting flat brackets to connect return top to desk top as shown STEP 15 Use cover caps to cover any visible cams and screws ...

Отзывы: