background image

25

EN 

Baby Vital-Center

BEEM - Elements of Lifestyle

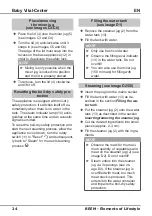
Put the lid (3) onto the steamer jug 


‹

(2).
Move the rotary switch (11) to "Steam" 


‹

. The steam indicator lamp (10) 

lights up and indicates that the steam-

er is in operation.

After the maximum filling quantity (150 ml) 

of the water tank has evaporated (approx. 

20 minutes), an acoustic signal is emitted 

and the 

steam indicator lamp (10) extin-

guishes.

Turn the rotary switch (11) to the "Off" 


‹

position  . Wait 2 minutes before 

opening the lid to make sure that 

steam can no longer escape from the 

steamer jug. Before the next steam-

ing process, you must turn the rotary 

switch (11) to "Reset" 

 and then 

back to "Steam" 

.

If you finish steaming before the water 


‹

in the tank has fully evaporated, pour 

the the remaining water out of the wa-

ter tank. If you wish to steam a further 

portion, you do not need to press the 

reset button.

Mixing 

(see image D4)

Insert the chopper blade (7) into the 


‹

mixer jug (5) as described in the sec-

tion 

Mounting the chopper blade

.

Place the mixer jug (5) onto the ap-


‹

pliance as described in the 

Inserting/

removing the mixer jug

.

Fill the mixer jug (5) with the ingredi-


‹

ents (steamed or raw) and other addi-

tives if required as described in 

Tips/

Recipes

.

NOTE

Observe the mark for the maxi-


mum filling quantity (600 ml) and 

the maximum quantity of broth 

(250 ml) on the mixer jug (5) 

(see image D4).  

Do not overfill!

Place the lid (4) onto the mixer jug (5) 


‹

as described in the section 

Inserting/

removing the mixer jug

.

Turn the rotary switch (11) To "Mix" 


‹

. Hold the switch at this position 

until the ingredients have been suf-

ficiently chopped.

NOTE

Do not allow the appliance to 


mix uninterrupted for longer than 

30 seconds. If processing was 

not completed after 30 seconds, 

Leave the appliance switched 

off for a few seconds and then 

continue.

Release the rotary switch (11) when 


‹

the mixing process is finished. The 

switch returns to the "Off"   position 

automatically.
Remove the mashed food from the 


‹

mixer jug. You can use the spatula 

supplied.

Содержание Baby Vital-Center

Страница 1: ...Steamer Chopper for baby food Cuiseur vapeur broyeur alimentation b b Stoomkoker maalmachine voor babyvoeding Elements of Lifestyle User Manual Mode d emploi Gebruiksaanwijzing Bedienungsanleitung Mo...

Страница 2: ......

Страница 3: ...BEEM Elements of Lifestyle 1 2 3 4 5 6 7 8 11 12 9 10 13 14...

Страница 4: ......

Страница 5: ...t im norma len Hausm ll entsorgt werden Ent sorgen Sie das Ger t ber die kommuna len Sammelstellen Garantie Innerhalb der Garantiezeit von 2 Jahren beheben wir kostenlos alle Material oder Fabrikation...

Страница 6: ...ezeit Konformit tserkl rung Hiermit erkl rt die Firma BEEM dass sich dieses Ger t in bereinstimmung mit den grundlegenden Anforderungen und den brigen einschl gigen Bestimmungen der Richtlinien 2006 9...

Страница 7: ...r t au er Reichwei te von Kindern Kontrollieren Sie das Ger t vor der Verwendung auf u ere sichtbare Sch den Nehmen Sie ein besch dig tes Ger t nicht in Betrieb Das Ger t w hrend des Betriebes nicht u...

Страница 8: ...Wassertank nach da sonst hei es Wasser und Dampf aus dem Ger t austreten k nnen Lassen Sie das Ger t abk hlen be vor Sie mit der Reinigung beginnen WARNUNG Gefahr durch scharfe Messer Ber hren Sie di...

Страница 9: ...s gelangen k nnen Die Steckdose muss leicht zug ng lich sein so dass die Netzverbindung schnell getrennt werden kann Elektrischer Anschluss F r einen sicheren und fehlerfreien Be trieb des Ger tes sin...

Страница 10: ...h den f hren zum Erl schen des Garantieanspruchs Lieferumfang pr fen Pr fen Sie den Inhalt auf Vollst ndigkeit und auf sichtbare Sch den Melden Sie eine unvollst ndige oder besch digte Lieferung umgeh...

Страница 11: ...1 B3 Setzen Sie das Fl gelmesser 7 von oben mit der Hand in die ffnung am Boden des Mixbeh lters 5 WARNUNG Das Messer ist sehr scharf Nur am Kunststoffgriff siehe Pfeile in Bild B2 anfassen Drehen Sie...

Страница 12: ...nd drehen Sie den Drehschalter 11 auf Reset und danach f r den n chsten Dampfgarvorgang zur ck auf Dampfga ren Wassertank f llen Siehe Bild D1 Entfernen Sie den Garbeh lter 2 vom Wassertank 13 F llen...

Страница 13: ...messer 7 in den Mixbeh lter 5 ein wie im Kapitel Fl gelmesser montieren beschrie ben Setzen Sie den Mixbeh lter 5 auf das Ger t wie im Kapitel Mixbeh lter einsetzen entnehmen beschrieben F llen Sie di...

Страница 14: ...ursachen Nach der Mittagsmahlzeit werden nach und nach die anderen Milchmahlzeiten ebenfalls ersetzt zuerst am Nachmit tag z B durch einen Obst Getrei debrei dann am Abend z B durch einen Milchgetreid...

Страница 15: ...aschen Sie das Fleisch und schneiden Sie es in kleine St cke Geben Sie das Fleisch in den Garbeh lter und lassen Sie es 20 Minuten garen Danach wird das Fleisch im Mixbecher fein p riert Sollte der Br...

Страница 16: ...rden Der Griff 1 des Garbeh l ters 2 kann zur leichteren Reinigung demontiert werden Um den Wassertank 13 zu reinigen f llen Sie ihn mit warmem Seifenwas ser sp len Sie gr ndlich mit Wasser nach und t...

Страница 17: ...Sonnenlicht gesch tzt ist Ersatzteile und weiteres Zubeh r Pos Artikelnr Bezeichnung 1 2 3 900675001 Garbeh lter mit Deckel und Griff 4 5 900675006 Mixbeh lter mit Deckel 7 8 900675011 Fl gelmesser k...

Страница 18: ...llen Siehe Kapitel Trockenlaufschutz zur cksetzen Das Ger t d mpft nicht Kein Wasser im Wassertank Ger t ausschalten und Wassertank f llen Trockenlaufschutz schaltet das Ger t ab obwohl sich noch Wass...

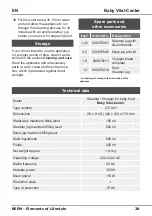
Страница 19: ...n the Eu ropean Union Dispose of the appli ance via communal collection points Guarantee We will remedy any faults due to mate rial flaws or manufacturing faults free of charge within the guarantee pe...

Страница 20: ...by the ma chine operator If used commercially please pay attention to the extended guarantee period Declaration of Conformity BEEM hereby declares that this appliance complies with the fundamental req...

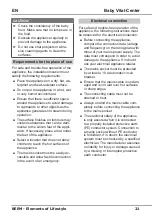
Страница 21: ...i ance Keep the appliance out of the reach of children Inspect the appliance for visible signs of damage before use Do not use a damaged appliance Do not leave the appliance unattended during operatio...

Страница 22: ...steaming process otherwise hot water and steam can escape from the appliance Allow the appliance to cool down before starting with cleaning WARNING Danger from sharp blades Do not touch the blades whe...

Страница 23: ...cket must be easily ac cessible and allow fast disconnection in the event of an emergency Electrical connection For safe and trouble free operation of the appliance the following instructions must be...

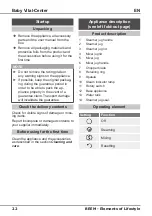
Страница 24: ...ee claim Transport damage will invalidate the guarantee Check the delivery contents Check for visible signs of damage or miss ing items Report incomplete or damaged contents to your supplier immediate...

Страница 25: ...he chopping blades see images B1 B3 Put the chopper blade 7 into the opening on the bottom of the mixer jug 5 from above WARNING The blade is very sharp Only grip the plastic handle see arrows on imag...

Страница 26: ...the rotary switch 11 to Reset and subsequent ly back to Steam for the next steaming process Filling the water tank see image D1 Remove the steamer jug 2 from the water tank 13 Fill the tank with water...

Страница 27: ...hopper blade 7 into the mixer jug 5 as described in the sec tion Mounting the chopper blade Place the mixer jug 5 onto the ap pliance as described in the Inserting removing the mixer jug Fill the mixe...

Страница 28: ...h tomatoes as they can cause nappy rash After the midday meal the other milk feedings are gradually replaced at first at midday e g by a fruit grain puree then in the evening e g milk grain puree and...

Страница 29: ...the skin tendons and residual fat wash the meat and cut into small pieces Put the meat into the steamer jug and steam it for 20 minutes The meat is then mashed finely in the mix er jug If the puree i...

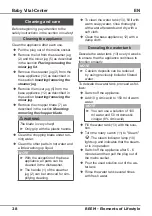
Страница 30: ...exception of the base appliance all parts can be cleaned in the dishwasher The handle 1 of the steamer jug 2 can be removed for sim plifying cleaning To clean the water tank 13 fill it with warm soap...

Страница 31: ...arts and other accessories Item Article No Designation 1 2 3 900675001 Steamer jug with lid and handle 4 5 900675006 Mixer jug with lid 7 8 900675011 Chopper blade complete 14 900675016 Seal Steamer j...

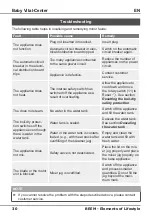
Страница 32: ...e the rotary switch 11 to Reset See section Resetting the boil dry safety protection The does not steam No water in the water tank Switch off the appliance and fill the water tank The boil dry protec...

Страница 33: ...e mettre ce produit aux ordures m nag res normales Eliminer l appareil via les points de collecte communaux Garantie Au cours de la p riode de garantie de 2 ans nous r parerons gratuitement tous les v...

Страница 34: ...veuillez noter la modification de la p riode de garantie D claration de conformit Par la pr sente la soci t BEEM d clare que l appareil est conforme aux exigences fondamentales et autres des directiv...

Страница 35: ...appareil hors de port e des enfants Avant d utiliser l appareil veuillez le contr ler pour v rifier qu il ne pr sente aucun dommage apparent Pendant le fonctionnement de l ap pareil ne le laissez pas...

Страница 36: ...trement de l eau tr s chaude et de la vapeur peuvent s chapper de l appareil Laissez refroidir l appareil avant de commencer le nettoyage AVERTISSEMENT Danger issu de couteaux tranchants Ne touchez pa...

Страница 37: ...s chau des de l appareil La prise doit tre facile d acc s afin de pouvoir d brancher rapidement l appareil Branchement lectrique Afin que l appareil fonctionne de mani re s re et sans d faut il convie...

Страница 38: ...n du droit de garantie Contr ler le volume de livraison V rifiez l int gralit du contenu et l absen ce de dommages visibles Signalez dans les plus brefs d lais une livraison incompl te ou endommag e v...

Страница 39: ...tions B1 B3 Mettez le couteau ailettes 7 par le haut avec la main dans l ouverture sur le fond du bol de mixage 5 AVERTISSEMENT Les couteaux sont tranchants Ne touchez que la poign e en plastique cf f...

Страница 40: ...ensuite sur la prochaine op ration de cuis son la vapeur sur Cuisson la vapeur Remplir le r servoir d eau cf illustration D1 Enlevez le bol de cuisson 2 du r ser voir d eau 13 Remplissez le r servoir...

Страница 41: ...e bol de mixage 5 de la mani re d crite au chapitre Monter le couteau ailettes Mettez le bol de mixage 5 sur l ap pareil comme d crit au chapitre Mise en place enl vement du bol de mixage Donnez les i...

Страница 42: ...les toma tes elles peuvent provoquer une irrita tion des fesses Apr s le repas de midi les autres repas au lait sont eux aussi succes sivement remplac s d abord l apr s midi p ex par une bouillies au...

Страница 43: ...eaux Donnez la viande dans le bol de cuisson et laissez cuire pendant environ 20 minu tes Ensuite la viande est finement pur e dans le bol de mixage Si la pur e est trop ferme ajoutez y un peu de jus...

Страница 44: ...base peuvent tre nettoy es en lave vaisselle La poign e 1 du bol de cuisson 2 se laisse d monter pour un nettoyage plus facile Pour nettoyer le r servoir d eau 13 remplissez le d eau savonneuse chaud...

Страница 45: ...soires Pos R f rence D signation 1 2 3 900675001 Bol de cuisson avec couvercle et poign e 4 5 900675006 Bol de mixage avec couvercle 7 8 900675011 Couteau ailettes complet 14 900675016 Joint bol de cu...

Страница 46: ...e sec L appareil ne cuit pas Pas d eau dans le r servoir d eau Eteindre l appareil et remplir le r servoir d eau La protection contre la marche sec coupe l appareil bien qu il y ait encore de l eau da...

Страница 47: ...naar de plaatselijke verzamelpunten Garantie Tijdens de garantieperiode van 2 jaar verhelpen wij gratis alle materiaal of fabri cagefouten Bij een commerci le of daarmee gelijk te stellen toepassing...

Страница 48: ...ruik rekening met een wijziging van de garantieperiode Conformiteitsverklaring Bij deze verklaart BEEM dat dit apparaat aan de principi le eisen en de overige van toepassing zijnde bepalingen van de r...

Страница 49: ...araat buiten het bereik van kinderen Controleer het apparaat v r gebruik op van buiten zichtbare schade Stel een beschadigd apparaat niet in be drijf Laat het apparaat tijdens de werking niet zonder t...

Страница 50: ...l de watertank nooit tijdens het stoomkoken bij omdat anders heet water en stoom uit het apparaat kan ontsnappen Laat het apparaat afkoelen voordat u met het reinigen begint WAARSCHUWING Gevaar door s...

Страница 51: ...ontact moet goed toegan kelijk zijn zodat de spanningstoevoer snel onderbroken kan worden Elektrische aansluiting Voor een veilige en feilloze werking van het apparaat moeten bij de elektrische aanslu...

Страница 52: ...teert in het vervallen van de garantie Leveringsomvang controleren Controleer de inhoud op volledigheid en op zichtbare schade Meld een onvolledige of beschadigde le vering onmiddellijk aan uw leveran...

Страница 53: ...de watertank 13 staat Vleugelmes monteren demonteren zie afbeeldingen B1 B3 Plaats het vleugelmes 7 van boven met de hand in de opening van de mixbeker 5 WAARSCHUWING De messen zijn erg scherp Alleen...

Страница 54: ...e nieuwe stoomprocedure terug op Stomen Watertank vullen zie afbeelding D1 Verwijder het stoomreservoir 2 van de watertank 13 Vul de watertank met water OPMERKING Gebruik uitsluitend vers koud water L...

Страница 55: ...leugelmes 7 in de mixbe ker 5 als beschreven in het hoofdstuk Vleugelmes monteren Plaats de mixbeker 5 op het apparaat als beschreven in het hoofdstuk Mix beker plaatsen wegnemen Doe de ingredi nten g...

Страница 56: ...s kunnen veroorzaken Na de middagmaaltijd worden gelei delijk aan ook de andere maaltijden vervangen eerst na de middag bijv door granenpap met fruit vervolgens s avonds bijvoorbeeld door melk granenp...

Страница 57: ...e vetrestanten was het vlees en snijd het in kleine stukjes Doe het vlees in het stoomreservoir en laat het 20 minuten stomen Vervolgens wordt het vlees in de mixbeker gepureerd Als de pap te dik is v...

Страница 58: ...RKING Alle delen behalve het basisap paraat kunnen in de vaatwasser gereinigd worden De handgreep 1 van het stoomreservoir 2 kan voor een eenvoudigere reiniging gede monteerd worden Om de watertank 13...

Страница 59: ...nderdelen en verdere accessoires Pos Artikelnr Benaming 1 2 3 900675001 Stoomreservoir met deksel en handgreep 4 5 900675006 Mixbeker met deksel 7 8 900675011 Vleugelmes com pleet 14 900675016 Dichtin...

Страница 60: ...reset Zie hoofdstuk Droogkook bescherming resetten Het apparaat stoomt niet Geen water in de watertank Apparaat uitschakelen en watertank vullen Droogkookbescher ming schakelt het apparaat uit hoewel...

Страница 61: ......

Страница 62: ...BEEM Elements of Lifestyle A1 B1 C1 D4 A2 A3 B2 C3 D2 C2 B3 C4 C5 C6 D1 D3...

Страница 63: ......

Страница 64: ...er votre vendeur Neem voor klantenservice in andere landen contact op met uw handelaar Elements of Lifestyle BEEM GmbH Abteilung Kundendienst Dieselstra e 19 21 61191 Rosbach v d H Germany Fon 49 0 18...

Отзывы: