AUSTRALIA / NEW ZEALAND
Assembly and Operating Instructions
INTEGRATED
SIDE BURNER
BSW318SA
Страница 1: ...AUSTRALIA NEW ZEALAND Assembly and Operating Instructions INTEGRATED SIDE BURNER BSW318SA...
Страница 2: ...that are always present when you use an appliance it is important that the appliance is installed correctly and that you read the safety instructions carefully to avoid misuse and hazards We recommend...
Страница 3: ...gas supply to an individual burners if the flame goes out for any reason How It Works Flame Failure Technology switches gas off to an individual burner if the flame goes out During normal operation th...
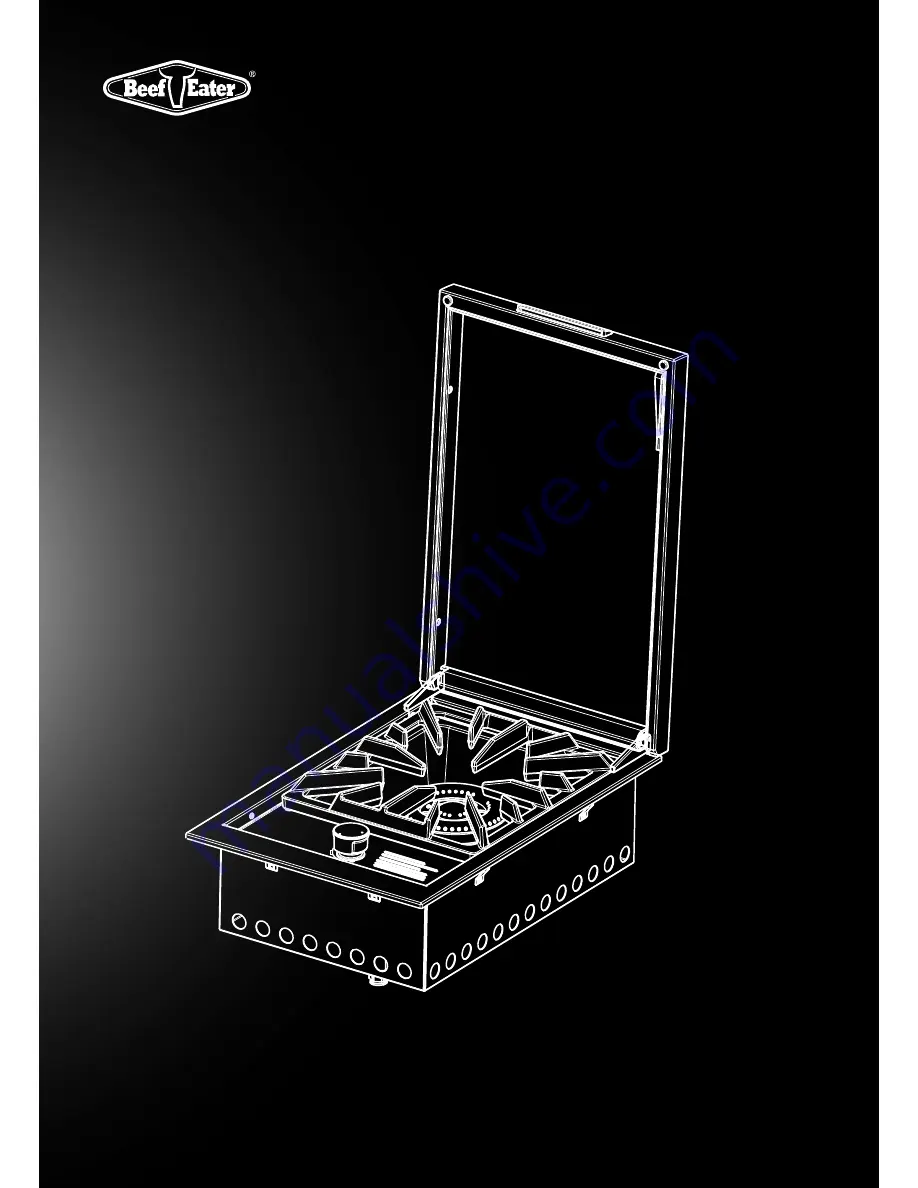
Страница 4: ...4 PRODUCT DESCRIPTION PRODUCT DESCRIPTION 1 Slimline lid 2 Gas connection point Integrated burner 2 1...
Страница 5: ...5 PRODUCT DESCRIPTION PRODUCT DESCRIPTION 3 4 6 4 5 7 3 Pivoting lid safety leg 4 Lid mounting bracket 5 Trivet 6 Burner 7 Burner control...
Страница 6: ...son This appliance must be installed in accordance with these instructions Australian Standard AS NZS 5601 and local authority This product must be installed as per the instructions which requires the...
Страница 7: ...tighten 2 Fitting the regulator Fit the regulator ensuring the blue fibre washer is in place and the arrow indicating the gas flow is correct Do not over tighten 3 Connect to consumer piping The NG r...
Страница 8: ...lied set up for Natural gas and is labelled accordingly A Universal LPG conversion Kit is supplied with the product The components required for conversion are Brass adaptor Fibre washer Small plastic...
Страница 9: ...supplied LPG from either A 9kg portable LPG cylinder or A remote supply of LPG via fixed pipework Turndown adjustment screw Gas bottle safety information This appliance is designed to use a 9kg 20 lb...
Страница 10: ...tion Connect the brass test point adapter to the appliance gas inlet with the arrow on the adapter oriented according to direction of gas flow with the sealing washer in place to seal the connection T...
Страница 11: ...support structure When planning the location and preparing the installation structure for this appliance note the following This appliance is Certified to AS 4563 and Clause 6 10 2 of AS NZS 5601 1 is...
Страница 12: ...nting This vent is to allow air into the enclosure for the correct combustion of gases and for the correct exhausting of the products of combustion The vent must be no less than 250mm x 25mm unless in...
Страница 13: ...h opening providing a free area of at least 200cm2 for every cylinder enclosed For ULPG installations having enclosed cabinetry below the separation panel that does not contain a gas bottle low level...
Страница 14: ...with hard plumbing to each of the regulators From the regulator to the appliance the connection method remains unchanged For Universal LPG This is achieved by adding fittings to branch off at the cyl...
Страница 15: ...OOST and place a lighted match near to the burner If the unit does not operate correctly refer to the troubleshooting section on page 17 To turn the burner off When cooking is complete rotate the knob...
Страница 16: ...rly when cleaning on and around the control knob to ensure that water and soapy residue do not enter the control panel where the valve is located or into the burner Trivet and reversible grill plate T...
Страница 17: ...oo high Turn gas valves down or turn off the burner Smell of gas DO NOT ATTEMPT TO LIGHT THE APPLIANCE Gas leak Turn off gas at the isolation valves Check for leaks tighten joints If problem persists...
Страница 18: ...18 NOTES NOTES NOTES...
Страница 19: ...maintain or service iii normal wear and tear iv power surges electrical storm damage or incorrect power supply v incomplete or improper installation vi incorrect improper or inappropriate operation v...
Страница 20: ...eaterbbq com For more information on all Beefeater products or for dimension and installation information call into your retailer phone or email our customer care team or visit our website Beefeater W...