9
CF1400/CF2300
Burner Manual
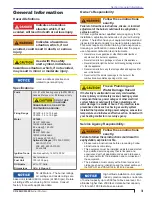
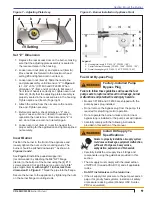
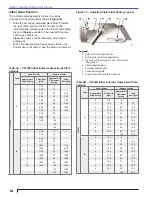
Set “Z” Dimension
Replace the rear access door on the burner, making
sure that the adjusting plate assembly is seated in
the recessed area in the housing.
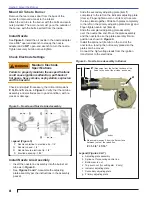
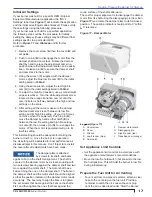
Loosen acorn nut (item
c
) and spline nut (item
b
).
Move nozzle line forward to the maximum head
setting #9 and tighten acorn nut (item
c
).
Loosen acorn nut (item
d
). Slide the nozzle line
and plate assembly until dimension “Z” in
Figure 6
is 1-3/4” ±1/16” (CF1400 and CF2300). When
dimension “Z” (from end of air tube to
fl
at area of
front face of head) is correctly set, tighten acorn nut
(item
d
). Verify that the adjusting plate assembly is
properly seated in the recessed area in the housing.
Tighten spline nut (item b)
fi
nger tight.
Attach the oil line from the oil valve to the nozzle
line end. Tighten securely.
Before proceeding, check dimension “Z” once
again. Loosen acorn nut (item
d
) if necessary to
reposition the nozzle line. Once dimension “Z” is
set, do not loosen acorn nut (item
d
) again.
Loosen acorn nut (item
c
) to set the head at the
proper setting for the application and tighten splined
nut securely.
Insert Burner
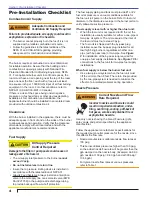
Position the burner in the front of the appliance and
loosely tighten the nuts on the mounting studs. The
burner should be pitched downward 2° as shown in
Figures 3 and 4
.
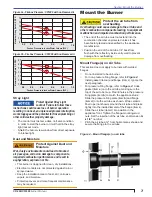
See
Figure 8
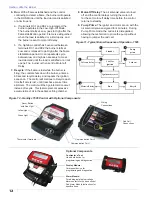
. Install the pedestal support kit
(recommended) by attaching the
3/4”
NPT
fl
ange
(item
a
) to the bottom of the burner using the (4) #10
screws provided. Cut and thread (one end only) a
3/4”
pipe nipple (item
b
)
with length 11 inches less than
dimension D
in
Figure 8
. Thread the pipe into the
fl
ange.
Secure the burner to the appliance by tightening the nuts
on the burner
fl
ange mounting studs.
1.
2.
3.
4.
5.
6.
Figure 7 – Adjusting Plate Assy.
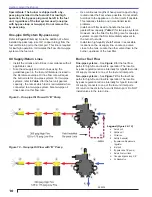
Fuel Unit By-pass Plug
Factory-Installed Pump
Bypass Plug
Failure to follow these guidelines will cause the fuel
pump seals to rupture and result in oil leakage, burner
malfunction and potential
fi
re and injury hazards.
Models CF1400 and CF2300 are shipped with the
pump bypass plug installed.
Do not remove the bypass plug from the pump. It is
required for step-
fi
ring (Lo/Hi) operation.
Do not operate the burner unless a return line or
bypass loop is installed or the pump seal will rupture.
Carefully comply with the following instructions
provided in this section of the manual.
y
y
y
y
Install Oil Supply To
Speci
fi
cations
Failure to properly install the oil supply system
could cause oil leakage, equipment malfunction,
puff-back of hot gases, heavy smoke,
asphyxiation, explosion and
fi
re hazards.
Carefully install the oil supply lines,
fi
ttings and
components using the guidelines provided in this
section.
The oil supply must comply with the latest edition
of NFPA 31 (Canada CSA B139) and all applicable
codes.
Do NOT install valves in the return line.
If the oil supply inlet pressure to the pump exceeds 3
psig or for gravity feed systems, install an oil safety
or pressure reducing valve (Webster OSV, Suntec
PRV or equivalent).
y
y
y
y
Figure 8 – Burner Installed in Appliance Front
Section: Mount the Burner
Legend
H
Housing total length (CF1400 - 18”, CF2300 - 18.5”)
J
Center to bottom of housing (CF1400 - 10.88”, CF2300 - 10.5”)
K
Overall housing height (CF1400 - 13.63”, CF2300 - 15.63”)
d
b
e
f
c
g
#
9 Setting


