background image

11

Deutsch

19. Hinweise zur Batterieentsorgung

Im Zusammenhang mit dem Vertrieb von Batterien oder mit der Lieferung von 

Geräten, die Batterien enthalten, ist der Anbieter verpflichtet, den Kunden auf 

folgendes hinzuweisen: Der Kunde ist zur Rückgabe gebrauchter Batterien als 

Endnutzer gesetzlich verpflichtet. Er kann Altbatterien, die der Anbieter als 

Neubatterien im Sortiment führt oder geführt hat, unentgeltlich am Versandlager 

(Versandadresse) des Anbieters zurückgeben. Die auf den Batterien abgebildeten 

Symbole haben folgende Bedeutung: Pb = Batterie enthält mehr als 0,004 Masse

-

prozent Blei, Cd = Batterie enthält mehr als 0,002 Masseprozent Cadmium, Hg = 

Batterie enthält mehr als 0,0005 Masseprozent Quecksilber.

Hiermit erklärt die Firma WD Plus GmbH, dass sich das Gerät 304474 in Übereinstimmung 

mit den grundlegenden Anforderungen und den übrigen einschlägigen Bestimmungen der 

Richtlinie  2014/53/EU  befindet.  Eine  vollständige  Konformitätserklärung  erhalten  Sie  bei: 

WD Plus GmbH, Wohlenbergstraße 16, 30179 Hannover; http://downloads.ganzeinfach.de/

search/model/304474

WEEE Richtlinie 2012/19/EU 

WEEE Register-Nr: DE 67896761

Das Symbol der durchgekreuzten Mülltonne bedeutet, dass 

die Batterie nicht in den Hausmüll gegeben werden darf.

Содержание 304474

Страница 1: ...Projection Clock Mod Nr 304474 ...

Страница 2: ...2 Deutsch Table of contents 1 Deutsch 3 2 English 12 3 Français 21 4 Italiano 30 5 Español 39 ...

Страница 3: ...it bei spielsweise an eine Wand oder Zimmerdecke zu projizieren Durch den Dual Alarm können Sie zwei unterschiedliche Alarmeinstellungen vornehmen Mit dem Projektionswecker ist es möglich entweder von einem Beep Ton oder alternativ von Ihrem Lieblingsradiosender geweckt zu werden Mihilfe des beweg lichen Projektors können Sie sich die Projektion an einer gewünschten Stelle an zeigen lassen Spannun...

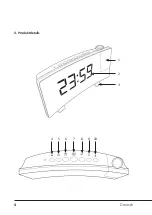
Страница 4: ...4 Deutsch 4 Produktdetails 1 2 3 4 5 6 7 8 9 10 ...

Страница 5: ... die Uhrzeit und des Alarms 6 Uhrzeit einstellen Nachdem Sie das Gerät mit einer ordnungsgemäß angeschlossenen Steckdose verbunden haben drücken und halten Sie die Taste SET für ca 3 Sekunden um die Zeit einzustellen Verwenden Sie die UP und DOWN Tasten um die Zahlenwerte zu erhöhen oder zu verrin gern Drücken Sie erneut auf SET um die Einstellungen fortzusetzen Der Einstellzyklus ist wie folgt 1 ...

Страница 6: ...e 2 Minute 3 Alarmfunktion OFF rd bu OFF Alarm ausgeschaltet rd Radio Alarmton bu Alarm Piepton Im Anschluss an Alarm 1 können Sie die Alarmzeit 2 einstellen Gehen Sie bei der Einstellung wie zuvor beschrieben vor 8 Einschalten des Alarms Sobald Sie in den Alarmeinstellungen nicht die Alarmfunktion OFF gewählt ha ben ist der jeweilge Alarm aktiv Wenn der gewünschte Alarm aktiviert oder deak tivier...

Страница 7: ... gedreht hat 11 Radiofunktion Drücken Sie die RADIO SLEEP Taste um die Radiofunktion einzuschalten Ver wenden Sie die Tasten UP und DOWN um die Frequenz zu erhöhen oder zu verringern Halten Sie eine der Tasten um den automatischen Sendersuchlauf zu starten Das Radio wird den nächsten verfügbaren Sender automatisch einstellen und abspielen Hinweis Für einen optimalen Radioempfang empfehlen wir dass...

Страница 8: ...odus befinden die SET Taste wiederholt um zwischen den voreingestellten Sendern zu wechseln 13 Radio Einschlaf Funktion Drücken Sie die RADIO SLEEP Taste zweimal um in die Einschlaf Funktion zu ge langen Unten rechts im Display erscheint der Schriftzug SL Durch wiederholtes Drücken der RADIO SLEEP Taste wählen Sie zwischen einem Einschlaftimer von 5 Minuten bis zu 90 Minuten aus Ist der Timer akti...

Страница 9: ...croUSB Anschluss ausschließlich zur Stromversorgung des Weckers dient 16 Zusätzliche Sicherheitshinweise für dieses Gerät Stellen Sie keine offenen Flammen wie zum Beispiel Kerzen auf das Gerät Stellen Sie das Produkt nicht in einem geschlossenen Bücherre gal ohne ausreichende Belüftung ab Die Lüftungsschlitze dürfen nicht mit Gegenständen behindert oder blockiert werden Das Gerät darf weder Tropf...

Страница 10: ...m Gerät die nicht vom ursprünglichen Lieferanten durchgeführt wird führt zum Erlöschen der Gewährleistungs bzw Garantieansprüche Das Gerät darf nur von Personen benutzt werden die diese Anleitung gelesen und verstanden haben Die Gerätespezifikationen können sich ändern ohne dass vor her gesondert darauf hingewiesen wurde 18 Entsorgungshinweise Elektrische und elektronische Geräte dürfen nach der e...

Страница 11: ...aben folgende Bedeutung Pb Batterie enthält mehr als 0 004 Masse prozent Blei Cd Batterie enthält mehr als 0 002 Masseprozent Cadmium Hg Batterie enthält mehr als 0 0005 Masseprozent Quecksilber Hiermit erklärt die Firma WD Plus GmbH dass sich das Gerät 304474 in Übereinstimmung mit den grundlegenden Anforderungen und den übrigen einschlägigen Bestimmungen der Richtlinie 2014 53 EU befindet Eine v...

Страница 12: ... the current time for example onto a wall or room ceiling You can adjust two different alarm settings using the dual alarm The projection alarm clock can wake you up with a beeping sound or optionally with your favourite radio stations Using the movable projector the projection can be displayed on any desired surface Power supply 5V DC via microUSB 3V DC 1 backup CR2032 battery Transmitting power ...

Страница 13: ...13 English 4 Product details 1 2 3 4 5 6 7 8 9 10 ...

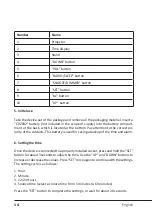
Страница 14: ...evice is connected to a properly installed socket press and hold the SET button for about 3 seconds to adjust the time Use the UP and DOWN buttons to increaseordecreasethevalues Press SET onceagaintocontinuewiththesettings The setting cycle is as follows 1 Hour 2 Minute 3 12 24 Hours 4 Snooze time select a snooze time from 5 minutes to 60 minutes Press the SET button to complete the settings or wa...

Страница 15: ...ettings then the respective alarm is active When the desired alarm is activated or deactivated this is shown on the display When Alarm 1 or Alarm 2 is set off the corresponding LED flashes in the display Caution The alarm will be completely switched off if you press the Radio On Off button or the AL button The alarm will go off again on the next day Note When the second alarm time is activated dur...

Страница 16: ...tenna is completely rolled out By pressing the SNOOZE DIMMER button you can switch off the radio function and return back to the time display 11 1 Volume Press the VOL button to access the volume settings With the UP and DOWN buttons you can select the volume from L00 minimum volume to L15 maximum volume 12 Accessing and changing the radio station presetting Press the RADIO SLEEP button to activat...

Страница 17: ...splay Press and hold the SNOOZE DIMMER button for about 2 seconds in time mode AU automatic mode or OFF manual mode is shown in the display To activate automatic dimming press and hold the SNOOZE DIMMER button for about 2 seconds until AU appears in the display The automatic dimming mode is now activated To dim the clock display press and hold the SNOOZE DIMMER button for about 2 seconds OFF appea...

Страница 18: ...e device to repair or make modifications Avoid contact with the mains voltage Do not short circuit the product The device is not waterproof hence please use it only in dry surroundings Protect it from high humidity water and snow Keep the device away from high temperatures Do not expose the device to sudden changes in temperature or strong vibrations as this could damage the electronic components ...

Страница 19: ...he user manual or and on the packaging refers to these regulations With this manner of sorting recycling and disposal of used de vices you make an important contribution towards protecting our environment 19 Instructions for battery disposal In conjunction with the sale of batteries along with the supply of devices that include batteries the supplier is obliged to point out the following to the cu...

Страница 20: ...ipulations of the directive 2014 53 EU A complete conformity statement can be obtained from WD Plus GmbH Wohlenbergstraße 16 30179 Hannover http downloads ganzeinfach de search model 304474 WEEE directive 2012 19 EU WEEE Register no DE 67896761 The symbol of the crossed out dustbin means that the battery may not be disposed of in household waste ...

Страница 21: ... sur un mur ou sur un plafond Grâce à la double alarme vous pouvez effectuer deux réglages d alarme différents Avec le réveil projection il est possible d être réveillé avec un beep ou alter nativement par votre station de radio favorite Avec l aide du projecteur pivotant vous pouvez faire afficher la projection à l emplacement souhaité Alimentation élec trique 5 V CC via microUSB 3 V CC 1x batter...

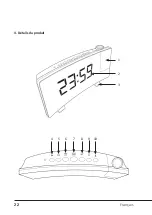
Страница 22: ...22 Français 4 Détails du produit 1 2 3 4 5 6 7 8 9 10 ...

Страница 23: ...de l heure et de l alarme 6 Régler l heure Une fois que vous avez connecté l appareil à une prise correctement instal lée maintenez la touche SET enfoncée pendant env 3 secondes pour régler l heure Utilisez les touches UP et DOWN pour augmenter ou di minuer les chiffres Appuyez de nouveau sur SET pour continuer le réglage Le cycle de réglage est comme suit 1 Heure 2 Minute 3 12 24 Heures Numéro Dé...

Страница 24: ...me OFF rd bu OFF alarme désactivée rd alarme radio bu beep d alarme Après l alarme 1 vous pouvez régler le temps d alarme 2 Procédez comme décrit ci dessus pour le réglage 8 Activation de l alarme Si vous n avez pas sélectionné la fonction d alarme OFF dans les paramètres d alarme l alarme correspondante est active Lorsque l alarme désirée est activée ou désactivée l affichage l indique Lorsque l ...

Страница 25: ...ce que la projection ait pivoté 11 Fonction radio Appuyez sur la touche RADIO SLEEP pour mettre en marche la fonction radio Utilisez les touches UP et DOWN pour augmenter ou diminuer la fréquence Maintenez appuyée une des touches pour lancer la recherche de stations automa tique La radio réglera automatiquement la suivante station disponible et la lira Remarque Pour une réception de radio optimale...

Страница 26: ... entre les stations préréglées 13 Fonction d endormissement radio Appuyez deux fois sur la touche RADIO SLEEP pour accéder à la fonction d en dormissement Une inscription SL apparait sur l écran en bas à droite En ap puyant plusieurs fois sur la touche RADIO SLEEP vous choisissez une minuterie sommeil de 5 minutes à 90 minutes Si la minuterie est active la radio s éteint automatiquement après le t...

Страница 27: ...pe A est conçu comme sortie de charge et que le port microUSB sert uniquement à l alimentation électrique du réveil 16 Consignes de sécurité supplémentaires pour cet appareil Ne placez pas de flammes nues comme par exemple une bougie sur l appareil Ne placez pas le produit dans une bibliothèque fermée sans une ventilation suffisante Les fentes d aération ne doivent pas être bloquées ou entravées p...

Страница 28: ...ctuée par le fournisseur initial entraîne l annulation de la garantie L appareil ne doit être utilisé que par des personnes ayant lu et compris ce manuel Les spécifications de l appareil peuvent être modifiées sans indication préalable 18 Informations sur la mise au rebut de vos appareils Les appareils électriques et électroniques ne doivent pas selon la directive euro péenne DEEE être jetés dans ...

Страница 29: ...rant sur les batteries ont les significations suivantes Pb la batterie contient plus de 0 004 en poids de plomb Cd la batterie contient plus de 0 002 en poids de cadmium Hg la batterie contient plus de 0 0005 en poids de mercure Par la présente WD Plus GmbH déclare que l appareil 304474 est conforme aux exigences essentielles et aux autres dispositions pertinentes de la directive 2014 53 UE Pour o...

Страница 30: ...mpio sul la parete o sul soffitto Mediante il Dual Alarm è possibile impostare due allarmi differenti Con la sveglia a proiezione è possibile essere svegliati da un suono beep o in alternativa dalla stazione radio preferita Con il proiettore orientabile è possibile impostare la proiezione nella posizione desiderata Alimentazione di tensione 5V DC via microUSB 3V DC 1 batteria di riserva CR2032 Pot...

Страница 31: ...31 Italiano 4 Dettagli del prodotto 1 2 3 4 5 6 7 8 9 10 ...

Страница 32: ...l orario e dell allarme 6 Impostare l ora Non appena l apparecchio è correttamente collegato alla presa della cor rente tenere premuto il tasto SET per ca 3 secondi per impostare l ora rio Utilizzare il tasto UP e DOWN per aumentare o diminuire i valori dei numeri Premere nuovamente SET per continuare con le impostazioni Il ciclo di impostazione avviene come segue 1 Ore 2 Minuti 3 12 24 ore Numero...

Страница 33: ... allarme 1 potete impostare l orario allarme 2 Per l imposta zione procedere come descritto 8 Attivazione dell allarme Qualora nelle impostazioni allarme non abbiate selezionato la funzione allarme OFF è attivo il rispettivo allarme Quando l allarme desiderato è attivato o disat tivato questo viene visualizzato sul display Quando scatta l allarme 1 o l allarme 2 sul display lampeggia il rispettivo...

Страница 34: ...dei tasti per avviare la sintonizzazione automatica La radio imposta automaticamente e riproduce la prossima stazione disponibile Nota Per la ricezione radio ottimale si consiglia che l antenna a filo sia completa mente srotolata e distesa Premendo il tasto SNOOZE DIMMER disattivate la funzione radio e accedete di nuovo alla visualizzazione dell orario 11 1 Volume Premere il tasto VOL per accedere...

Страница 35: ...O SLEEP si può scegliere tra un timer di spegnimento da 5 minuti fino a 90 minuti Se il timer è attivo la radio si spegne automaticamente dopo il periodo impostato Se selezionato l impostazione OFF disattivate la funzione sleep 14 Dimmeraggio del display Premere e tenere premuto il tasto SNOOZE DIMMER nella modalità orario per ca 2 secondi Sul display appare AU modalità automatica o OFF modalità m...

Страница 36: ...ccate Il dispositivo non deve essere esposto a gocce o schizzi e altri liquidi o addirittura essere sommerso Il prodotto non deve essere esposto alla luce solare diretta Per la pulizia non utilizzare detergenti aggressivi o solventi Pulire l unità con un panno morbido e pulito Prima di pulire si prega di staccare la spina di alimentazione In nessun caso non cercare di introdurre fili di metallo sp...

Страница 37: ...uti domestici I loro componenti devono es sere consegnati separatamente al centro di riciclaggio o smaltimento in quanto gli eventuali componenti tossici e pericolosi possono inquinare permanentemente l ambiente in caso di smaltimento improprio Secondo la legge sulle apparecchiature elettriche ed elettroniche ElektroG il consumatore è tenuto a restituire gratuitamente tali apparecchi al termine de...

Страница 38: ...5 in peso di mercurio Con la presente la ditta WD Plus GmbH dichiara che il dispositivo 304474 è conforme ai req uisiti essenziali e alle rimanenti disposizioni in materia come stabilito dalla direttiva 2014 53 UE Una dichiarazione di conformità completa è disponibile presso WD Plus GmbH Wohlen bergstraße 16 30179 Hannover http downloads ganzeinfach de search model 304474 Direttiva RAEE 2012 19 UE...

Страница 39: ...emplo una pared o el techo de la habitación La alarma doble le permite configurar la alarma de dos formas distintas Con el despertador proyector es posible escoger entre un pitido o su emisora de radio favorita para despertarse Con ayuda del brazo proyector orientable podrá dirigir la proyección al lugar deseado Suministro de energía 5 V CC mediante microUSB 3 V CC 1x pila de reserva CR2032 Potenc...

Страница 40: ...40 Español 4 Detalles del producto 1 2 3 4 5 6 7 8 9 10 ...

Страница 41: ...a alarma 6 Configurar la hora Después de conectar el aparato a un enchufe debidamente instalado pulse y mantenga pulsada el botón SET durante unos 3 segundos para configurar la hora Utilice los botones UP y DOWN para aumentar o disminuir el va lor de los números Vuelva a pulsar SET para continuar con la configuración El ciclo de configuración es el siguiente 1 Hora 2 Minuto 3 12 24 horas Número De...

Страница 42: ...OFF alarma apagada rd tono de radio para la alarma bu tono de pitido para la alarma Después de configurar la Alarma 1 puede continuar con la Alarma 2 Proceda de la forma descrita anteriormente 8 Conectar la alarma La alarma en cuestión estará encendida si no ha seleccionado la función OFF en los ajustes de la misma Cuanto se active o desactive la alarma esto se mostrará en la pantalla El LED corre...

Страница 43: ...e se gire 11 Función de radio Pulse el botón RADIO SLEEP para activar la función de radio Utilice los bo tones UP y DOWN para aumentar o disminuir la frecuencia Mantenga una de las teclas pulsadas para iniciar la búsqueda automática de emisoras La radio se configurará de forma automática y comenzará a reproducir la primera emisora disponible que encuentre Indicación Para recibir una señal de radio...

Страница 44: ...l botón SET varias veces 13 Función de apagado automático de la radio Pulse RADIO SLEEP dos veces para acceder a la configuración de esta función Abajo derecha en la pantalla aparece la inscripción SL Pulse repetidamente el botón RADIO SLEEP para seleccionar un temporizador de 5 a 90 minutos Si el temporizador está activado la radio se apaga una vez transcurrido el tiempo con figurado Si seleccion...

Страница 45: ... concebida como salida de carga la salida USB de tipo A y que la conexión microUSB solo sirve para alimentar el despertador 16 Indicaciones adicionales de seguridad para este aparato No coloque ninguna llama abierta como p ej velas sobre el aparato No ponga el aparato en una estantería cerrada sin ventilación suficiente La ranura de ventilación debe quedar siempre descubierta No sumerja el aparato...

Страница 46: ... por el proveedor da lugar a la rescisión de los derechos de garantía El dispositivo solo debe ser utilizado por personas que han leído y entendido este manual Las especificaciones del dispositivo pueden cambiarse sin que sea necesa rio realizar un aviso previo 18 Indicaciones de eliminación Los dispositivos eléctricos y electrónicos no deben eliminarse con los residuos do mésticos según la direct...

Страница 47: ...n los siguientes significados Pb La pila contiene más de un 0 004 de su peso en plomo Cd La pila contiene más de un 0 002 de su peso en Cadmio Hg La pila contiene más de un 0 0005 de su peso en mercurio La empresa WD Plus GmbH declara por la presente que el aparato 304474 satisface los req uisitos esenciales y el resto de disposiciones pertinentes según lo establecido en la directiva 2014 53 UE So...

Страница 48: ...DOWNLOADS MANUALS WD Plus GmbH Wohlenbergstraße 16 D 30179 Hannover V1 0 ...

Отзывы: