BE Ag & Industrial 35.001.500 Скачать руководство пользователя страница 4

4     

USER MANUAL

MAINTENANCE

SPECIFICATIONS

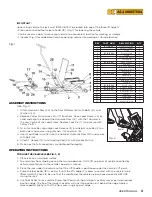
TO LOWER THE VEHICLE (see Fig. 1, 2)

1.  Raise the jack slightly and pull back on the Height Lock Release to release Height Lock Bar (2).
2.  Fasten the High lock release (11) to the Clip.
3.  Press the Release Pedal (19) very gently to lower the Saddle (7) and vehicle.

(See Fig. 1)

TO ADD HYDRAULIC JACK OIL

With lift saddles fully lowered and the jack on level ground, unscrew and remove hydraulic ram. Using a 

good grade of SAE 5 W hydraulic jack oil, fill the oil reservoir to the bottom of the threads in the oil filler 

hole. Replace and tighten the hydraulic ram. DO NOT ALLOW dirt or debris to enter the system.

TO REPLACE HYDRAULIC JACK OIL

• Open the release valve by pressing down on the release pedal (19). Unscrew and remove hydraulic ram.
• Turn entire jack over so that all of the old oil will drain out of the oil fill hole.

NOTE: 

When draining oil, use a proper container and ALWAYS follow ALL local and state waste disposal 

guidelines.

• After all of the old oil has drained out of the jack, turn the jack back over to a level position to fill with 

new oil.

• Rapidly pump foot pedal (18), 6 to 8 full strokes to release any pressurized air. 
• Using a good grade of SAE 5W hydraulic jack oil, fill the reservoir to the bottom of the threads in the oil 

fill hole. DO NOT ALLOW dirt and debris to enter the System

• Replace and tighten.

IMPORTANT: 

When adding or replacing oil, ALWAYS use a good grade of (SAE 5 W) hydraulic jack oil. 

NEVER use brake fluid, alcohol, glycerin, detergent motor oil or dirty oil of any kind. Improper oil usage 

will cause serious internal damage to jack.

LUBRICATION

• Use a good grade of lubricating oil on all moving parts when needed.

STORING

• When jack is not in use, or when storing the jack, ALWAYS have the lift saddles in the lowest (down) 

position.

RUST PREVENTION

Check power unit (hydraulic ram) see parts list Fig. 1 number (20) page 3, every two months or sooner 

based on use for any rust or corrosion. Clean and wipe down with oil cloth.

Maximum load capacity:

680 kg.

Locking Positions:

20, 28 and 33 cm.

Measurements:

79 x 37 x 33 cm.

Weight without straps and extensions (sold separately): 26.8 kg.

Содержание 35.001.500

Страница 1: ...3 4 6 14 5 9 9 This is the safety notification symbol This symbol will notify you of any potential injury hazards Please follow all instructions that follow this symbol to avoid possible injuries or...

Страница 2: ...aged parts are noted Immediately after raising the vehicle ensure that the Height Lock Bar is engaged ALWAYS wear safety glasses when operating this product NEVER place yourself under or in a position...

Страница 3: ...r 2 3 Stops 2 4 105 101B 002 Front wheels 2 5 Frame 1 6 Front load frame 1 7 Lift saddle 2 8 105 101B 003 Rubber pads 2 9 M8 nut 2 10 8 Lock washer 2 11 High lock release 1 12 Cotter pin 1 13 105 101B...

Страница 4: ...After all of the old oil has drained out of the jack turn the jack back over to a level position to fill with new oil Rapidly pump foot pedal 18 6 to 8 full strokes to release any pressurized air Usin...

Страница 5: ...e not responsible for damage to ornamental designs you place on this BE AG INDUSTRIAL product and such ornamentation should not cover any warnings or instructions or they may void the warranty This wa...

Страница 6: ...nstructions qui accompagnent ce symbole pour viter tout risque de blessure ou de mort Indique une situation de danger Le non respect des mesures appropri es peut entra ner la mort ou des blessures gra...

Страница 7: ...r de le dolly ou de le d placer N apportez AUCUNE modification ce produit Inspectez TOUJOURS le cric avant chaque utilisation NE PAS utiliser si une fuite de liquide et ou des pi ces cass es pli es fi...

Страница 8: ...llage commande de pr cision 19 Fig 1 pour abaisser le v hicule Peut tre utilis comme chariot pour d placer votre v hicule vers un emplacement pratique pour le travail ou le stockage Poign e en T Fig 1...

Страница 9: ...que l article ne glisse pendant l op ration de levage soulevez UNIQUEMENT les points du v hicule sp cifi s par le constructeur du v hicule dans le manuel d utilisation du v hicule 3 Placez le cric sou...

Страница 10: ...tout air sous pression l aide d une huile de v rin hydraulique SAE 5W de bonne qualit remplissez le r servoir jusqu au bas des filets de l orifice de remplissage d huile NE LAISSEZ PAS la salet et le...

Страница 11: ...nul e Nous ne sommes pas responsables des dommages caus s aux motifs ornementaux que vous placez sur ce produit BE AG INDUSTRIAL et ces ornements ne doivent pas couvrir les avertissements ou les instr...

Страница 12: ...12 USER MANUAL PARTS BRABEREQ COM TOLL FREE PHONE NUM RO DE T L PHONE SANS FRAIS 1 877 588 3311...

Отзывы: