

Customer Service
Service client / Kundendienst / Servicio a clientes
/ Assistenza clienti / Apoio ao Cliente
ENGLISH
DETAILED SETUP
1. Before using your MOGA Pro Power, fully charge it by
plugging the included Micro-B cable into the Micro-B charging
port on your controller. While charging, the LED Charge
indicator next to the Wake/Battery button flashes yellow
when the controller is off, green while in A-mode, and orange
in B-mode. A solid LED indicates that the controller is fully
charged.
2. Download and install the MOGA Pivot app using the QR
code provided or from visiting MOGAanywhere.com/Pivotapp
on your device’s web browser—make sure the Pivot app is set
to automatically update.
3. Unfold the MOGA Arm. Place your smartphone into the
top of the MOGA Arm, gently push the arm open, and lock
your phone in place. Use the included tablet stand if you are
connecting your MOGA Pro Power to an Android 2.3+ tablet.
4. Slide the switch located under the MOGA Arm from Off
to A.
5. When you slide the Power switch to A, your MOGA is in
Bluetooth® pairing mode. The LED Status indicators flash
blue while in pairing mode. Pairing mode lasts for 180 seconds
before the MOGA controller turns off to save power.
6. Launch the MOGA Pivot app. Pivot will take you step-by-
step through the process to ensure that your smartphone’s
Bluetooth service is turned on and your smartphone is paired
with your MOGA Pro Power controller. Follow the on-screen
instructions to start gaming!
USING MOGA BOOST:
To charge your mobile device while you play, plug the included
8-inch MOGA Boost™ cable into the charging port on the top
of your MOGA controller, then into the Micro-B port on your
device. MOGA Boost will not function if the MOGA Pro Power
controller drops below 25% charge. The LED Status indicators
flash rapidly when the charge drops below 25%.
LED INDICATORS:
The LED Charge indicator displays solid green when the
controller is powered on in A-mode, solid orange when
powered on in B-mode, and turns off when the controller is
off. While charging, the LED Charge indicator flashes yellow
when the controller is off, green while in A-mode, and orange
in B-mode.
The LED Status indicators all flash in unison while the
controller is pairing. After pairing is complete, the LEDs display
whether the controller is the first, second, third, or fourth
controller paired to the mobile device.
When your MOGA Pro Power is paired to your mobile device,
you can press the Wake/Battery button, and the LED Status
indicators will show battery charge in 25% increments—one
solid and one flashing LED at 25%, two solid and one flashing
LED at 50%, three solid and one flashing LED at 75%, and all
four LEDs solid at 100%. The Wake/Battery button will not
function with your controller off. In sleep mode, pressing the
Wake/Battery button will wake up your MOGA Pro Power.
A-MODE VS. B-MODE:
A-mode supports all the MOGA Enhanced games in our
massive library. For games that aren’t MOGA
Enhanced, but do support HID (Human Interface Device)
drivers, B-mode will allow you to map the game’s controls to
your MOGA.
GAMING ON YOUR TABLET:
MOGA supports gaming on any Android 2.3+ tablet, turning
your tablet into a portable console!
CONNECTING TO YOUR TV:
You can use MOGA to play mobile games on your television. If
your tablet or phone supports MHL out—most newer models
do via the charging port—and your television features an
HDMI input, simply plug an MHL cable into your mobile device
and your TV for a large screen experience. Go to meetmhl.
com to see diagrams and how-to-videos to get the most out
of your device.
FREQUENTLY ASKED QUESTIONS
Q: I am having trouble pairing my MOGA Pro Power.
A: First, try again. If the LED Status indicators stop flashing,
press the Wake/Battery button. If your MOGA still won’t pair,
turn the switch Off then back to A. Once you see the LEDs
flash blue, try to pair again.
If those options don’t work, you can try to manually pair with
your MOGA Pro Power. Go to your Settings menu, select
Wireless & Networks>Bluetooth Settings, and, with Bluetooth
on, scan for devices. When MOGA Pro 2 appears, select Pair.
Then reopen Pivot—the MOGA controller should then pair.
Q: I want to pair my MOGA Pro Power to another device, but it
keeps re-pairing with my original device.
A: Launch Pivot and open the Settings menu. Select Add/
Manage Controllers—you must always unpair your MOGA
Pro Power before pairing with another device. Tap Unsync.
Then, using the same menu, pair your MOGA Pro Power with
the new mobile device. You may also unpair your MOGA
controller in the System Settings menu of your mobile device.
Q: My device is not charging when connected to the MOGA
Boost charging port.
A: Make sure you have more than 25% charge left in your
MOGA Pro Power. Also make sure the MOGA controller is in A
or B mode. MOGA BOOST will not function when the power
switch is set to Off.
Q: I am trying to charge both my MOGA Pro Power and my
mobile device simultaneously, but my device is not charging.
A: You cannot charge your mobile device with MOGA Boost
while your MOGA Pro Power controller is charging.
For answers to more frequently asked questions, check out
MOGAanywhere.com/support.
FCC STATEMENT:
Warning: Changes or modifications to this unit not expressly
approved by the party responsible for compliance could
void the user’s authority to operate the equipment. NOTE:
This equipment has been tested and found to comply with
the limits for a Class B digital device, pursuant to Part 15
of the FCC Rules. These limits are designed to provide
reasonable protection against harmful interference in a
residential installation. This equipment generates, uses and
can radiate radio frequency energy and, if not installed and
used in accordance with the instructions, may cause harmful
interference to radio communications. However, there is
no guarantee that interference will not occur in a particular
installation. If this equipment does cause harmful interference
to radio or television reception, which can be
determined by turning the equipment off and on,the user is
encouraged to try to correct the interference by one or more of
the following measures:
- Reorient or relocate the receiving antenna.
- Increase the separation between the equipment and receiver.
- Connect the equipment into an outlet on a circuit different
from that to which the receiver is connected.
- Consult the dealer or an experienced radio/TV technician
for help.
IC STATEMENT:
This device complies with Industry Canada licence-exempt
RSS standard(s). Operation is subject to the following two
conditions: (1) this device may not cause interference, and
(2) this device must accept any interference, including
interference that may cause undesired operation of the device.
CARE AND MAINTENANCE
Do not expose your MOGA Pro Power to extreme
temperatures. Your MOGA Pro Power is meant to be stored
and used in average temperatures and should never be
exposed to direct sunlight or freezing temperatures for any
length of time. Normal operating and storage temperature
range is 40F–110F. Do not expose your MOGA Pro Power to
water or other liquids.
MOGA and the MOGA logo are trademarks of Bensussen
Deutsch and Associates, Inc. TM and © Bensussen Deutsch
and Associates, Inc. Android is a trademark of Google Inc. The
Bluetooth® word mark and logos are registered trademarks
owned by Bluetooth SIG, Inc. and any use of such marks by
PowerA is under license. All other trademarks are property of
their respective owners.
FRENCH
INSTALLATION DÉTAILLÉE
1. Avant d’utiliser votre MOGA Pro Power, chargez-le
complètement en branchant le câble micro B au port micro B
de chargement de votre contrôleur. Pendant le chargement,
l’indicateur de charge à DEL situé à côté du bouton Réveil /
Batterie clignote en jaune quand le contrôleur est arrêté, en
vert en mode A et en orange en mode B. Un voyant DEL fixe
indique que le contrôleur est complètement chargé.
2. Téléchargez et installez l’application MOGA Pivot
en utilisant le code QR fourni ou en vous rendant sur
MOGAanywhere.com/Pivotapp sur le navigateur de votre
appareil – veillez à ce que l’application Pivot soit paramétrée
pour effectuer des mises à jour automatiques.
3. Dépliez le bras MOGA Arm. Placez votre smartphone sur le
dessus du MOGA Arm, ouvrez délicatement ce dernier, mettez
votre téléphone en place et bloquez-le. Utilisez le support de
tablette fourni si vous connectez votre MOGA Pro Power à une
tablette Android 2.3+.
4. Faites glisser le bouton d’alimentation situé sous le MOGA
Arm de la position Off (arrêt) à la position A.
5. Votre MOGA passe en mode de synchronisation
Bluetooth® lorsque vous faites glisser le bouton
d’alimentation sur la position A. Les indicateurs d’état à DEL
clignotent en bleu pendant le mode synchronisation. Le mode
synchronisation dure 180 secondes, puis le contrôleur MOGA
s’éteint pour économiser l’énergie.
6. Lancez l’application MOGA Pivot. Pivot vous accompagnera
pas-à-pas dans le déroulement du processus pour assurer
que le service Bluetooth de votre smartphone est activé et
que votre smartphone est synchronisé avec votre contrôleur
MOGA Pro Power. Suivez les instructions à l’écran et à vous
de jouer !
UTILISATION DU MOGA BOOST:
Pour charger votre appareil mobile pendant que vous jouez,
connectez le câble de 20 cm MOGA Boost au port situé au
dos de votre contrôleur MOGA, puis au port micro B de votre
appareil. MOGA Boost ne fonctionnera pas si la charge du
contrôleur MOGA Pro Power tombe à moins de 25 %. Les
indicateurs d’état à DEL clignotent rapidement lorsque la
charge tombe à moins de 25 %.
INDICATEURS À DEL:
L’indicateur de charge à DEL s’allume en vert fixe lorsque le
contrôleur est mis en mode A, en orange fixe lorsqu’il est en
mode B et s’éteint lorsque le contrôleur est arrêté. Pendant le
chargement, l’indicateur de charge à DEL clignote en jaune
quand le contrôleur est arrêté, en vert en mode A et en orange
en mode B.
Les indicateurs d’état à DEL clignotent tous à l’unisson
pendant le processus de synchronisation du contrôleur.
Une fois la synchronisation terminée, les DEL indiquent si
le contrôleur est le premier, le deuxième, le troisième ou le
quatrième à être synchronisé à l’appareil mobile.
Lorsque la MOGA Pro Power est synchronisée à votre appareil
mobile, vous pouvez appuyer sur le bouton Réveil / Batterie, et
les indicateurs d’état à DEL indiqueront la charge de la batterie
par tranches de 25 % – une DEL fixe et une clignotante pour
25 %, deux fixes et une clignotante pour 50 %, trois fixes et
une clignotante pour 75 % et les quatre fixes pour 100 %.
Le bouton Réveil / Batterie ne fonctionne pas lorsque votre
contrôleur est arrêté. En mode de veille, appuyez sur le bouton
Réveil / Batterie pour réactiver votre MOGA Pro Power.
MODE A OU MODE B?
Le mode A est compatible avec tous les jeux optimisés pour
MOGA de notre vaste collection. Pour les jeux qui ne sont
pas optimisés pour MOGA, mais qui sont compatibles avec
HID (interface personne-machine), le mode B vous permet
d’adapter les commandes du jeu à votre MOGA.
POUR JOUER SUR VOTRE TABLETTE:
La MOGA permet de jouer avec toutes les tablettes Android
2.3+, transformant ainsi votre tablette en console portable!
CONNEXION À VOTRE TÉLÉVISEUR:
Il est possible d’utiliser votre MOGA pour jouer à des jeux
mobiles sur votre téléviseur. Si votre tablette ou votre
téléphone est compatible avec MHL – c’est le cas de la plupart
des modèle récents via le port de chargement – et que votre
téléviseur est doté d’un connecteur HDMI, il vous suffit de
connecter un câble MHL à votre appareil mobile et à votre
téléviseur pour profiter du jeu sur grand écran. Rendez-vous
sur meetmhl.com pour voir des schémas et des vidéos de
démonstration afin de pouvoir profiter au maximum de votre
appareil.
FOIRE AUX QUESTIONS
Q: J’ai du mal à synchroniser ma MOGA Pro Power.
R: Commencez par une nouvelle tentative. Si les indicateurs
d’état à DEL cessent de clignoter, appuyez sur le bouton Réveil
/ Batterie.
Si votre MOGA ne se synchronise toujours pas, mettez le
bouton d’alimentation sur Off, puis de nouveau sur A. Dès que
les DEL se mettent à clignoter en bleu, essayez à nouveau de
synchroniser.
Si ces options ne donnent pas de résultat, vous pouvez essayer
de synchroniser manuellement votre MOGA Pro Power.
Allez dans le menu Settings (configuration), sélectionnez
Wireless & Networks>Bluetooth Settings et, avec Bluetooth
activé, recherchez les appareils. Lorsque MOGA 2 s’affiche,
sélectionnez Pair (synchroniser). Rouvrez ensuite Pivot – le
contrôleur MOGA devrait alors se synchroniser.
Q: Je veux synchroniser ma MOGA Pro Power avec un autre
appareil, mais elle se resynchronise chaque fois avec mon
ancien appareil.
R: Lancez Pivot et ouvrez le menu Settings (configuration).
Sélectionnez Add / Manage Controllers (ajouter / gérer
des contrôleurs) – désynchronisez toujours votre MOGA
Pro Power avant de le synchroniser avec un autre appareil.
Tapotez sur Unsync (désynchroniser). Dans le même menu,
synchronisez ensuite votre MOGA Pro Power avec le nouvel
appareil mobile. Vous pouvez également désynchroniser votre
contrôleur MOGA dans le menu System Settings (paramètres
système) de votre appareil mobile.
Q: Mon appareil ne se charge pas lorsqu’il est connecté au
port de chargement de la MOGA Boost.
R: Vérifiez qu’il reste plus de 25 % de charge dans votre
MOGA Pro Power. Assurez-vous également que le contrôleur
MOGA est bien en mode A ou B MOGA Boost ne fonctionne
pas lorsque le bouton d’alimentation est sur Off.
Q: J’essaye de charger simultanément ma MOGA Pro Power et
mon appareil mobile, mais l’appareil mobile ne se charge pas.
R: Vous ne pouvez pas charger votre appareil avec la MOGA
Boost pendant que le contrôleur MOGA Pro Power est en
cours de chargement. Rendez-vous sur MOGAanywhere.
com/support pour obtenir des réponses à d’autres questions
fréquemment posées.
ENTRETIEN ET MAINTENANCE
N’exposez pas votre MOGA Pro Power à des températures
extrêmes. Votre MOGA Pro Power doit être entreposée et
utilisée à des températures moyennes et ne doit pas être
exposée à la lumière directe du soleil ou à des températures
sous zéro pendant quelque durée que ce soit.
Les températures normales de fonctionnement et
d’entreposage sont comprises entre 4,5°C et 43°C.
N’exposez pas votre MOGA Pro Power à de l’eau ou à d’autres
liquides.
MOGA et le logo MOGA sont des marques de commerce de
Bensussen Deutsch and Associates, Inc. ™ et © Bensussen
Deutsch and Associates, Inc. Android est une marque de
commerce de Google Inc. La marque et les logos Bluetooth®
sont des marques déposées de Bluetooth SIG, Inc. et toute
utilisation de ces marques par PowerA s’effectue sous licence.
MOGA PRO
™
POWER
User Manual
BDA Inc.
15525 Woodinville-Redmond Rd NE
Woodinville, WA 98072
1-888-664-4327
Mon–Fri; 5 AM–5 PM PST
[email protected]
2-Year Limited Warranty: Visit MOGAanywhere.com for details
Garantía limitada de 2 años. Visita MOGAanywhere.com para obtener detalles
Garantia limitada de 2 anos: Visita MOGAanywhere.com para obter detalhes e registar o teu produto
Beschränkte 2-Jahres-Garantie – Details und Informationen finden Sie unter MOGAanywhere.com
Garantie limitée de 2 ans – Rendez-vous sur MOGAanywhere.com pour de plus amples informations
Garantia limitada de 2 anos: Visita MOGAanywhere.com para obter detalhes
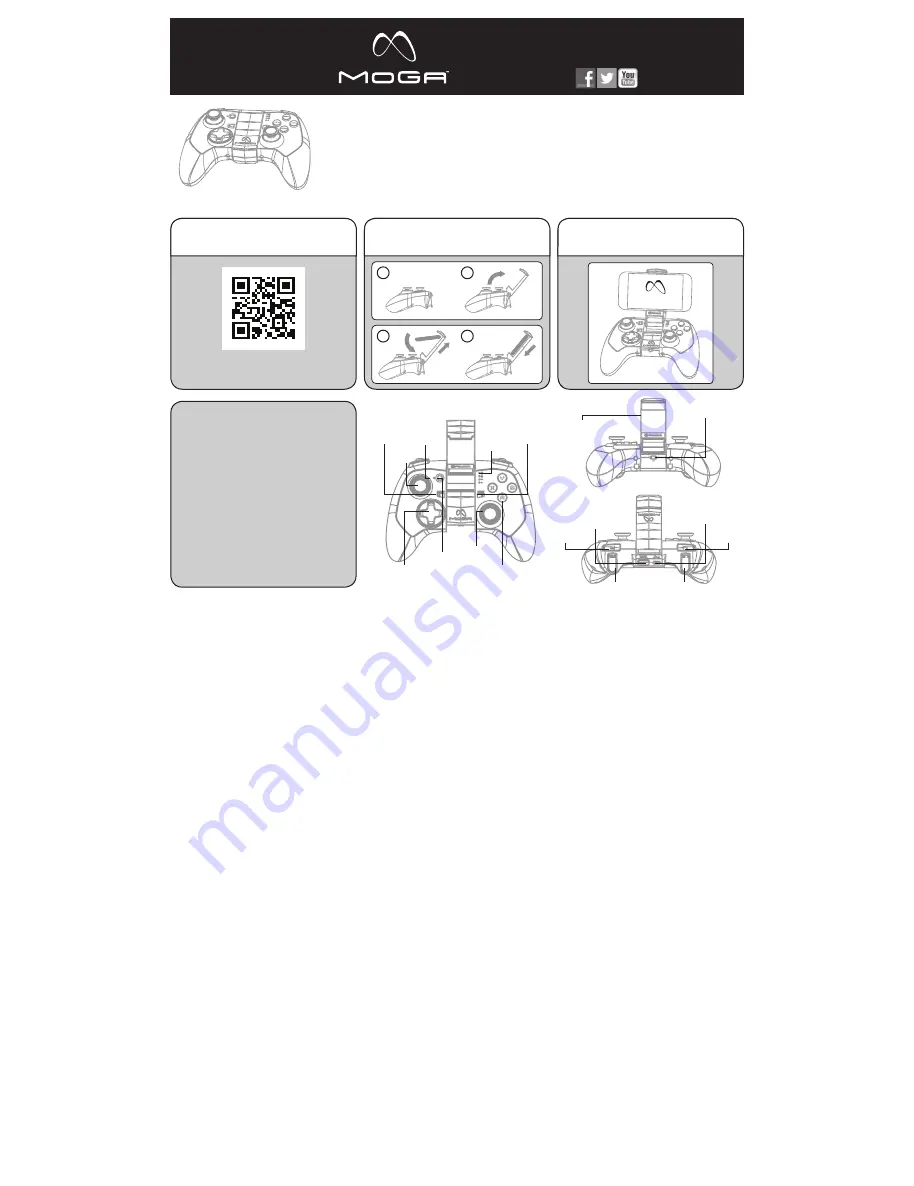
Fig. 1 Front View
Action Buttons
R2
Right Analog
Stick/R3
Wake/Battery
Button
START Button
SELECT Button
LED
Indicators
D-Pad
GETTING STARTED IS AS EASY AS 1, 2, 3!
Fig. 2 Bottom View
Fig. 3 Top View
MOGA Arm with
S.M.R.T. Lock Technology
A/Off/B Power Switch
Micro-B Charging Port
MOGA Boost
Charging Port
R1
L2
Left Analog
Stick/L3
LED Charge
Indicator
QUICK-START INSTRUCTIONS
Make sure you fully charge your
MOGA PRO™ POWER before use.
1. Download, run and install the MOGA
Pivot™ app using the QR code provided or
by visiting MOGAanywhere.com/PivotApp
on your device’s web browser.
2. Insert your smartphone into the MOGA
Arm on the MOGA PRO POWER and secure
it with the S.M.R.T. Lock™. We recommend
using the included tablet stand when not
using the MOGA Arm.
3. Game On. Anywhere.
USER MANUAL
Manuel de l’utilisateur,
Bedienungsanleitung,
Manual de usuario,
Manuale per l’uso,
Manual do usuário
/MOGAanywhere
MOGAanywhere.com
2. Insert phone your into
the MOGA Arm
™
.
3. Game On. Anywhere.
1. Download, run and install
the MOGA Pivot App.
1
2
Scan QR Code or go to
MOGAanywhere.com/PivotApp
3
4
Pivot app
L1
All manuals and user guides at all-guides.com
all-guides.com