


48
BD CARV II Installation and User’s Guide
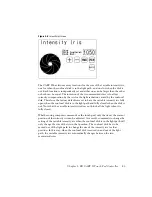
Figure 3-10
Main Screen with the Calibration Function Activated
Press the “+” and “-” buttons to move the prism further in and out of the light
path to align the image out of the binoc port. The position selected becomes the
position the prism will acquire when it is placed in the light path. The instrument
functions normally even if the calibration buttons are displayed. Once a different
screen is displayed, the calibration buttons will be hidden when the Main Screen
is displayed again. Pressing and holding the binoc button again will start the
calibration function. To hide the calibration buttons without leaving the Main
Screen, press the camera button.
Calibrating the Confocal Disk
NOTICE
Users should never attempt to calibrate the confocal disk; these
instructions are for trained technicians only.
The confocal disk position can be adjusted in the light path in much the same
way as the prism, above. However, several steps must be performed before the
calibration controls are available on the touch screen. First, calibration controls
for the confocal disk are activated through the FRAP Iris Screen. Instructions for
activating the calibration function for this screen and a screen shot with the
calibration function activated can be found in the FRAP Iris Screen on page 44.
The calibration buttons will be hidden if the BACK button is pressed and then
Содержание CARV II
Страница 12: ...12 BD CARV II Installation and User s Guide ...


