


1
1
2
2
3
3
4
4
A
A
B
B
C
C
D
D
SHEET
1
OF
1
DRAWN
CHECKED
QA
MFG
APPROVED
produccion
05/03/2015
DWG NO
TITLE
SIZE
C
SCALE
REV
3
a:
Attach the tap to the basin
and carefully bed in the waste
using silicone
only.
.
b:
Carefully apply silicone to
the top edges of the unit.
c:
Carefully position the basin
down onto the unit, ensure it is
at the back.
1:
2:
3:
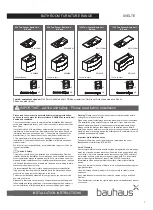
Pull both drawer runners fully out.
Set the drawer down onto the runners.
Push the drawer fully in.
Test to make sure the drawers operate
correctly and there are no obstructions
behind the drawer.
the basin material which may in time cause the failure of the product. Waste
Note:
fittings should be carefully bedded in silicone and the back nut hand tightened an
in order to prevent similar stress related failures.
Step 4
a:
Check the unit is level.
If levelling is required, use
a screwdriver to adjust the
hanging position, as follows:
b:
To lift or lower the unit,
adjust the screw shown.
c:
To move the unit closer or
further from the wall, adjust the
screw shown.
c
a
b
Basin Installation
Step 5
Step 6
a
c
b
1
SE0611SRW
Basin is shown as
a typical example
1
1
2
2
3
3
4
4
A
A
B
B
C
C
D
D
SHEET
1
OF
1
DRAWN
CHECKED
QA
MFG
APPROVED
produccion
05/03/2015
DWG NO
TITLE
SIZE
C
SCALE
REV
1
1
2
2
3
3
4
4
A
A
B
B
C
C
D
D
SHEET
1
OF
1
DRAWN
CHECKED
QA
MFG
APPROVED
produccion
05/03/2015
DWG NO
TITLE
SIZE
C
SCALE
REV
Connect the tap and waste.
Apply silicone
all the way
around the join between the
basin/unit and wall, and
around the base of the basin.
Leave silicone, 24 hours to dry.
3
1
2
2
3
1
1
2
2
3
3
4
4
A
B
C
D
SHEET
1
OF
1
DRAWN
CHECKED
QA
MFG
APPROVED
produccion
05/03/2015
DWG NO
SVELTE_DRAWERS_60_80_
TITLE
SIZE
C
SCALE
1
1
2
2
3
3
4
4
A
A
B
B
C
C
D
D
SHEET
1
OF
1
DRAWN
CHECKED
QA
MFG
APPROVED
produccion
05/03/2015
DWG NO
SVELTE_DRAWERS_60_80_100_120
TITLE
SIZE
C
SCALE
REV