English
10
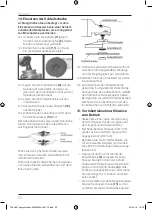
If you are using thin grinding discs, screw
the outer flange upwards with the collar. If
you are using thick grinding discs, screw the
outer flange downwards with the collar.
14.7
Spin the grinding disc by hand to check
for proper installation and ease of
movement.
14.8
Perform a test run (see Startup).
14.9
To change the grinding disc, go in
reverse order after you have loosened
the outer flange using the face pin
wrench. Before changing the grinding
disc, clean the outer flange and the
inner flanges from grinding residue
each time.
15. Before startup/operating
instructions
• Ensure that the voltage of the power
source matches the information on the
type label.
• The diameter of the disk must not be
greater than what is indicated on the
type label (230 mm).
• Use only grinding discs that are
approved for speeds of at least 6,300
revolutions/minute.
• The device may be used only with fitted
protective cover
(6)
. Adjust the position
of the protective cover with the require-
ments of the operation. The protective
cover
(6)
should always be aligned so
that they will protect you in the best
possible way against sparks and
particles.
• To adjust the protective cover, lift the
tension lock
(15)
. Move the protective
cover accordingly. If necessary, slightly
loosen the locking nut with the wrench
(an opening for nut fasten/loosen)or a
spanner
(14)
and then tighten the nut
again.
• Make sure that the grinding disc can
always rotate freely.
• After installing a new grinding disc, let
the angle grinder run for about 1 minute
without load. Replace vibrating discs
immediately. Protect discs from impact,
shock, moisture and grease. Always
make sure that the grinding disc rotates
in the direction of the printed arrow.
Always observe the expiration date of
the grinding disc. This is stamped in the
inner ring on each grinding disc.
• For best grinding results, set the angle
grinder with an angle between 30° and
40° to the workpiece surface for coarse
grinding and move it evenly back and
forth.
• Never grind materials containing
asbestos.
• Secure the workpiece.
• Avoid overheating of the grinding disc
through sufficient cooling phases.
16. Startup
Insert the plug into the socket.
16.1
Switch ON:
Use one finger to push the lock button
(2b)
forward and then press the ON/OFF switch
(2a)
.
16.2
Switch OFF:
Release the switch
(2a)
.
17. Replacing the protective cover
For your own safety, replace a damaged
protective cover immediately.
17.1
Loosen the tension lock
(15)
and rotate
the protective cover until the latches on
the protective cover are visible in the
savings.
17.2
Pull out the protective cover straight
upwards. If necessary, also loosen the
locking screw
(14)
to better be able to
remove the protective cover.
7062851-Angle-Grinder-2200W-Ma-1801-15.indb 10
26-03-18 10:55


