


8. GUI – Installation
•
Source
: Active Stereo (sequential L/R)
•
Layout mode
: Standard layout (1x1 layout)
•
Video Timing
: 2560 x 1600 (WQXGA) @120 Hz
•
Color depth
: 30 bpp
•
Connector
: DisplayPort 1.2 or HDMI
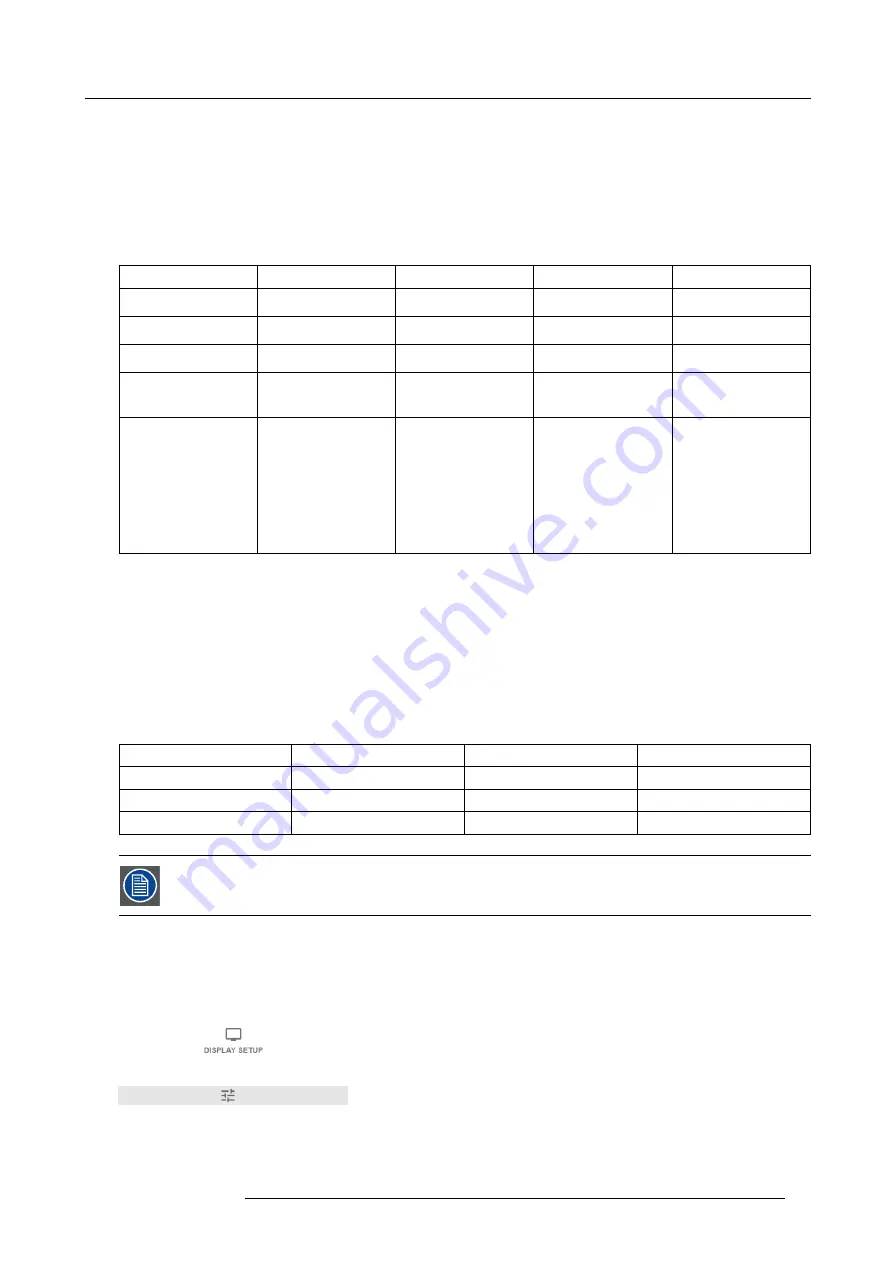
Connecting with the quad DP 1.2 Input card
You can use one of the following methods. The resulting image will always be an Active Stereo image.
Source
Layout mode
Video Timing / cable
Fixed con
fi
guration?
Color depth
Active Stereo (sequential
L/R)
Standard layout (1x1
layout)
2560 x 1600 @120 Hz
30 bpp
Active Stereo (sequential
L/R)
4 Column mode (4x1
layout)
960 x 2160 @120 Hz
30 bpp
Active Stereo (sequential
L/R)
4 Quadrant mode (2x2
layout)
1920 x 1080 @120 Hz
30 bpp
Passive Stereo (separate
L/R)
Standard layout (1x1
layout)
3840 x 2160 @60 Hz
•
Cable 1: left eye
•
Cable 2: right eye
30 bpp
Passive Stereo (dual
pipe L/R)
2 Column mode (2x1
layout)
1920 x 2160 @60 Hz
•
Cable 1: left eye,
left column
•
Cable 2: left eye,
right column
•
Cable 3: right eye,
left column
•
Cable 4: right eye,
right column
30 bpp
8.7.4
Choosing the desired Display Setup
Output modes
The following output modes are available:
•
AutoStereo
: Automatic mode (2D input = 2D output, 3D input = Active Stereo output).
•
Mono
: Forces all source signals to 2D output.
•
ActiveStereo
: Forces all source signals to Active Stereoscopic 3D.
Use the following table as an indicator of what display mode you require.
Source signal
AutoStereo
Mono
ActiveStereo
2D Source
Output is a 2D image
Output is a 2D image
Output is in Active Stereo
Active Stereo source
Output is in Active Stereo
Output is a 2D image
Output is in Active Stereo
Passive Stereo source
Output is in Active Stereo
Output is a 2D image
Output is in Active Stereo
When a different Display Mode is chosen compared to the source signal (e.g. Active Stereo source with Mono
output), advanced image processing will make sure you a desirable image will be displayed.
How to select the desired projection method?
1. In the main menu, select
Installation
→
Display Setup
.
Image 8-52
Installation menu, Display setup
The Display setup menu is displayed.
R5906151 XDL 17/04/2018
75
Содержание XDL-4K75
Страница 1: ...XDL User Manual R5906151 00 17 04 2018...
Страница 4: ......
Страница 16: ...1 Safety 12 R5906151 XDL 17 04 2018...
Страница 22: ...2 Pulse Remote Control Unit 18 R5906151 XDL 17 04 2018...
Страница 42: ...4 Getting Started Take note that the update process can take a long time to complete 38 R5906151 XDL 17 04 2018...
Страница 46: ...5 Graphic User Interface GUI 42 R5906151 XDL 17 04 2018...
Страница 58: ...7 GUI Image 54 R5906151 XDL 17 04 2018...
Страница 82: ...8 GUI Installation 78 R5906151 XDL 17 04 2018...
Страница 96: ...9 GUI System Settings 92 R5906151 XDL 17 04 2018...
Страница 98: ...10 Status menu 94 R5906151 XDL 17 04 2018...
Страница 104: ...11 Maintenance procedures 100 R5906151 XDL 17 04 2018...


