background image

R5912128 /03 SP4K-B

112

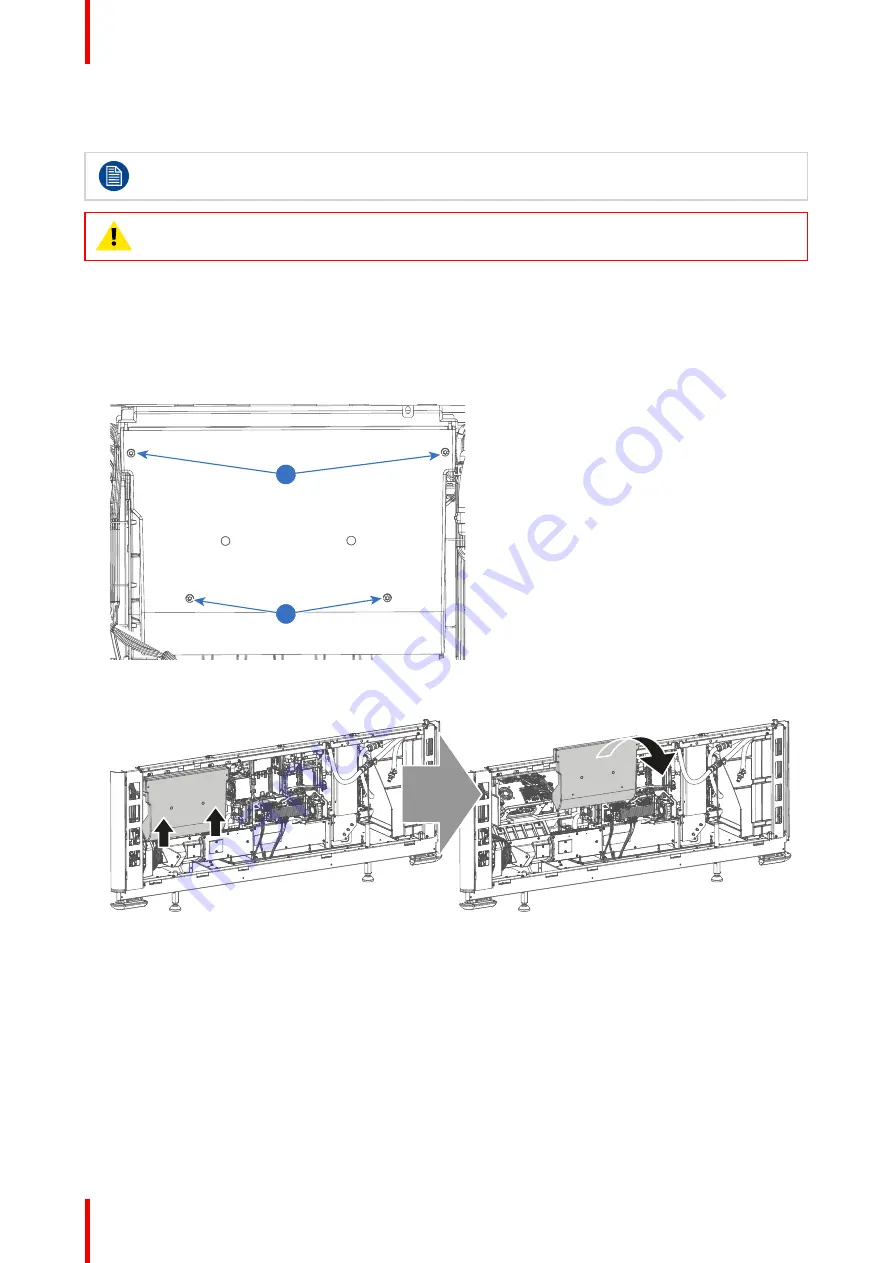
10.1 Opening the sealed compartment

This procedure assumes that the side and top cover have been removed.

CAUTION:

This procedure may only be done by a qualified and trained service technician.

Required tools

Torx screwdriver T20

How to open the sealed compartment

1.

Remove the four screws holding the side cover (reference 1). Use a T20 Torx screwdriver.

1

1

Image 10–1 Sealed cover fixation

2.

Lift the cover up slightly using both lips. Then remove the cover by taking it away from the projector.

Image 10–2 Sealed compartment side cover, remove

3.

Slightly slide the top cover a bit outwards. Then lift it up and remove it.

Convergence

Содержание SP4K-B

Страница 1: ...ENABLING BRIGHT OUTCOMES Installation manual SP4K B...

Страница 2: ...Registered office Barco NV President Kennedypark 35 8500 Kortrijk Belgium www barco com en support www barco com Barco NV Beneluxpark 21 8500 Kortrijk Belgium www barco com en support www barco com...

Страница 3: ...to deliver secure solutions and services to our customers while protecting Barco s intellectual property When product security concerns are received the product security incident response process will...

Страница 4: ......

Страница 5: ...municator 36 2 8 Web Commander 37 2 9 Exhaust adapters optional 38 3 Installation process 39 3 1 Installation process overview 40 4 Physical installation projector 41 4 1 Positioning the SP4K B 42 4 2...

Страница 6: ...ting to the projector for the first time 106 9 2 Software update 107 10 Convergence 111 10 1 Opening the sealed compartment 112 10 2 Closing the sealed compartment 114 10 3 Convergence controls 116 10...

Страница 7: ...r 141 12 14 Mounting the rear cover 142 12 15 Mounting the front cover 143 A Dimensions 145 A 1 Dimensions of the projector 146 A 2 Dimensions of the universal pedestal 147 A 3 Dimensions of the exter...

Страница 8: ...R5912128 03 SP4K B 8...

Страница 9: ...projector After this chapter additional warnings and cautions are given depending on the procedure Read and follow these warnings and cautions as well Clarification of the term SP4K B used in this doc...

Страница 10: ...energy of the light source which is equivalent with lamp based systems Thermal retinal eye injury is possible when exposed within the Hazard Distance HD The HD is defined from the projection lens sur...

Страница 11: ...task described in the User Installation manual All other maintenance tasks and service tasks must be performed by qualified SERVICE PERSONNEL The DLP Cinema Systems are intended FOR PROFESSIONAL USE O...

Страница 12: ...et cord shall be not less than 1 5 mm 14 AWG and has a rating of minimum 300V In case of using a circuit breaker of a current rating less than 40A the cross sectional area of the conductors in the pow...

Страница 13: ...e any of the projector s covers Do not place this equipment on an unstable cart stand or table The product may fall causing serious damage to it and possible injury to the user Lenses shields or scree...

Страница 14: ...If this does happen switch off and remove all power from the projector Do not operate the projector again until it has been checked by qualified service personnel Do not block the projector cooling fa...

Страница 15: ...r adjustment of the other controls may result in damage and will often require extensive work by a qualified technician to restore the product to normal operation If the product has been dropped or th...

Страница 16: ...THE BEAM IS PERMITTED RG3 IEC EN 62471 5 2015 CLASS 1 IEC EN 60825 1 2014 HAZARD DISTANCE CONSULT SAFETY MANUAL RG3 IEC EN 62471 5 2015 CLASS 1 IEC EN 60825 1 2014 RG3 IEC EN 62471 5 2015 CLASS 1 IEC...

Страница 17: ...uette d identification pour les param tres ATTENTION COURANT DE FUITE LEV RACCORDEMENT LA TERRE INDISPENSABLE AVANT LE RACCORDEMENT AU R SEAU VOIR LA NOTICE D INSTALLATION AVANT DE RACCORDER AU R SEAU...

Страница 18: ...ese values are minimum values and are based on the guidance provided in IEC 62471 5 2015 section 6 6 3 5 The installer and user must understand the risk and apply protective measures based upon the ha...

Страница 19: ...meters above the floor Horizontal clearance to the hazard distance zone shall be not less than 2 5 meters Any human access horizontally to the Hazard Zone if applicable shall be restricted by barriers...

Страница 20: ...or intrabeam exposure HDreflection the distance that has to be kept restrictive related to the reflected light from the rear projection screen HDdiffuse the relevant distance to be considered while ob...

Страница 21: ...f modifying optics Hazard Distance 0 1 2 3 4 5 6 7 8 9 10 11 12 13 14 15 16 17 18 0 5 1 1 5 2 2 5 3 3 5 4 4 5 5 5 5 6 6 5 7 7 5 8 8 5 9 9 5 10 10 5 11 11 5 12 Hazard Distance m Throw Ra o SP4K 55B SP4...

Страница 22: ...R5912128 03 SP4K B 22 Safety...

Страница 23: ...d safety area around the installed projector required power net etc Furthermore careful consideration of things such as image size ambient light level projector placement and type of screen to use are...

Страница 24: ...projectors are no exception to this The system can be used up to 4 000 m 13 125 ft altitude1 but the maximum ambient temperature should be reduced once exceeding 2 500 m 8 202 ft This in accordance w...

Страница 25: ...izes and conduit types must comply with local codes A readily accessible disconnect device shall be incorporated externally to the equipment for removal of the power to the equipment mains terminals T...

Страница 26: ...unpacking let the projector acclimatize to a room temperature between 10 C 50 F and 35 C 95 F It is suggested to only start using the projector after having it stored for a minimum of 16 hours in its...

Страница 27: ...ge 2 2 Removing foam manuals and cardboard boxes 6 Remove the outer cardboard box and any additional plates 7 Remove the inner top cover Image 2 3 8 Remove both U shaped plates and the four foam corne...

Страница 28: ...the top cover 10 Lift the projector from the pallet using a hoisting tool Image 2 6 Caution Take into account the weight of the projector when manipulating the projector For this reason make sure to...

Страница 29: ...projector as it was originally packed at the factory The projector is delivered with a plastic cover inside the Lens Holder This to prevent intrusion of dust and foreign particles The projector is no...

Страница 30: ...unded with foam Once the cooler has arrived at the installation site it needs to be removed from the cardboard box and wooden pallet in a safe manner Required tools Side cutter Knife How to unpack the...

Страница 31: ...ding the cooler Use a at least 2 people to lift up the cooler and put it on its installation location Save the original shipping carton and packing material they will be necessary if you ever have to...

Страница 32: ...ied as soon as possible Projector Box content After unpacking the projector it is recommended to check if all following items where included A note with QR codes to inform the user that the installati...

Страница 33: ...r and looking at the projection screen in front of the projector B L R F T Image 2 9 T Top of the projector L Left side of the projector Light source side F Front of the projector R Right side of the...

Страница 34: ...om the air outlets is not automatically sucked back in via the air inlets The projector must be installed with sufficient space around the projector head minimum 20 cm 8 inch to ensure sufficient air...

Страница 35: ...35 R5912128 03 SP4K B 2 1 3 Image 2 12 1 Air inlet right side of external cooler 2 Air inlet left side of external cooler 3 Air outlet of external cooler Getting started...

Страница 36: ...rojector without any additional software installation It is accessible via a web browser and is fully supported on iOS and Android devices While all web browsers are supported the recommended browser...

Страница 37: ...l efficiency Projectionists can enjoy a streamlined and intuitive user interface that seamless blends projector control with a full fledged screen management system The Barco Web Commander user interf...

Страница 38: ...f the top cover of the projector These exhaust adapters allow the customer to fix an air extraction system to the projector in order to extract hot air coming from the air outlets of the projector Ima...

Страница 39: ...is chapter gives an overview of all the different stages in the installation process which you have to follow to get your SP4K B projector up and running Each stage is briefly described and refers to...

Страница 40: ...more information see Projector Power Cycle page 97 8 Connect your device to the projector for the first time and log into Web Communicator See Connecting to the projector for the first time page 106...

Страница 41: ...essing the power connections 45 4 3 Power input configuration of the projector 46 4 4 Connecting the projector with the power net 48 4 5 Connecting a UPS with the projector electronics 50 4 6 Connecti...

Страница 42: ...iant 20 cm Image 4 1 Positioning at port window Barco offers a pedestal for the SP4K B projector This pedestal allows for a solid and easy setup of the projector The pedestal support 19 rack systems p...

Страница 43: ...to use a hoisting or lifting tool to lift up the projector while adjusting the feet Make sure to adjust both front or both rear feet at the same time Make sure both feet are adjusted in a similar mann...

Страница 44: ...tor feet For this reason Make sure of the following Make sure to use a hoisting or lifting tool to lift up the projector while adjusting the feet Make sure to adjust both front or both rear feet at th...

Страница 45: ...from the power net Required tools Torx screwdriver T20 How to access 1 Remove the back and power side cover of the projector 2 Slightly loosen the two screws on the bottom of the net input cover refe...

Страница 46: ...upply of 200 240 V In this configuration 200 240 V is measured between L1 and the neutral N or L2 Before operating the projector place the links in the correct position depending on the local power su...

Страница 47: ...nd U1 A and B W2 U1 U2 V1 V2 W1 A B C D Image 4 9 configuration 3 Mono phase configuration Spread the four links over the six pins as illustrated Make sure both the upper and lower pins are connected...

Страница 48: ...ertified AC power supply cord 4 mm 10 AWG min 300 V in case of mono phase or configuration Certified AC power supply cord 4 mm 10 AWG min 500 V in case of Y configuration How to connect the main AC po...

Страница 49: ...rminals reference 5 However ensure that you correctly connect the PE reference 4 and the neutral wire reference 6 4 Secure the AC power cord by fastening the cable gland reference 3 Use a 30 mm open e...

Страница 50: ...and minimum 300V The projector is configured by default for use without UPS Required tools Torx screwdriver T20 Flat screwdriver Open end wrench 24 mm Nut driver 10 mm Torque wrench with 10 mm hexagon...

Страница 51: ...0 75 Nm Warning Always connect the PE wire reference 4 first then the other wires 3 2 4 5 Image 4 14 2 UPS Power cord 3 Cable gland 4 Protected Earth PE wire 5 Power wires L and N Tip Check for good...

Страница 52: ...and projector Maximum 3 m 10ft Distance between external cooler inlet and outlet and a solid surface at least 20 cm CAUTION Cable hot plugging is forbidden How to connect 1 Check that the projector i...

Страница 53: ...53 R5912128 03 SP4K B Projector to External cooler OUT1 IN1 IN1 OUT1 OUT2 IN2 IN2 OUT2 When disconnecting the cable always mount the plastic cover over the connector Physical installation projector...

Страница 54: ...R5912128 03 SP4K B 54 Physical installation projector...

Страница 55: ...or your specific situation using the lens calculator Also it is explained how to install and remove a lens from the projector lens holder and how you can shift zoom and focus the lens Furthermore it i...

Страница 56: ...lenses Consult the lens selection list to see which non active lenses are also supported Order No Type Throw range 4k R9856506 R9856525 HB 1 13 1 72 R9856526 HB 1 35 1 86 R9856527 HB 1 46 2 10 R98565...

Страница 57: ...n of parameters and all possible configurations are displayed Image 5 1 Example of the Digital Cinema Lens calculator tool Take into account that when the projector is tilted the Screen Width you have...

Страница 58: ...ocket reference 2 as illustrated 1 2 Image 5 2 Lens installation preparing the lens holder 2 Remove the dust cover from the lens opening Image 5 3 Tip While not placed in the projector place the dust...

Страница 59: ...may fall out of the lens holder 6 Secure the lens in the lens holder by sliding the primary lens lock handle into the locked position to the top of the projector Ensure the lens touches the front plat...

Страница 60: ...ng the lock handle outwards and then towards the unlocked position as illustrated Image 5 6 Image 5 6 Unlock the lens 2 Gently pull the lens out of the lens holder Image 5 7 Lens removal It s recommen...

Страница 61: ...61 R5912128 03 SP4K B It is recommended to place the dust cover of the original projector packaging back into the lens opening to prevent intrusion of dust Image 5 8 Lenses and Lens holder...

Страница 62: ...25 75 instead after Scheimpflug adjustment For this reason it is advised to perform Scheimpflug adjustment after you have reached the sharpest possible image using lens shift zoom and focus Maximum s...

Страница 63: ...u to focus the image on the screen Image 5 12 If no the Z axis lens motors can be used to manipulate the lens Use the and Focus keys to manipulate the lens image Take into account that the lens focus...

Страница 64: ...EEN DMD Lp1 Lp2 Fp1 Fp2 SCREEN DMD Lp3 Lp4 Fp3 Fp4 Scheimpflug Image 5 13 Scheimpflug principle Scheimpflug principle The plane of sharp focus can be changed so that any plane can be brought into shar...

Страница 65: ...d lens with a Calibrate return to mid position action 3 Make sure you have performed a lens shift zoom and focus action to obtain the sharpest possible picture Tip Do not perform a Scheimpflug adjustm...

Страница 66: ...will fade a bit This is expected behavior 2 Sharpen the image at the lower left corner of the screen by turning the upper right Scheimpflug adjustment screw reference 2 Image 5 18 F 2 Image 5 18 Right...

Страница 67: ...be applied take into account that the maximum allowed torque is 10 Nm What to do when no sharp image can be obtained If you are unable to obtain a sharp image even after performing all previously ment...

Страница 68: ...R5912128 03 SP4K B 68 Lenses and Lens holder...

Страница 69: ...Cinema Processor Direct 73 About this chapter This chapter describes the functionality of the touch display as well as the different input and communication ports of your projector Note that all info...

Страница 70: ...optional feature While the touch display is be handy for local use all functionality of the touch display can also be accessed via Web Communicator This to ensure that if you mostly access the project...

Страница 71: ...Area Network WAN 10 100 1000 base T port Use this Ethernet port reference 2 Image 6 2 to connect the network which contains the DHCP server The SP4K B can be connected to a WAN Wide area network refe...

Страница 72: ...or firmware updates or for downloading the log files without a network connection If the only file on the USB device is the firmware file a fw file the projector will automatically start one of the fo...

Страница 73: ...with an third party IMB Supported IMBs from ICP D software version 1 2 0 5 included in the Series 4 software 1 4 0 onwards Dolby ShowVault IMB From software version 2 8 25 onward Dolby IMS3000 From so...

Страница 74: ...nking Orange Operating System start up Blinking Green Orange Security Manager Image Integrity tests Blinking Green Blinking Yellow Security Manager Self Test Green Blinking Green Starting Applications...

Страница 75: ...t 91 7 10 Obtaining the ICMP X certificate 92 7 11 Removing a HDD from the ICMP X 93 7 12 Installing a HDD into the ICMP X 94 About this chapter This chapter describes the ICMP X in general the HDDs t...

Страница 76: ...R5912128 03 SP4K B 76 ICMP X...

Страница 77: ...ctor installation and maintenance of the ICMP X requires the same skills and the same precautions as an intervention on the projector itself For order info see www barco com Front plate of the ICMP X...

Страница 78: ...el Unlike the previous version the name of ICMP X appears on the upper left side of the front face under the Barco logo 0123456789 ICMP X Image 7 4 Location in the Card Cage The Card Cage can be diffe...

Страница 79: ...uld be replaced as soon as possible About RAID recovery process The restoration from degraded to normal condition of the RAID 5 system is done automatically When the RAID controller detects a new HDD...

Страница 80: ...e drive in a non operational environment is 90 days Drives should be stored in the original unopened shipping packaging whenever possible Once the drive is removed from the original packaging the reco...

Страница 81: ...er RAID initialization restart content can be ingested All content will be lost RAID initialization need to be perform with Web Communicator immediately usable after RAID initialization restart conten...

Страница 82: ...gested immediately All content will be lost Only usable after RAID initialization restart content can then be ingested immediately Set of 3 HDDs with content reused from an ICMP X 1 Unit is equipped w...

Страница 83: ...mation 4 SYNC IN OUT Synchronization signal IN and OUT Reserved for multiple projector projection Use a coaxial cable of 50 to connect the sync signal from projector to projector 5 LAN 2 ports The ICM...

Страница 84: ...B 3 0 source In addition USB 3 0 ports supply more power than USB 2 0 ports to an external device when for example the content is ingested from devices that do not have their own power supply 8 HDMI A...

Страница 85: ...IPS error Blinking Green Off Boot loader Blinking Green Blinking Orange Operating System start up Blinking Green Orange Security Manager Image Integrity tests Blinking Green Blinking Yellow Security M...

Страница 86: ...the following troubleshooting table for curative actions Troubleshooting Situation Solution One disk failed red LED RAID degraded The ongoing event is not interrupted Note The disk status RAID degrade...

Страница 87: ...witch on the power 4 Start RAID Initialize See user guide of the Web Communicator Result a new empty RAID is created All HDD LEDs remain off Error 10580 local storage not available Note The disk statu...

Страница 88: ...dia Processor Barco signed X 509 device certificate PKI CA BARCO ICMPX 0123456789 pem QR Image 7 10 Trusted Device List TDL The Goal of the TDL is to maintain timely and accurate information on partic...

Страница 89: ...ontain streams that are compressed encoded and encrypted in order to reduce the huge amount of required storage and to protect from unauthorized use The image part is JPEG 2000 compressed whereas the...

Страница 90: ...ICMP X All installation and maintenance operations on the ICMP X are performed via Web Communicator the Barco configuration software Please refer to the user guide for more information Factory settin...

Страница 91: ...ICMP is requested to restart The READY LED on the front panel of the ICMP starts to blink orange The lasers are switched off and the projector remains in ON mode Once the READY LED lit continuous gree...

Страница 92: ...redirect to the ICMP X certificate download page on the web server Note Instead of downloading the ICMP X certificate you can use the CertID number reference 2 located below the QR code in communicat...

Страница 93: ...n defective HDDs should be removed and kept How to remove a HDD 1 Switch off the projector 2 Moving the latch towards the left Image 7 13 3 Push the unlock button to open the handle Image 7 14 4 Pull...

Страница 94: ...D Installing or exchange one or several HDDs into ICMP X has an impact on data presents on the already inserted drives RAID integrity depends on the type of HDD swap Refer to the chapter What are the...

Страница 95: ...ery process The red LED of the HDD which has to be rebuilt is blinking This process takes about 200 GB per hour Once the RAID is completed the red LED turns off CAUTION It s strongly recommended to co...

Страница 96: ...R5912128 03 SP4K B 96 ICMP X...

Страница 97: ...projector OFF 102 About the Projector Power Cycle This chapter contains the Switch ON and Switch OFF procedures for the SP4K B projector These procedures highlight all important points to be checked...

Страница 98: ...y powered and active touch display is on if available Web Communicator is active and light is ON Full GREEN Going to ECO mode Turning electronics and light source OFF Blinking green 2 3 4 5 6 1 Image...

Страница 99: ...ation of the Power button and GPI 1 4 input on the Cinema Controller Power state diagram ON ON 1 sec 6sec Image on the screen START UP FORCE SHUTDOWN SHUTDOWN ECO ECO READY READY OFF OFF Image 8 3 Pow...

Страница 100: ...to the mains power 3 Ensure that the correct lens is installed for your application 4 Press the power button to switch the projector ON The projector will start up and the touch display will start its...

Страница 101: ...Once logged in you will be redirected to the Light dowser lens menu 7 In this menu press the Light button to activate the light source Use a press of 1 second The Light source will start warming up 8...

Страница 102: ...as been switched OFF You can only power it using the power button How to put the projector in ECO mode using the touch display 1 In the main menu of the touch display press on the ECO button Image 8 6...

Страница 103: ...ge 8 8 How to turn the projector OFF 1 Press the power button for more than six seconds The projector will go to OFF mode or Send a signal via GPI3 for more than six second The projector will go to OF...

Страница 104: ...R5912128 03 SP4K B 104 Projector Power Cycle...

Страница 105: ...105 R5912128 03 SP4K B 9 1 Connecting to the projector for the first time 106 9 2 Software update 107 Connectivity 9...

Страница 106: ...address of the projector The login page of Web Communicator will be displayed or use a Bonjour program to trace the random IP address assigned to your projector 2 Log in onto Web Communicator Using t...

Страница 107: ...ware update 5 In the Software Update menu click Browse for a package to install An Open browse window is prompted Image 9 1 6 Select the file downloaded from the Barco website The selected file will b...

Страница 108: ...a software package inserted via USB device 7 Click Image name from the USB device connected to the projector and confirm The software update will start Update progress The update will proceed as follo...

Страница 109: ...109 R5912128 03 SP4K B Image 9 6 Example of the components update page 5 Once every component has been updated you will be redirected to the Web Communicator login page Connectivity...

Страница 110: ...R5912128 03 SP4K B 110 Connectivity...

Страница 111: ...pattern onto the red pattern 119 About this chapter This chapter describes how to prepare the projector for convergence adjustment and how to adjust the convergence Take into account that opening the...

Страница 112: ...ools Torx screwdriver T20 How to open the sealed compartment 1 Remove the four screws holding the side cover reference 1 Use a T20 Torx screwdriver 1 1 Image 10 1 Sealed cover fixation 2 Lift the cove...

Страница 113: ...113 R5912128 03 SP4K B Image 10 3 Sealed top cover remove Convergence...

Страница 114: ...nt as illustrated Image 10 4 Sealed top cover mount 2 Slide the top cover wards on the lips until it is in its correct position 3 Hook the cover plate onto the studs 4 Slide the cover downwards on bot...

Страница 115: ...115 R5912128 03 SP4K B 1 1 Image 10 6 Sealed cover fixation Convergence...

Страница 116: ...of which are extended for accessibility The adjustment knobs are numbered from 1 to 6 and have the same color as the channel which they affect To access the control knobs the top cover and left side c...

Страница 117: ...sing the correct brightness level Adjustment Range Avoid slipping of the torque limiter clutch by limiting the amount number of adjustment s made Typically the convergence adjustments serve to correct...

Страница 118: ...th one full pixel Turning the control knob clockwise corresponds to the direction of the arrow of the test pattern Image 10 9 Location of the control knobs 1 2 both left and 3 right 2 To translate the...

Страница 119: ...of the arrow of the test pattern Image 10 11 Location of the control knobs 2 To translate the GREEN pattern horizontally slightly turn the green control knob number 6 3 To rotate the GREEN pattern sig...

Страница 120: ...R5912128 03 SP4K B 120 6 If all adjustments are finished switch off the projector 7 Close the sealed compartment and reinstall all covers of the projector Convergence...

Страница 121: ...ector user guide where more detailed instructions and menu navigations are available If you want more detailed explanations of how every menu related to the color calibration works please consult this...

Страница 122: ...ic P7 correction Measured values are saved in the Measured Color Gamut Data MCGD file This calibration needs to be repeated for each used format FLAT SCOPE and for each used projection mode 2D 3D For...

Страница 123: ...written with the measured values Laser correction Based on the measured values the projector can balance the power of the lasers to move the projector uncorrected white point towards the desired white...

Страница 124: ...menu 1 Status of the last white point tracking 2 White point tracking button 3 2D measurement 4 3D measurement 6 Start the white point calibration wizard by performing a White point tracking Tip If t...

Страница 125: ...o ensure that in the cinema theater the film is projected within the same color space as intended by the film industry the color space of the projector has to be corrected accordingly What has to be d...

Страница 126: ...movie e g only the stairs and emergency exit lighting is switched on Note In an optimal setup less than 1 of light from any other source than the light from the projector should illuminate the screen...

Страница 127: ...t this chapter Most installation maintenance and service procedures demand removing one or more of the projector covers to gain access to the parts to maintain or to service To avoid redundancy all pr...

Страница 128: ...placing the filter there is no need to turn off the projector Required tools No tools required How to remove 1 Slide the front cover to the side of the Input Communication Unit and remove it Note The...

Страница 129: ...placing the filter there is no need to turn off the projector Required tools No tools required How to remove 1 Slide the rear cover to the side of the Input Communication unit and remove it Note The h...

Страница 130: ...river T20 How to remove 1 Remove the rear cover 2 Remove the two screws of the mains side cover Use a T20 Torx screwdriver 3 Slide the side cover a bit towards the rear side of the projector 4 Lift up...

Страница 131: ...projector 2 Remove the mains side cover For more info see Removal of the mains side cover page 130 3 Remove the two screws at the top of the side cover Use a T20 Torx screwdriver Image 12 4 Removing...

Страница 132: ...1 Remove the light source side cover 2 Remove the two screws of the sealed compartment side cover Use a T20 Torx screwdriver 3 Lift up and remove the side cover Tip It may be necessary to move the co...

Страница 133: ...r T20 How to remove 1 Remove the two screws at the top of the side cover Use a T20 Torx screwdriver Image 12 7 Removing the screws of the side cover 2 Tilt the upper side of the cover outwards and rem...

Страница 134: ...completed without removing this small cover This procedure is only provided to be complete Required tools Torx screwdriver T20 How to remove 1 Remove the top cover and rear cover 2 Loosen the screw o...

Страница 135: ...our screws of the top cover Use a T20 Torx screwdriver 2 Carefully lift the top cover up and remove it Note There are several clips on the side bars of the projector in which the top cover is clicked...

Страница 136: ...ojector Tip The top cover has been designed it can be mounted in only one way 2 Carefully click the cover on the clips that are mounted on both side bars of the projector This to make sure the top cov...

Страница 137: ...nto the four cover hooks reference 1 Image 12 12 located on the bottom frame of the projector 1 2 Image 12 12 Mounting the side cover 2 Click the cover onto the cover receiver of the top frame referen...

Страница 138: ...How to mount 1 Mount the light source side cover Mounting the light source side cover page 137 2 Place and slide down the sealed compartment side cover Image 12 14 Removal of the mains side cover 3 Fa...

Страница 139: ...T20 How to mount 1 Carefully place the side cover onto the three cover hooks located on the bottom frame of the projector Tip Place the cover in a slightly tilted angle so you can clearly see the hook...

Страница 140: ...R5912128 03 SP4K B 140 1 Image 12 17 Tightening the screws of the side cover Projector Covers...

Страница 141: ...crewdriver T20 How to mount 1 Make sure the light source side cover is mounted 2 Place and slide down the mains side cover Image 12 18 Removal of the mains side cover 3 Fasten the side cover using the...

Страница 142: ...o tools required How to mount 1 Place the cover over the cover hook on the bottom of the projector frame reference 1 2 Slide the clips in the rear cover over the cover hooks in the top of the frame re...

Страница 143: ...o tools required How to mount 1 Place the cover over the cover hook on the bottom of the projector frame reference 1 2 Slide the clips in the front cover over the cover hooks in the top of the frame r...

Страница 144: ...R5912128 03 SP4K B 144 Projector Covers...

Страница 145: ...145 R5912128 03 SP4K B A 1 Dimensions of the projector 146 A 2 Dimensions of the universal pedestal 147 A 3 Dimensions of the external cooler 148 Dimensions A...

Страница 146: ...T CENTER OFGRAVITY AIR INLET AIR INLET CENTER OF GRAVITY 760 699 1315 4 1470 288 573 78 535 859 675 MAX 499 44 4X 613 221 44 330 97 760 42 5 804 366 273 481 83 137 MAX 295 Image A 1 All dimension give...

Страница 147: ...147 R5912128 03 SP4K B A 2 Dimensions of the universal pedestal Dimensions 566 7 866 8 876 3 Image A 3 Dimensions given in millimeters Dimensions...

Страница 148: ...R5912128 03 SP4K B 148 A 3 Dimensions of the external cooler Dimensions Dimensions are given in millimeter CENTER OF GRAVITY 305 389 546 330 516 462 555 589 Image A 4 Dimensions...

Страница 149: ...index files in XML format The MXF files contain streams that are compressed encoded and encrypted in order to reduce the huge amount of required storage and to protect from unauthorized use The image...

Страница 150: ...DMD plane and lens plane are parallel the plane of sharp focus will also be parallel to these two planes If however the lens plane is tilted with respect to the DMD plane the plane of sharp focus wil...

Страница 151: ...driver 10 mm Open end wrench 17 mm Open end wrench 24 mm Open end wrench 36 mm Side cutter Smartphone with auto focus or control software e g Communicator Web Communicator Commander or Web Commander S...

Страница 152: ...R5912128 03 SP4K B 152 List of tools...

Страница 153: ...83 GPI 83 GPI port 71 GPO 83 GPO port 71 LAN 83 LAN port 71 SYNC 83 USB 2 0 83 USB 3 0 83 USB port 72 WAN port 71 Communication ports ICMP X 83 Configuration ICMP X 90 Connect Main AC 48 Connectivity...

Страница 154: ...munication ports 71 Input ports 71 Introduction 70 Input ports ICMP X 83 Install Lens 58 Installation Overview 40 Power connection access 45 Power input configuration 46 Process 39 Installation requir...

Страница 155: ...Data Sheet SDS 15 Servicing 15 Safety Data Sheet SDS 15 Scheimpflug 64 Introduction 64 Scheimpflug s law 64 Sealed compartment Close 114 Open 112 sealed compartment side cover Remove 132 Sealed compa...

Страница 156: ...R5912128 03 SP4K B 156 Index...

Страница 157: ......

Страница 158: ...www barco com R5912128 03 2022 02 23...

Отзывы: