


5. Configurator
5. Click
OK
to make the connection.
Image 5-9
Create connection via host name
Making a connection via a host name is only possible when the host name is known by
the network DNS server.
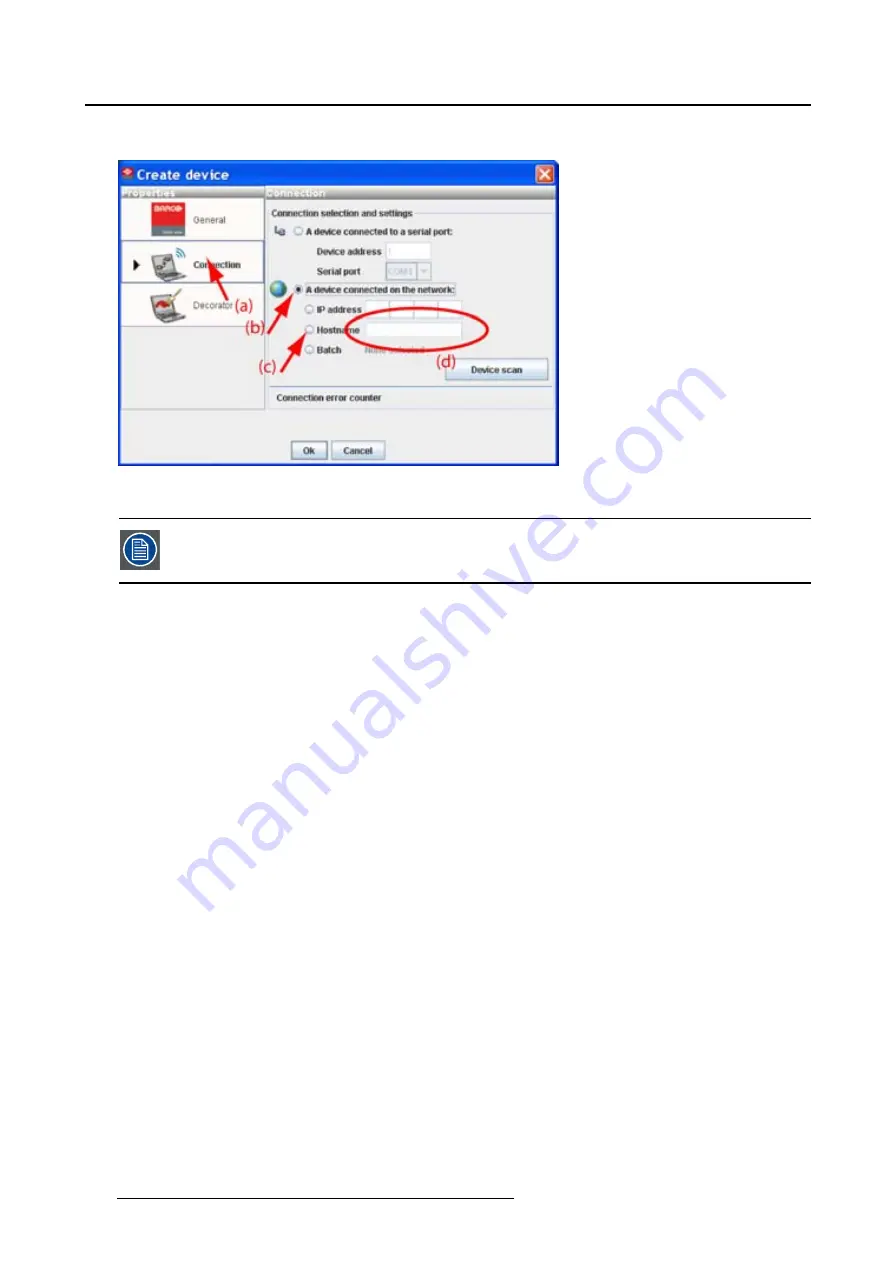
Via a projector scan single connection
1. Select the
Connection
properties tab (a).
The right pane changes to the connection setup page.
2. Click on the radio button next to
A projector connected on the network
to select the Ethernet connection
(b).
3. Click on the
Device scan
button (c).
The
Scanning projector
progress bar appears. The broadcast query (based on UDP) for projectors
scans the complete LAN network to detect available projectors on the network. The scanning results
are displayed in the
Discover projectors
dialog box (d). Only the projector of the added projector type
and the not yet added projectors to the con
fi
guration are in the list.
4. Click on the desired IP address to select (e) and click
Open
(f).
A connection is made with the selected projector.
Via a projector scan multiple connection (batch)
1. Select the
Connection
properties tab (a).
The right pane changes to the connection setup page.
2. Click on the radio button next to
A projector connected on the network
to select the Ethernet connection
(b).
3. Click on the
Device scan
button (c).
The
Scanning projector
progress bar appears. The broadcast query (based on UDP) for projectors
scans the complete LAN network to detect available projectors on the network. The scanning results
are displayed in the
Discover projectors
dialog box (d). Only the projector of the added projector type
and the not yet added projectors to the con
fi
guration are in the list.
4. Hold down the
Ctrl
key and click on the projectors which must be added in batch (e). Click
Open
to
add the projectors (f).
52
R59770513 RLM W-SERIES 28/07/2010
Содержание RLM W Series
Страница 1: ...RLM W series Reference manual R59770513 01 28 07 2010 ...
Страница 4: ......
Страница 8: ...Table of contents 4 R59770513 RLM W SERIES 28 07 2010 ...
Страница 36: ...3 Menus Image 3 15 Clear short cut on snapshot 32 R59770513 RLM W SERIES 28 07 2010 ...
Страница 46: ...4 Preferences Image 4 13 Selecting a workspace 42 R59770513 RLM W SERIES 28 07 2010 ...
Страница 67: ...5 Configurator Image 5 21 Multi selection of projectors R59770513 RLM W SERIES 28 07 2010 63 ...
Страница 68: ...5 Configurator 64 R59770513 RLM W SERIES 28 07 2010 ...
Страница 77: ...6 General projector settings Image 6 8 Restore factory defaults R59770513 RLM W SERIES 28 07 2010 73 ...
Страница 78: ...6 General projector settings 74 R59770513 RLM W SERIES 28 07 2010 ...
Страница 97: ...8 Adjustments Image 8 15 Input balance R59770513 RLM W SERIES 28 07 2010 93 ...
Страница 98: ...8 Adjustments 94 R59770513 RLM W SERIES 28 07 2010 ...
Страница 104: ...10 Installation 100 R59770513 RLM W SERIES 28 07 2010 ...
Страница 106: ...11 Communication 102 R59770513 RLM W SERIES 28 07 2010 ...
Страница 111: ...12 Warping Image 12 5 Normal warping rotation R59770513 RLM W SERIES 28 07 2010 107 ...
Страница 146: ...12 Warping Image 12 56 Color value via HSB Image 12 57 Color value via RGB 142 R59770513 RLM W SERIES 28 07 2010 ...
Страница 150: ...Index 146 R59770513 RLM W SERIES 28 07 2010 ...


