background image

1. TLD HB (1.6-2.0:1) Lens Kit

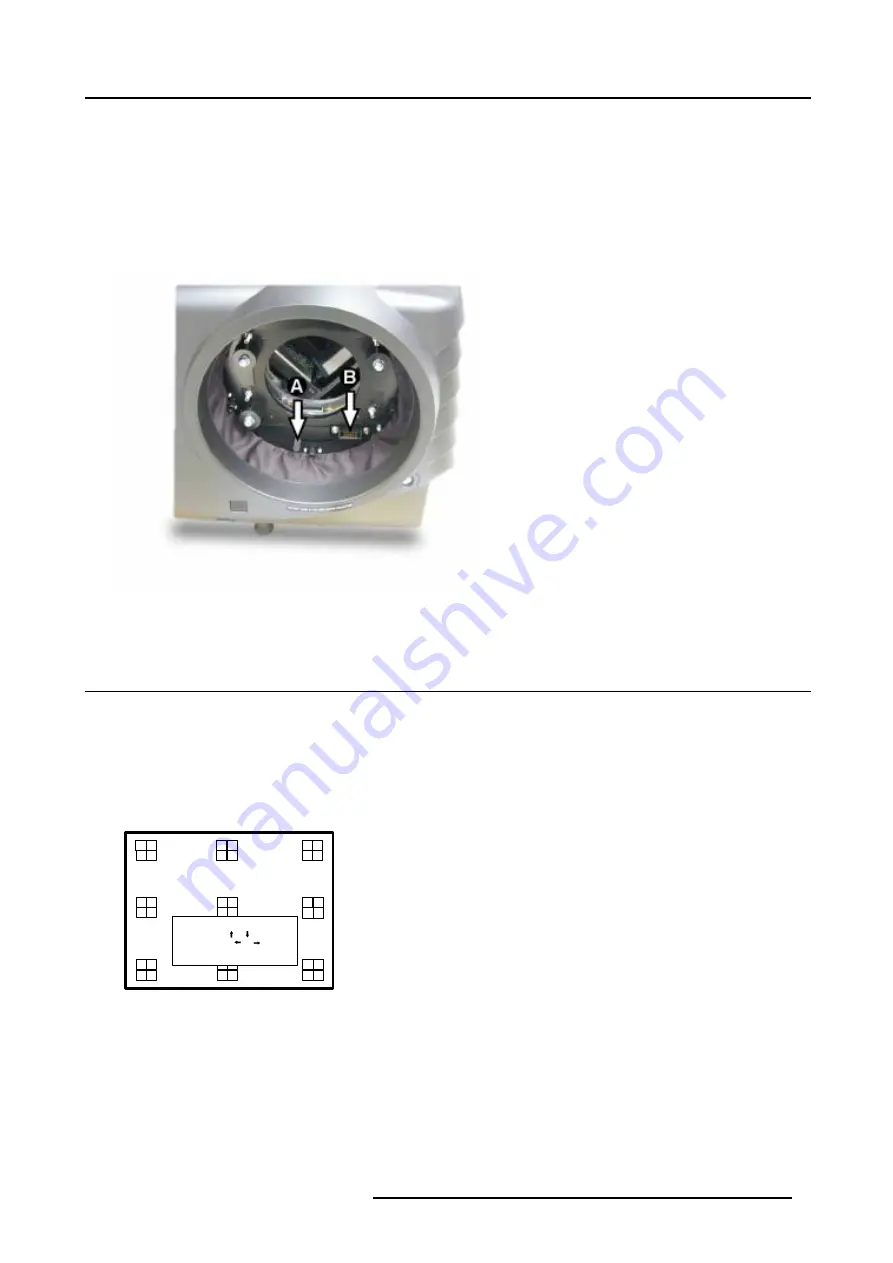
How to install the new lens?

To install the lens, follow the next procedure:
1. Take the lens assembly out of its packing material and remove the lens caps on both sides.

2. Move the handle (A) of the lens anchor system to the right. (image 1-4)

3. Push the lens, motors at the top, in the lens block gap horizontally, lining up the motor connector on the lens with the connector

on the lens block (B), until the lens clicks in the lens anchor system.

Caution:

For a table mounted projector, hold the projector when pushing the lens into the lens block to avoid sliding off from
the table.

Image 1-4
Lens installation

1.4 Quick Lens Adjustment

Quick zoom/focus adjustment

1. Press the Selection key

*

, Barco key.

The zoom/focus menu will be displayed. (image 1-5)

2. Push the cursor key

or

to zoom and

or

to focus the image.

3. When finished, press

EXIT

key to return or

ENTER

to continue to the shift adjustment.

LENS ADJUSTMENT ZOOM/FOCUS

ZOOM with     or     ,
FOCUS with       or 
<ENTER> to shift
<EXIT> to return

Image 1-5

R5976663 TLD HB (1.6-2.0:1) LENS KIT 14102003

5

Содержание R9842060

Страница 1: ...BARCPROJECTION TLD HB 1 6 2 0 1 LENS KIT R9842060 INSTALLATION MANUAL 14102003 R5976663 00...

Страница 2: ...0 Fax 32 56 36 88 24 E mail events barco com Visit us at the web www barco com Barco nv Intelligent Displays Noordlaan 5 8520 Kuurne Phone 32 56 36 82 11 Fax 32 56 35 86 51 E mail presentations bid ba...

Страница 3: ...ically made to the information in this publication these changes are incorporated in new editions of this publication Copyright All rights reserved No part of this document may be copied reproduced or...

Страница 4: ......

Страница 5: ...TS 1 TLD HB 1 6 2 0 1 Lens Kit 3 1 1 Kit Contents 3 1 2 Removing the installed lens 3 1 3 Installing the new lens 4 1 4 Quick Lens Adjustment 5 1 5 Lens Formulas 6 1 6 Cleaning the lens 7 R5976663 TLD...

Страница 6: ...Table of contents 2 R5976663 TLD HB 1 6 2 0 1 LENS KIT 14102003...

Страница 7: ...jector Necessary Tools No tools necessary Risk of personal injury Instructions for lens installation must be followed thoroughly How to remove the installed lens To remove the lens follow the next pro...

Страница 8: ...he lens out of the lens block 1 3 Installing the new lens What has to be done This new lens has to be installed on the SLM series projector Necessary Tools No tools necessary Risk of personal injury I...

Страница 9: ...lens clicks in the lens anchor system Caution For a table mounted projector hold the projector when pushing the lens into the lens block to avoid sliding off from the table Image 1 4 Lens installation...

Страница 10: ...rmulas PD SW Screen Height Image Height PD Projector Distance distance between screen and projector Projector Screen Image 1 7 To calculate the distance between the projector frontside and the screen...

Страница 11: ...pe lenses with a CLEAN TorayseeTM cloth 2 Always wipe lenses in a single direction Warning Do not wipe back and forwards across the lens surface as this tends to grind dirt into the coating 3 Do not l...

Страница 12: ...1 TLD HB 1 6 2 0 1 Lens Kit 8 R5976663 TLD HB 1 6 2 0 1 LENS KIT 14102003...

Страница 13: ...aan 5 B 8520 Kuurne Phone 32 56 36 89 70 Fax 32 56 36 88 24 E mail antoon dejaegher barco com Web www barco com From Date Please correct the following points in this documentation R5976663 00 page wro...

Отзывы: