

SEL
ESC
Adjust
2
3
6
1
5
4
SDI
LOGO
FRZ
BLACK
TAKE
Effects
PDS-
902
PROGRAM:
RGB
NEXT:
SDI
NTSC (480i)
Inputs
7
8
Quick Setup and Operations
1
Connect Power
— Ensure that power is properly
connected to the PDS. (Chapter 3,
“Cable and
Adapter Information”)
2
5
6
Barco, Inc.
Connect Outputs
— Connect the output(s) of the
PDS to your projector(s) or other target devices.
(Chapter 3,
“Signal Installation”)
Power On
— Turn on power to the PDS, your
projector(s), and to all peripheral equipment.
(Chapter 4,
“Power-Up Initialization”)
8
Set Output Format
— Set the desired output
resolution and frame rate. (Chapter 4,
“Output
Format”)
9
Save Output Configuration
— After completing all
output adjustments, save the output configuration.
(Chapter 4,
“Save Config”)
11
Enable Test Pattern
— Turn on a test pattern, verify
an image, and adjust as required. When complete,
turn off the pattern. (Chapter 4,
“Test Pattern”)
Select and Adjust Input
— Select an input, and
perform the necessary image adjustments. (Chapter
4,
“Input Menu”)
12
Adjust System Parameters
— Adjust parameters
such as transition time, display brightness, user prefs.
(Chapter 4,
“User Preference Menu,” “System Menu”)
13
14
3
4
Repeat for Each Input
— Repeat steps 10 and
11 for each input that you have connected to the
PDS.
10
Save System Configuration
— After completing all
system adjustments, save the system configuration.
(Chapter 4,
“Save System State”)
15
Ready to Roll
— With all output, input and system
configurations saved, press the desired input button,
and press
TAKE
.
16
7
Connect Inputs
— Connect all analog, DVI, and
SDI input sources to the PDS. (Chapter 3,
“Signal
Installation”)
Launch GUI
— (Optional) Connect your laptop to the
PDS, log onto the PDS using its IP address, and
launch the GUI. (Chapter 5,
“GUI Operations”)
Save Input Configuration
— After completing all
adjustments for an input, save the input configuration.
(Chapter 4,
“Save Config”)
Enable Remote Control
— (Optional)
Connect
Ethernet or Serial communications, and issue desired
commands. (Appendix B,
“Remote Control”)
P/N 26-1204004-00 Rev 01
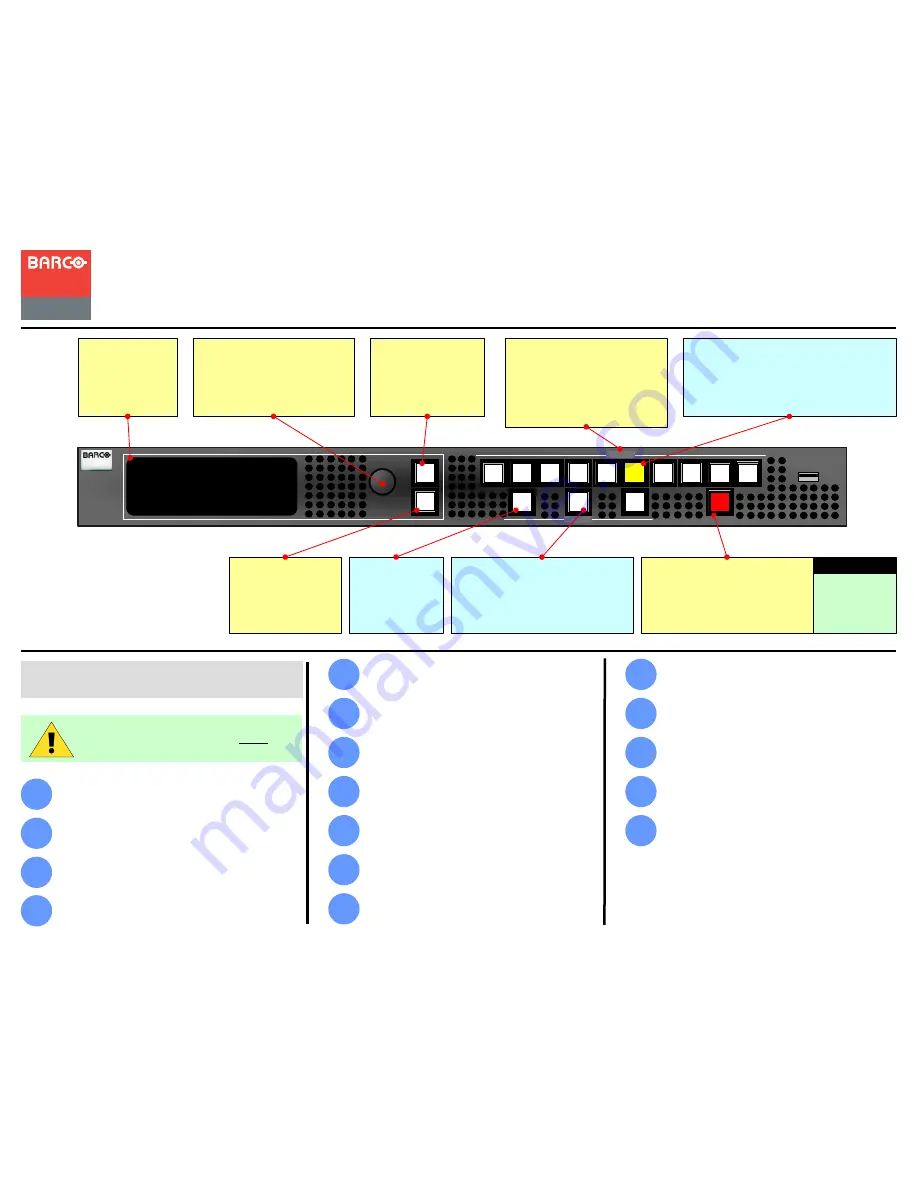
Inputs Section
Sources 1-4
: Analog
Sources 5-8*
: DVI or Analog
SDI
: 3G/HD/SD-SDI
LOGO
: Full screen capture
* (sources 7-8 not on PDS-701)
Menu Display
Use
ADJUST
knob,
plus
SEL
and
ESC
buttons to navigate
menus.
Adjust
•
Counter-clockwise
:
scroll down
menu tree, or decrement values.
•
Clockwise
: scroll up menu tree,
or increment values.
SEL
Press to enter a menu,
change or accept a
parameter, or answer
“
Yes
” to a query.
ESC
Press to exit a menu
without making changes,
cancel an operation, or
answer “
No
” to a query.
FRZ
Press to freeze or
un-freeze current
Program source.
Lit solid
= frozen.
Button States
Off
: Input not selected
Blinking
:
Input “pending” for transition
Lit solid
: Input on Program
BLACK
Press to pend or initiate a black transition.
Black Auto Take
mode affects function
(User Preferences).
Blinking
= Pending.
Lit solid
= Black on Program.
TAKE
Press to mix the selected input
to Program, or to execute a pending
black transition. Use the
Setup Menu
to adjust the transition time.
NOTE
After each
TAKE
, Program
and pending
sources flip-flop.
Factory Reset
– When using a PDS for the first
time, perform a factory reset. (Chapter 4,
“Factory Reset Menu”)
The following list summarizes PDS setup and
operations. For error-free installation, always
refer to the listed section in the User’s Guide.
PDS Series
Quick Start Guide
Visibly yours
Toll Free:
Fax:
Technical Support:
Website:
+1 (888) 414-7226
+1 (916) 859-2515
+1 (866) 374-7878
www.barco.com


