background image

3. Display installation

Image 3-1

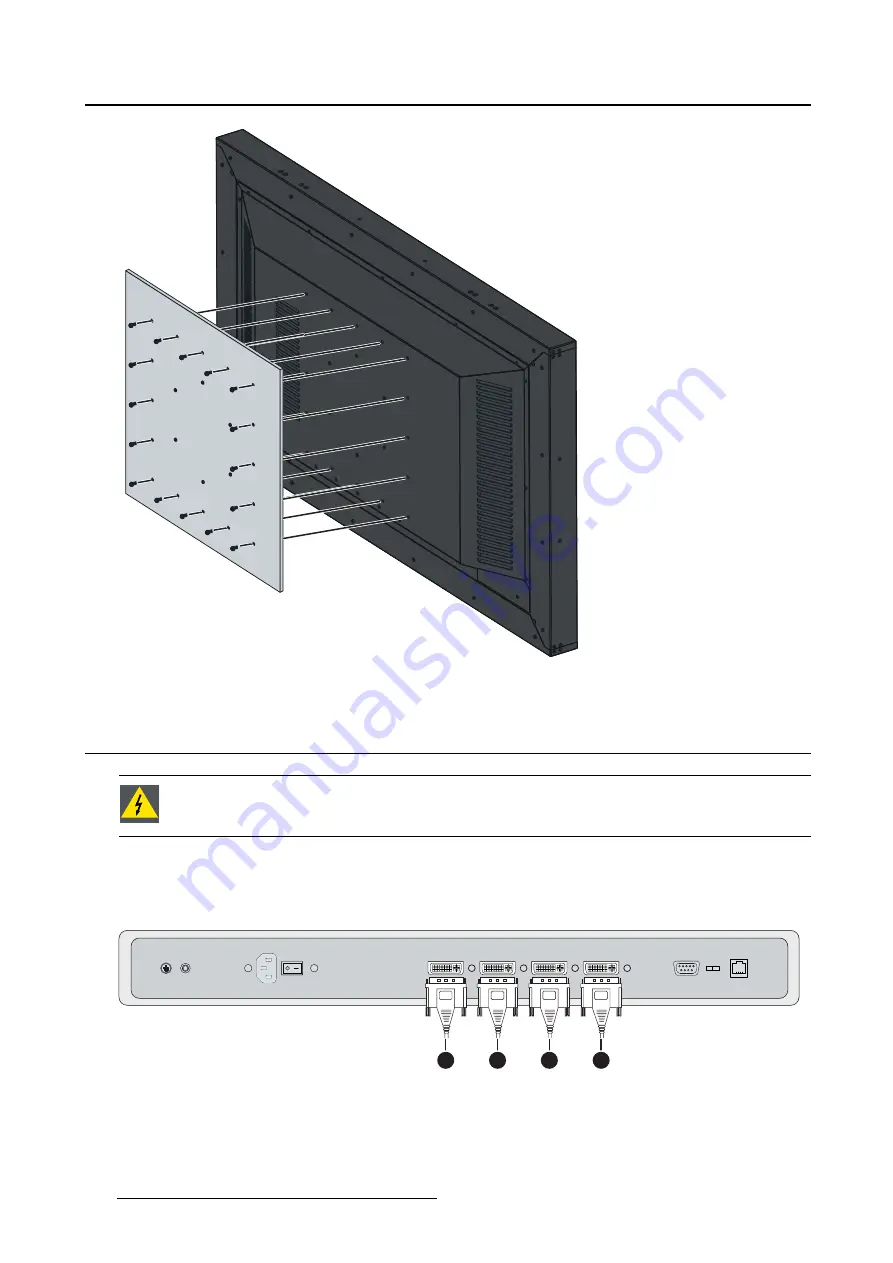
3.3

Video input connection

W

ARNING

:

When the display is assembled in the medical system, take care of the an-

chorage of all cables, to avoid unwanted detachment.

To connect the video inputs

1. Connect the available video source(s) to the corresponding video inputs using the appropriate video

cable(s).

1

2

3

4

Image 3-2

2. Select the input via OSD or RS-232

14

(451920611502) K5902088 MDSC-8258 08/09/2014

Содержание MDSC-8258

Страница 1: ...MDSC 8258 User Guide 451920611502 K5902088 01 08 09 2014 ...

Страница 2: ...Barco nv President Kennedypark 35 8500 Kortrijk Belgium Phone 32 56 23 32 11 Fax 32 56 26 22 62 Support www barco com esupport Visit us at the web www barco com Printed in Belgium ...

Страница 3: ...OSD menu activation 18 4 5 OSD menu navigation 18 4 6 Enter password 19 5 Advanced operation 21 5 1 Monitor info 21 5 2 Input channel menu 21 5 2 1 Act Input 21 5 2 2 Out power 21 5 3 Out Mode menu 22 5 3 1 Transfer function 22 5 4 User setting menu 23 5 4 1 User setting DICOM 23 5 4 2 User setting COLOR 23 5 4 3 User setting RGB SET 24 5 5 OSD setting menu 24 5 5 1 Horizontal Vertical position 24...

Страница 4: ...Table of contents 6 8 Technical specifications 34 6 9 Open source license information 37 A Appendix A 39 A 1 RS 232 protocol 39 2 451920611502 K5902088 MDSC 8258 08 09 2014 ...

Страница 5: ...gle the high brightness level the backlight stabiliza tion the grayscale correction and the compliance with the DICOM standards will help the users avoiding misinterpretation in medical diagnosis The MDSC 8258 is also suitable for viewing a large range of contents as color temperature and color gamma adjustments are provided The display can also be controlled by remote through a serial or Eth erne...

Страница 6: ...user during the installation set up and utilization of the MDSC 8258 display Depending on the specific version that has been purchased some of the features and options described in this document may not apply to the display in user s hands 4 451920611502 K5902088 MDSC 8258 08 09 2014 ...

Страница 7: ... 2 PARTS CONTROLS AND CONNECTORS 2 1 Front view Overview 1 2 3 4 5 Image 2 1 1 Power On Off 2 Enter key 3 Down key 4 Up key 5 Esc key A 5 key keypad is located on the bottom of the display 451920611502 K5902088 MDSC 8258 08 09 2014 5 ...

Страница 8: ...VESA mount screw holes 2 Connector location 2 3 Connector view Overview 1 2 5 7 9 11 3 13 12 6 8 10 4 Image 2 3 1 Protective earth pin 2 Input power connector 3 DVI D dual link connector 4 4 5Vout connector 5 DVI D dual link connector 3 6 451920611502 K5902088 MDSC 8258 08 09 2014 ...

Страница 9: ...cted with the nearest jack but every pair is indepen dent 500mA max If a DVI pair is disabled see Out power page 21 then there is no power on the con nector and the jack connected to the DVI connector 2 4 Connector pin assignments 2 4 1 DVI 1 connector Overview Image 2 4 Pin Function 1 D2_Rx T M D S 2 D2_Rx T M D S 3 GND data 2 shield 4 D4_RX T M D S 5 D4_RX T M D S 6 SCL for DDC 7 SDA for DDC 8 N...

Страница 10: ...Rx T M D S 2 D2_Rx T M D S 3 GND data 2 shield 4 D4_RX T M D S 5 D4_RX T M D S 6 SCL for DDC 7 SDA for DDC 8 N C 9 D1_Rx T M D S 10 D1_Rx T M D S 11 GND data 1 shield 12 D3_RX T M D S 13 D3_RX T M D S 14 5V input form the video source system 15 GND 16 5V Power for DVI extenders 17 D0_Rx T M D S 18 D0_Rx T M D S 19 GND data 0 shield 20 D5_RX T M D S 21 D5_RX T M D S 22 GND clock shield 23 CK_Rx T M...

Страница 11: ...M D S 11 GND data 1 shield 12 D3_RX T M D S 13 D3_RX T M D S 14 5V input form the video source system 15 GND 16 5V Power for DVI extenders 17 D0_Rx T M D S 18 D0_Rx T M D S 19 GND data 0 shield 20 D5_RX T M D S 21 D5_RX T M D S 22 GND clock shield 23 CK_Rx T M D S 24 CK_Rx T M D S 2 4 4 DVI 4 connector Overview Image 2 7 Pin Function 1 D2_Rx T M D S 2 D2_Rx T M D S 3 GND data 2 shield 451920611502...

Страница 12: ... 15 GND 16 5V Power for DVI extenders 17 D0_Rx T M D S 18 D0_Rx T M D S 19 GND data 0 shield 20 D5_RX T M D S 21 D5_RX T M D S 22 GND clock shield 23 CK_Rx T M D S 24 CK_Rx T M D S 2 4 5 RS232 connector Overview Image 2 8 Pin Function 1 Not connected 2 Rx driven by host 3 Tx driven by display 4 Not connected 5 Ground 6 Not connected 7 Not connected 8 Not connected 9 Not connected 10 451920611502 K...

Страница 13: ...wo brackets are only used for transportation and installation purposes To mount and use the hoist bracket to the display 1 Mount the brackets to the display using the screws provided in the accessory kit Verify that the screwing operation is well done using a torque value of 4N m 2 Move your display as shown on the picture below 451920611502 K5902088 MDSC 8258 08 09 2014 11 ...

Страница 14: ...3 Display installation 3 After transportation you can remove the brackets and the 8 mounting holes can be closed with 8 plastic caps 12 451920611502 K5902088 MDSC 8258 08 09 2014 ...

Страница 15: ...ION The monitor VESA interface has been designed for a safety factor 6 to sup port 6 times the monitor weight In the medical system use an arm with suitable safety factor IEC60601 1 To mount the display to an arm stand 1 Attach the mounting arm or stand firmly to the panel using 6 screws M6 Screw insert can be maximum 11 mm and minimum 8 mm 451920611502 K5902088 MDSC 8258 08 09 2014 13 ...

Страница 16: ...system take care of the an chorage of all cables to avoid unwanted detachment To connect the video inputs 1 Connect the available video source s to the corresponding video inputs using the appropriate video cable s 1 2 3 4 Image 3 2 2 Select the input via OSD or RS 232 14 451920611502 K5902088 MDSC 8258 08 09 2014 ...

Страница 17: ...the power supply 1 Connect the power cord set into the AC power adapter 2 Plug the power connector of the adapter into the power port of the display Image 3 3 3 The MDSC 8258 display is provided with an additional protective earth pin if necessary connect the earth pin to a grounded outlet by means of an AWG18 max 6ft 1 8m long wire 451920611502 K5902088 MDSC 8258 08 09 2014 15 ...

Страница 18: ...3 Display installation 16 451920611502 K5902088 MDSC 8258 08 09 2014 ...

Страница 19: ... when the display needs to come out of this mode by pushing the power on off key To change the status of your display 1 Activate the power through the switch located on the back side of the display 2 While your display is off press the Power On Off key once for 3 seconds The display goes into On Line status If no valid input is detected the display will go into standby mode To switch on off your d...

Страница 20: ... As a result the OSD main menu comes up If no further actions are taken within the following 30 seconds the OSD menu will disappear again The time out of the OSD menu automatic close function can be adjusted or disabled in the OSD menu OSD Time out The OSD menu position can be adjusted in the OSD menu OSD Hor Pos and OSD Vert Pos The OSD menu can be password protected see Key lock page 26 To enter...

Страница 21: ... menu is password protected see Key lock page 26 ENTER PASSWORD _ _ _ _ 3 Enter the password by using the four right keys of the keyboard you can label the four keys as 1 2 3 and 4 from left to right So if i e keycode is 4444 it means you have to press four time the Esc key 1 2 3 4 If the inserted password is not correct the following message appears on the screen WRONG PASSWORD The default passwo...

Страница 22: ...4 Daily operation 20 451920611502 K5902088 MDSC 8258 08 09 2014 ...

Страница 23: ... menu 3 Enter the Monitor info submenu The different information items are shown 5 2 Input channel menu Overview Act Input Out power 5 2 1 Act Input About Act Input Possibility to select one of the two input pairs 1 3 or 2 4 To select an input 1 Bring up the OSD main menu 2 Navigate to the Input Channel menu 3 Enter the Input Channel menu 4 Navigate to the Act Input submenu 5 Enter the Act Input s...

Страница 24: ...cording to the color temperature pre setted in the factory This setting can be set from 2000 K to 12000 K in steps of 100 K see User setting COLOR page 23 COLOR User The monitor output is corrected according to the color temperature selected by the user This setting can be set from 2000 K to 12000 K in steps of 100 K see User setting COLOR page 23 Monitor calibration is pre setted in the factory b...

Страница 25: ... main menu 2 Set the Out Mode to DICOM User see Out Mode menu page 22 3 Navigate to the User Setting menu 4 Enter the User Setting submenu 5 Change the DICOM offset as desired with the Up Down keys and confirm 5 4 2 User setting COLOR About user setting COLOR There are two user settings for Color Color Temp The current color temperature can be set from 2000 K to 12000 K in steps of 100 K Gamma Com...

Страница 26: ...Setting menu 4 Enter the User Setting submenu 5 Change the Gamma comp and or Color Level and or Black Level as desired with the Up Down keys and confirm 5 5 OSD setting menu 5 5 1 Horizontal Vertical position About horizontal vertical position This setting allows to adjust the horizontal vertical position of the OSD menu on the screen Moving the OSD menu across the center of the display the OSD wi...

Страница 27: ...able the display will not go in stand by mode while there is no valid input If a valid signal is applied to the monitor it will automatically turn on To change the horizontal vertical position 1 Bring up the OSD main menu 2 Navigate to the OSD Setting menu 3 Enter the OSD Setting submenu 4 Navigate to the TIME OUT LCD submenu 5 Enter the TIME OUT LCD submenu 6 Change the time out of the LCD as des...

Страница 28: ...his allows to enable the key lock at different menu levels If enabled entering the OSD menu will display a Request for password window The password is made up by four characters The possible options are OFF Key lock is disabled no password is required at any level SERVICE Password is required entering at Service sub menu level FULL Password is required entering at Main menu level To change key loc...

Страница 29: ...uipment Equipment primarily for use in a health care facility that is intended for use where contact with a patient is unlikely no applied part The equipment may not be used with life support equipment The user should not touch the equipment nor its signal input ports SIP signal output ports SOP and the patient at the same time Mission critical applications We strongly recommend there is a replace...

Страница 30: ... sides of the cupboard Installation Place the equipment on a flat solid and stable surface that can support the weight of at least 3 equip ments If you use an unstable cart or stand the equipment may fall causing serious injury to a child or adult and serious damage to the equipment Do not allow to climb or rest on the equipment When adjusting the angle of the equipment move it slowly so as to pre...

Страница 31: ...ävä suojamaadoituskoskettimilla varustettuun pistorasiaan Norway Apparatet må tilkoples jordet stikkontakt Sweden Apparaten skall anslutas till jordat uttag 6 2 Environmental information Disposal Information Waste Electrical and Electronic Equipment This symbol on the product indicates that under the European Directive 2012 19 EU governing waste from electrical and electronic equipment this produc...

Страница 32: ... Barco s product may contain The RoHS of Chinese Mainland is included in the MCV standard of the Ministry of Information Industry of China in the section Limit Requirements of toxic substances in Electronic Information Products 零件项目 名称 Component name 有毒有害物质或元素 Hazardous substances and elements 铅 Pb 汞 Hg 镉 Cd 六价铬 Cr6 多溴联苯 PBB 多溴二苯 醚 PBDE 印制电路配件 Printed Circuit Assemblies X O O O O O 液晶面板 LCD panel ...

Страница 33: ...tronic equip ment According to what declared by our components suppliers this product is RoHS compliant 6 3 Biological hazard and returns Overview The structure and the specifications of this device as well as the materials used for manufacturing makes it easy to wipe and clean and therefore suitable to be used for various applications in hospitals and other medical environments where procedures f...

Страница 34: ...use harmful interference in which case the user will be required to correct the interference at his own expense Canadian notice This ISM device complies with Canadian ICES 001 Cet appareil ISM est conforme à la norme NMB 001 du Canada 6 5 Cleaning and disinfection Instructions Be sure to unplug the power cord from the mains when cleaning your LCD monitor Take care not to scratch the front surface ...

Страница 35: ...approved according to the VCCI regulations Indicates the device is approved according to the KC regulations Indicates the device is approved according to the BSMI regulations Indicates the USB connectors on the device Indicates the DisplayPort connectors on the device Indicates the manufacturing date Indicates the temperature limitations1 for the device to safely operate within specs Indicates the...

Страница 36: ...ensee No other use duplication or disclosure of a Barco software product in any form is authorized The specifications of Barco products are subject to change without notice Trademarks All trademarks and registered trademarks are property of their respective owners Copyright notice This document is copyrighted All rights are reserved Neither this document nor any part of it may be reproduced or cop...

Страница 37: ...weight packaged 68 5 83 kg depending on version Mounting standard VESA 400 mm Screen protection Protective non reflective glass cover Recommended modalities Endoscopy Laparoscopy PACS PM US CT MR Certifications MDD 93 42 EEC amended by 2007 47 EC Class I IEC 60601 1 2005 CORR 1 2006 CORR 2 2007 EN 60601 1 2006 UL 60601 1 1st Edition 2006 04 26 ANSI AAMI ES 60601 1 3rd edition 2005 EN 60601 3rd edi...

Страница 38: ...6 Important information Dimensions 145 8 75 776 1318 5 459 25 459 25 400 200 400 200 188 188 Image 6 2 Dimensions MDSC 8258 36 451920611502 K5902088 MDSC 8258 08 09 2014 ...

Страница 39: ...source code is available on request by contacting your Barco customer support representative EACH SEPARATE OPEN SOURCE SOFTWARE COMPONENT AND ANY RELATED DOCUMENTA TION ARE PROVIDED AS IS WITHOUT EXPRESS OR IMPLIED WARRANTY INCLUDING BUT NOT LIMITED TO THE IMPLIED WARRANTIES OF MERCHANTABILITY AND FITNESS FOR A PARTICU LAR PURPOSE IN NO EVENT SHALL THE COPYRIGHTHOLDER OR ANY OTHER CONTRIBUTOR BE L...

Страница 40: ... assignee s as may be identified in the respective doc umentation source code README file or otherwise You shall not remove or obscure or otherwise alter the respective copyrights You acknowledge living up to the conditions of each separate Open Source Software license A list of the Open Source Software components used is available in the applicable EULA through the customer section of the Barco w...

Страница 41: ...the ASCII code 15 hex CR stands for the ASCII code 0D hex LF stands for the ASCII code 0A hex 1a Get Current Backlight Brightness PC monitor ESC b monitor PC string ACK where string is a 3 character ASCII string with the current backlight brightness example 300 1b Set Backlight Brightness PC monitor ESC b string monitor PC ACK where string is a 3 character ASCII string with the desired backlight b...

Страница 42: ...cter Keylock 0 zero Disable 1 Enable 4a Get Current Transfer Function PC monitor ESC O CR monitor PC character CR LF where character has the following meaning character Current Transfer Function 0 zero NATIVE 1 DICOM Factory 2 DICOM User 3 COLOR Factory 4 COLOR User 5 USER LUT 6 RGB COLOR A K T from 2000 to 12000 the character O in the command sequence is the letter o in uppercase 4b Set Transfer ...

Страница 43: ...ardware Release PC monitor ESC r1 CR monitor PC string CR LF where string is an ASCII string with the hardware release example VEGA LP1 5d Get Firmware Release PC monitor ESC r2 CR monitor PC string CR LF where string is an ASCII string with the firmware release example FW 1 05 5e Get Hardware Release PC monitor ESC r3 CR monitor PC string CR LF where string is an ASCII string with the FPGA releas...

Страница 44: ...ure status PC monitor ESC sT CR monitor PC string CR LF where string is an ASCII string with the temperature sensor status example OK 7d Error s pending PC monitor ESC sK CR monitor PC string CR LF where string could be NO ERRORS FOUND or a list of founded errors 8 Keylock code PC monitor ESC v monitor PC ACK where is a number between 1 and 4has the following meaning character key 1 ENTER 2 3 4 Es...

Отзывы: