background image

30 _______________________________________________________ Barco - LC-5621 - User manual

Operation

7.1.2

IR control

7.1.2.1

Location of the primary controls on the IR control

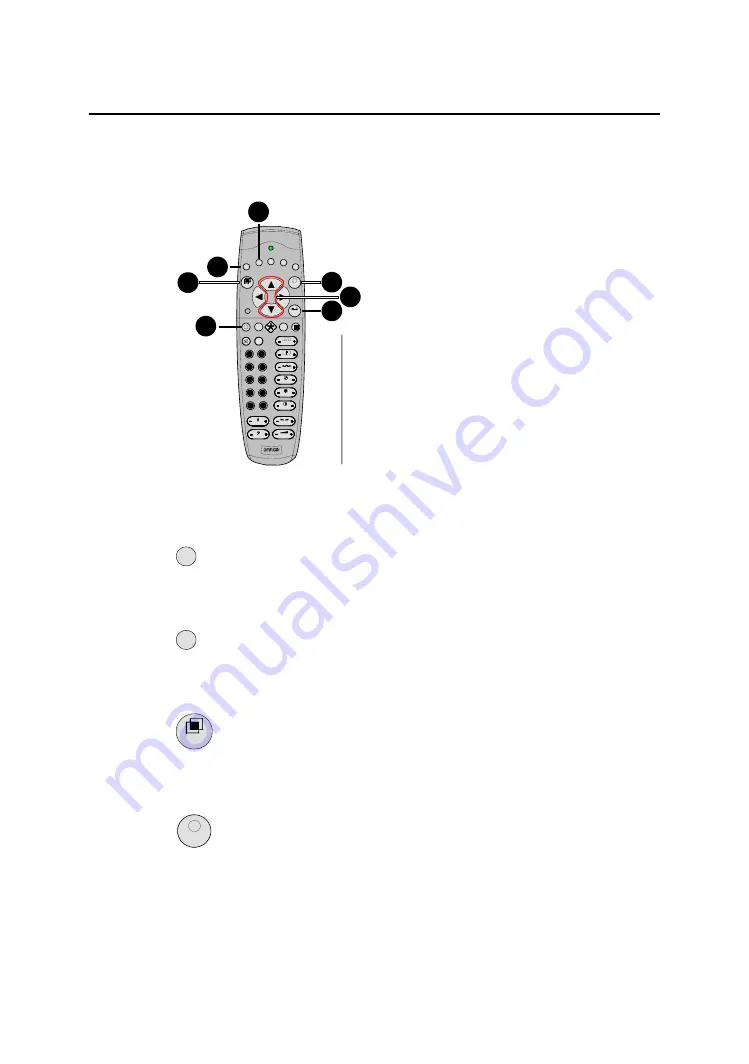
 Figure 8: Location of the primary controls on the IR control

7.1.2.2

F1 button (IR control)

Pressing this button adjusts the gamma settings of the display.

7.1.2.3

F2 button (IR control)

Pressing this button shows information on the display.

7.1.2.4

ADJ button (IR control)

Pressing this button will activate the OSD menu.

7.1.2.5

Exit button (IR control)

Pressing this button when the OSD menu is activated will close the OSD menu.

BALANCE

VOL

TREBLE

BASS

COLOR

BRIGHTN

COLOR

TINT

SHARPN

PHASE

?

3

1

8

7

6

2

4

9

5

0

ENTER

EXIT

F5

F4

F3

F2

F1

ADJ

PAUSE

TEXT

1

2

3

6

5

7

1
2
3
4
5
6
7

F1 (Source)
F2 (Mode)
ADJ (Menu)
EXIT (Menu)
ENTER (Enter)
Stand-by
Up/Down

4

F1

F2

ADJ

EXIT

Содержание LC-5621

Страница 1: ...LC 5621 56 quad full HD LCD display User manual K5960013 00...

Страница 2: ...2 ________________________________________________________ Barco LC 5621 User manual Intentionally left blank...

Страница 3: ...be installed and connected into the system It incorporates the pin layout of all the connectors Chapter 7 Operation This chapter describes the function and the general operation of all function keys...

Страница 4: ...in this manual provide information which if not adhered to may result in personal injury or death CAUTION Cautions presented in this manual provide information which if not adhered to may result in d...

Страница 5: ...th the limits of an FCC class refer to the technical specifications of the specific unit for more details about the corresponding class These limits are designed to provide reasonable protection again...

Страница 6: ...this book may be reproduced in any form by print photo printing microfilm or any other means without written permission from Barco NV This manual could include inaccuracies or typographical errors Man...

Страница 7: ...cteristics are often not evident from visual inspection nor can the protection afforded by them necessarily be obtained by using replacement components rated for higher voltage wattage etc Replacement...

Страница 8: ...o different time rules by sea the protest has to be issued against the captain and or ship within 3 days of the delivery of the goods by road the protest has to be issued against the last road carrier...

Страница 9: ...show large amounts of data in ultimate detail Faster response time Thanks to its extremely fast response time 6 5 ms gray to gray the LC 5621 reproduces fast moving action scenes with vivid accuracy W...

Страница 10: ...er or tissue paper Use non aggressive glass cleaning products instead Do NOT use alcohol sol vents at higher concentration 5 Avoid displaying fixed patterns on the display for long periods of time to...

Страница 11: ...unit is standard mounted on two stands on the rear of the unit The stands use the VESA mounting holes foreseen in the unit The stands can be mounted on two ways as shown in the drawing below Figure 1...

Страница 12: ...olution The LC 5621 can be mounted on an arm compliant to the VESA MIS F 800 400 8 standards The LC 5621 can also be mounted on a wall or ceiling according to the VESA MIS F 800 400 8 standards Figure...

Страница 13: ...________________________ 13 Installation 6 2 Connecting the signals 6 2 1 Connector location Figure 3 Connector location LC 5621 1 2 3 4 5 6 1 2 3 4 5 6 DVI D connector Master RS 232 connector DVI D c...

Страница 14: ...anging Automatic selection between the following voltage ranges 90Vac 140Vac 100V and 115V nominal 180Vac 264Vac 230V nominal Frequency 45 65Hz Mains Fuse inside the unit T 6 3 A H for fuse replacemen...

Страница 15: ...TMDS Data 2 2 TMDS Data 2 3 TMDS Data 2 4 Shield 4 TMDS Data 4 5 TMDS Data 4 6 DDC Clock 7 DDC Data 8 NC 9 TMDS Data 1 10 TMDS Data 1 11 TMDS Data 1 3 Shield 12 TMDS Data 3 13 TMDS Data 3 14 5V Power...

Страница 16: ...__________________________ Barco LC 5621 User manual Installation 6 2 2 3 Control connector 9 pins subD male connector layout Control pinning Pin signal 1 Nc 2 Signal receive 3 Signal transmit 4 Nc 5...

Страница 17: ...FX 4600 PC compatible with Intel Pentium or AMD Opteron class processor or higher Open PCI Express x16 lane slot with open adjacent slot Microsoft Windows XP 1 GB system memory 100 MB of available dis...

Страница 18: ...ading the correct drivers NOTE Before you install the LC 5621 use an additional LCD monitor to install the drivers to the workstation First the correct driver should be installed on your system Go to...

Страница 19: ...the checkbox and push the Download Now button Now the driver should be downloaded on your system 6 3 1 4 Installing the drivers Install the driver of the NVIDIA Quadro FX 4600 by double clicking the...

Страница 20: ...20 _______________________________________________________ Barco LC 5621 User manual Installation Click Next Following screen appears on the screen click Next to install the drivers to your computer...

Страница 21: ...____________________________________________________ 21 Installation Select Yes I want to restart my computer now Click Finish It is possible that the computer doesn t restart automatically If needed...

Страница 22: ...21 Put DVI D Master of the unit to the master DVI connector on the graphics card closest to the motherboard Put DVI D Slave of the unit to the slave DVI connector on the graphics card furthest from th...

Страница 23: ...LC 5621 User manual _______________________________________________________ 23 Installation Select Custom setup and click Next Following screen appears on the screen Select Color LCD 1 of 2 and click...

Страница 24: ...___________________________ Barco LC 5621 User manual Installation Following screen appears on the screen Select the screen resolution and Color quality as shown on the image above Click Next Followin...

Страница 25: ...Barco LC 5621 User manual _______________________________________________________ 25 Installation Click Next Following screen appears on the screen Choose Span and click Next...

Страница 26: ..._________________________________________ Barco LC 5621 User manual Installation Following screen appears on the screen Click Finish Now the left side of the unit and the right side of the unit show t...

Страница 27: ...talled The unit can be attached directly to the workstation Connect the unit with the master DVI D connector to the master DVI connector of the graphics card This is the DVI connector closest to the m...

Страница 28: ...trols of the LC 5621 7 1 1 2 Standby button Pressing this button puts the display in standby mode Standby mode means that the power to the LCD panel and backlight is disabled and that all power consum...

Страница 29: ...7 1 1 5 Enter button Pressing this button enables the user to select activate the menu item when the OSD menu is activated 7 1 1 6 Up Down buttons Pressing this buttons will navigate the cursor throu...

Страница 30: ...the display 7 1 2 3 F2 button IR control Pressing this button shows information on the display 7 1 2 4 ADJ button IR control Pressing this button will activate the OSD menu 7 1 2 5 Exit button IR cont...

Страница 31: ...means that the power to the LCD panel and backlight is disabled and that all power consumption is reduced to a strict minimum The display turns black To bring the unit out of this mode press the butt...

Страница 32: ...32 _______________________________________________________ Barco LC 5621 User manual Operation 7 1 3 2 Power LED Led indicator Mode Orange Standby Green In operation...

Страница 33: ...LC 5621 User manual _______________________________________________________ 33 Operation 7 2 Adjusting display settings 7 2 1 Overview of the on screen display Figure 10 Overview of the on screen dis...

Страница 34: ...nu closes the OSD Changing a value Press or to select the desired line If the line displays a value that can be modified 3 Press and change the value with or keys Executing a command Go to the desired...

Страница 35: ...igure 11 Main menu The main menu enables the user to scroll through the different menu items of the display 7 2 2 3 Brightness menu Figure 12 Brightness menu To enter the brightness menu push The brig...

Страница 36: ...push The contrast bar becomes visible Push or to increase decrease the contrast value Contrast can be adjusted from 0 to 100 The default value for contrast is 50 7 2 2 5 Gamma menu Figure 14 Gamma men...

Страница 37: ...ent color temperatures can be set One can choose between following color temperatures 5600K 6500K 7500K 8500K 9300K 7 2 2 7 User color menu Figure 16 User color menu To enter the user color menu push...

Страница 38: ...system information such as horizontal frequency HF vertical frequency VF resolution Res model number Mdl firmware version MVer FPGA version FVer and runtime hours Hrs 7 2 2 9 Fan status menu Figure 1...

Страница 39: ...e menu The language of the OSD menus can be set in this menu The different languages that one can choose are English German Spanish Italian Japanese 7 2 2 11 Misc menu Figure 20 Misc menu One can rese...

Страница 40: ...connector for bent or pushed in pins Ensure the DVI input mode is set to digital when the MAC digital output is connected to the DVI I connector Image persistence Image persistence is when a residual...

Страница 41: ...44 16 x 699 84 mm 48 98 x 27 55 3 1427 48 mm 56 2 diagonal 9 1 2 2 Screen specifications 16 8 million colors 256 gray scales Typical viewing angle 3 Horizontal 176 Vertical 176 CR 30 9 1 2 3 Light out...

Страница 42: ...en 5600K 6500K 7500K 8500K 9300K or USER Typical CIE coordinates are mentioned in the table below CIE 1931 x y coordinates are measured 9 1 2 7 Response time at 25 C ambient Rise time black to white t...

Страница 43: ...ng Pin signal 1 TMDS Data 2 2 TMDS Data 2 3 TMDS Data 2 4 Shield 4 TMDS Data 4 5 TMDS Data 4 6 DDC Clock 7 DDC Data 8 NC 9 TMDS Data 1 10 TMDS Data 1 11 TMDS Data 1 3 Shield 12 TMDS Data 3 13 TMDS Dat...

Страница 44: ...ication 9 1 4 1 115 Vac 220 Vac 50 60 Hz supply Nominal voltage 115 Vac or 220 Vac Operates between 85 Vac 264 Vac Frequency range 50 60 Hz 9 1 4 2 Power consumption Pmax 500 W 9 1 4 3 Safety Unit mee...

Страница 45: ...he IR control This information is also accessible form the host processor through the RS 232 interface according to the BARCO remote protocol 9 1 5 2 Controls The controls of the monitor are located o...

Страница 46: ...7 lbs 9 2 3 Mounting specifications 9 2 3 1 VESA compliant mounting solution The LC 5621 is standard mounted on a stand The unit is foreseen with mounting holes to be mounted on a vesa arm or wall wit...

Страница 47: ...er manual _______________________________________________________ 47 Technical specifications Figure 22 LC 5621 Rear view Figure 23 LC 5621 Bottom view DVI D Master DVI D Slave RS232 AC IN ON OFF MAIN...

Страница 48: ...48 _______________________________________________________ Barco LC 5621 User manual Technical specifications Figure 24 LC 5621 Side view...

Страница 49: ...35 C 95 F non condensing 9 3 4 EMI EMC 9 3 4 1 Immunity EN 61000 4 x Unit meets following immunity specifications 3 EN 61000 4 2 Level 3 Electrostatic Discharge immunity 3 EN 61000 4 3 Level 3 Radiat...

Страница 50: ...t Board ALC Ambient Light Controller AMLCD Active Matrix Liquid Crystal Display APA Automatic Phase Adjust APPLIC Application AR coating Anti Reflective coating B BIB Backlight Inverter Board Backligh...

Страница 51: ...lectro Magnetic Conductive EMI Electro Magnetic Immunity ESD Electrostatic Discharge ETI Elapsed Time Indication F FCC Federal Communication Commission FIFO First In First Out FLIR Forward Looking Inf...

Страница 52: ...y MHz Mega Hertz MMAN Maintenance Manual MRFD Modular Rugged Flat Display ms Millisecond MTBF Mean Time Between Failures MTTR Mean Time To Repair N N A Not Applicable NTSC National Television Standard...

Страница 53: ...on SER Serial Port SG Symbol Generator SGB Symbol Generator Board SIB Signal Interface Board SMPTE Society of Motion Picture and Television Engineers SOG Sync On Green SONAR Sound Navigation and Rangi...

Страница 54: ...A Ultra eXtended Graphic Array V V Volt VCM Video Control Module VESA Video Electronics Standards Association VGA Video Graphic Array VHDL Is the VHSIC Hardware Description Language VHSIC Very High Sp...

Страница 55: ...utions for all units 10 5 2 2 Image retention 10 6 Installation 11 6 1 Mounting procedure 11 6 1 1 LC 5621 mounted on stands 11 6 1 2 LC 5621 with VESA compliant mounting solution 12 6 2 Connecting th...

Страница 56: ...the key functions 34 7 2 2 2 Main menu 35 7 2 2 3 Brightness menu 35 7 2 2 4 Contrast menu 36 7 2 2 5 Gamma menu 36 7 2 2 6 Color temp menu 37 7 2 2 7 User color menu 37 7 2 2 8 Sys info 38 7 2 2 9 Fa...

Страница 57: ...3 1 VESA compliant mounting solution 46 9 2 3 2 Drawings LC 5621 46 9 3 Environmental specifications 49 9 3 1 Temperature 49 9 3 1 1 Operating continuous 49 9 3 1 2 Storage 49 9 3 2 Altitude Low press...

Страница 58: ...e 7 Primary controls of the LC 5621 28 Figure 8 Location of the primary controls on the IR control 30 Figure 9 Location of the indicators 31 Figure 10 Overview of the on screen display 33 Figure 11 Ma...

Страница 59: ...Barco LC 5621 User manual _______________________________________________________ 59 List of figures End of document...

Отзывы: