background image

53

R5915190 /01

IEX series

Image 5

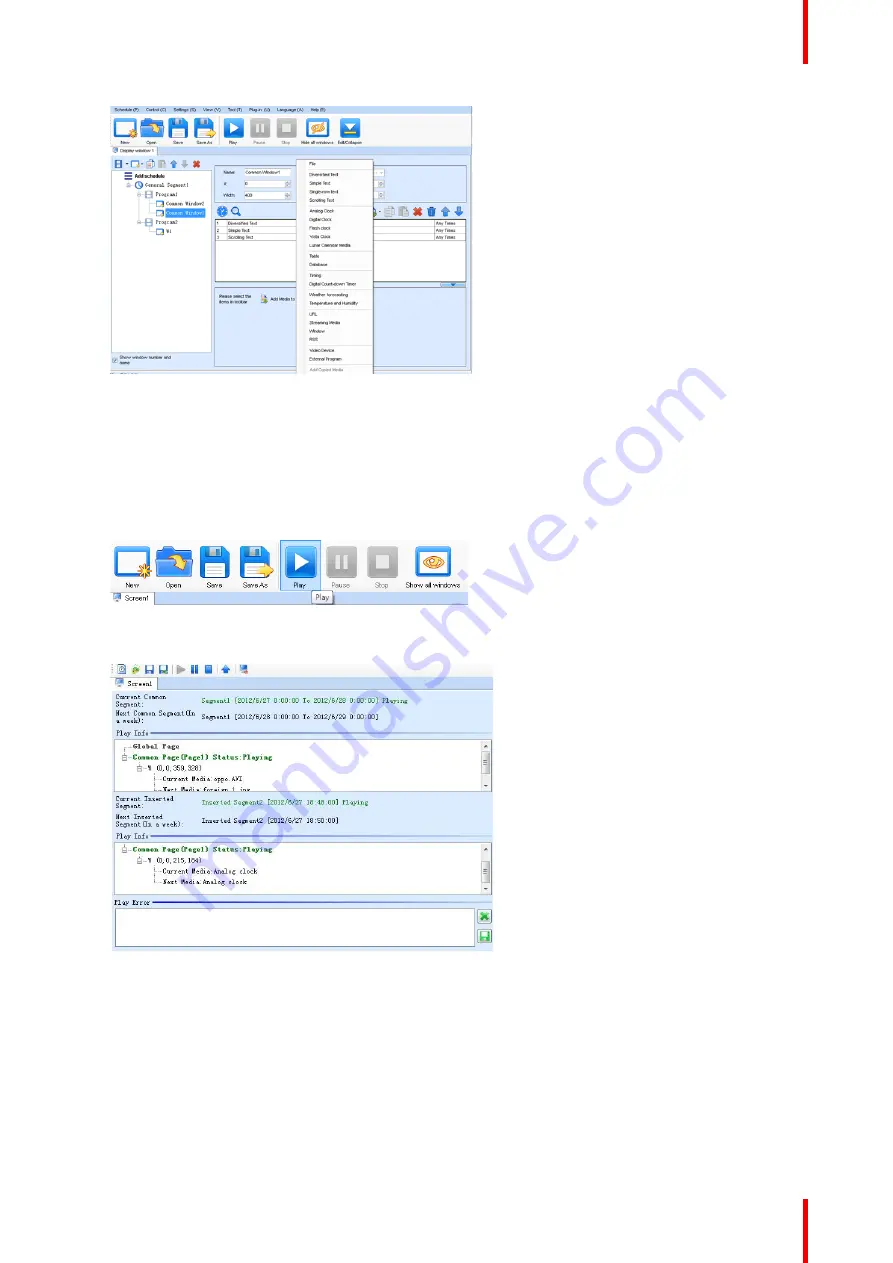
23 Media Playing menu

5.7 Professional Playing Solution - Play Media

How to play

1.

After the playing mode is edited or loaded, click the play key on the main toolbar to start the current
playing mode.

Image 5

24 Play Key

After play is activated, the editing page is switched to the playing page.

Image 5

25

2.

Clicking

Pause

or

Stop

on the toolbar can pause or stop the currently played program.

or

you can also perform this operation by using the operation menu that appears when you right click the
display window.

LED Display Playing Setting

Содержание IEX Series

Страница 1: ...ENABLING BRIGHT OUTCOMES Installation user guide IEX series...

Страница 2: ...Registered office Barco NV President Kennedypark 35 8500 Kortrijk Belgium www barco com en support www barco com Barco NV Beneluxpark 21 8500 Kortrijk Belgium www barco com en support www barco com...

Страница 3: ...t names mentioned in this manual serve as comments or examples and are not to be understood as advertising for the products or their manufacturers Federal Communications Commission FCC Statement This...

Страница 4: ......

Страница 5: ...n 22 3 4 Wiring for LED Display 24 3 5 Signal and Power Cable Connection 24 4 LED Display Control Setting 27 4 1 Power on testing 28 4 2 Starting the hardware 28 4 3 Software Control Setting 28 4 3 1...

Страница 6: ...Shutdown and Maintenance 61 6 1 Startup Sequence 62 6 2 Shutdown Sequence 62 6 3 Daily Maintenance 62 6 4 Warm up Operation 62 6 5 Warm up Operation Setting the Pre stored Picture NovaLCT 62 6 6 Warm...

Страница 7: ...tions and warnings mentioned in this chapter before installing the IEX tiles After this chapter additional warnings and cautions are given depending on the installation procedure Read and follow these...

Страница 8: ...horoughly familiar with all of the proper safety checks and installation instructions To do otherwise increases the risk of hazards and injury to the user Assembly parts are designed for intended use...

Страница 9: ...If the provided sockets plugs are damaged then replacement of the defective parts must be undertaken immediately Protect the power data cords from being walked on or pinched particularly at plugs conv...

Страница 10: ...18 tiles IEX1 5 110 180 VAC 7 tiles 9 tiles 180 240 VAC 14 tiles 18 tiles IEX1 8 110 180 VAC 7 tiles 9 tiles 180 240 VAC 14 tiles 18 tiles IEX2 5 110 180 VAC 7 tiles 9 tiles 180 240 VAC 14 tiles 18 t...

Страница 11: ...cked up front with the supplier IEX tiles are to be used in environments meeting the operating specifications IEX tiles are not to be used in environments that are subject to airborne contaminants suc...

Страница 12: ...ion solution Switch off the power immediately and contact the professional personnel when the LED display has any abnormal conditions such as peculiar smell smoke electric leakage and abnormal tempera...

Страница 13: ...signed for HD display application scenarios with high protection high reliability stable pictures wide viewing angle the IEX series supports wide range adjustment of the color temperature and brightne...

Страница 14: ...application environment 3 High efficiency transmission of board to board connection reduce the cable of module system card 4 High precision structure and fine adjustment of joints 5 With the flash me...

Страница 15: ...Cabinet Appearance Overview Image 2 1 Cabinet appearance 1 Upper lower shoulder screw hole 2 Signal and power socket 3 Positioning pin 4 Screw hole of fixing rear cover 5 Monitoring LCD 6 Handle 7 Tes...

Страница 16: ...ngle 160 5 Brightness uniformity 97 Ergonomics No Contrast 7 000 1 Power consumption 731 W m max 242 W m avg Heat dissipation 2 493 BTU hr m max 825 BTU hr m avg Operation power voltage 100 240V 50 60...

Страница 17: ...7 000 1 Power consumption 691 W m max 232 W m avg Heat dissipation 2 356 BTU hr m max 791 BTU hr m avg Operation power voltage 100 240V 50 60Hz Operational temperature 10 C to 40 C 14 F to 104 F Opera...

Страница 18: ...max 471 BTU hr m avg Operation power voltage 100 240V 50 60Hz Operational temperature 10 C to 40 C 14 F to 104 F Operational humidity 10 80 IP rating Front IP30 Rear IP50 3D No HDR No Redundant power...

Страница 19: ...F Operational humidity 10 80 IP rating Front IP30 Rear IP50 3D No HDR No Redundant power supply Optional Concave curvature Up to 5 inter tile Dimensions 600 x 337 5 x 74mm WxHxD 23 62 x 13 29 x 2 91...

Страница 20: ...topology 2 5 Scope of Applications Overview The IEX series products can be assembled seamless into a screen of any size and are extensively used as fixed LED displays for corporate control room and TV...

Страница 21: ...1 R5915190 01 IEX series 3 1 Package inspection 22 3 2 General installation 22 3 3 Fixed installation 22 3 4 Wiring for LED Display 24 3 5 Signal and Power Cable Connection 24 Installation and Wiring...

Страница 22: ...n calibration is performed on the IEX series product before shipment and the product needs to be installed sequentially according to the cabinet number See next drawing Image 3 1 Rear view of the disp...

Страница 23: ...ng plate detail 2 Mounting plate 3 M8 x 75 inner hexagon bolt 4 Front installation hole 5 2 6 Image 3 4 Mounting plate detail 2 Mounting plate 5 M8 x 75 inner hexagon bolt 6 Rear installation hole Ima...

Страница 24: ...Power Cable Connection Signal cabling See example of signal cable connection for cabinets with an arrangement of 4 cabinets Width x 4 cabinets Height Signal cables shall be connected based on the wiri...

Страница 25: ...ent of 4 cabinets Width x 4 cabinets Height Power cables shall be connected based on the wiring diagram of the delivered products for the project Image 3 13 Power cable connection diagram Remark Main...

Страница 26: ...R5915190 01 IEX series 26 Installation and Wiring...

Страница 27: ...27 R5915190 01 IEX series 4 1 Power on testing 28 4 2 Starting the hardware 28 4 3 Software Control Setting 28 4 4 Software Control Setting 39 LED Display Control Setting 4...

Страница 28: ...ending box to the USB port on the control PC 6 Check whether cables for the LED display are connected in accordance with the power cable and signal cable connection diagrams provided for the delivered...

Страница 29: ...on the main window Image 4 4 Main window advanced user 5 Click Next Image 4 5 Screen configuration The screen configuration is updated with the information of the selected port Sending Board setup 1 C...

Страница 30: ...k Scan Board Image 4 7 Scan board configuration 2 Click Load File to load the file xxxx rcfg stored on the optical disk Click Send to HW After sending confirm that the loaded picture received by scan...

Страница 31: ...creen connection with loaded file After sending confirm that the screen is complete 4 Click Save 4 3 3 Brightness Adjustment General On the main window click Brightness to display the brightness adjus...

Страница 32: ...Auto Adjustment by Hardware are automatic adjustment modes Automatic adjustment function is not recommended for indoor LED display products because the indoor environment has stable ambient light and...

Страница 33: ...Set coefficients for a new module After replacing a module set the correction coefficients for the new module Adjust Coefficients Color is uniform on screen Adjust the correction coefficients for a s...

Страница 34: ...corresponding correction coefficients Image 4 15 Obtaining Correction Coefficients for Receiving Card 4 Select Stable Upload and click Next Image 4 16 Uploading correction coefficients 5 Adjust Coeff...

Страница 35: ...efficients are retentive even after a power failure 7 Click Finish Image 4 18 Saving correction coefficients 4 3 6 Setting Coefficients for a New Module How to set 1 Select Position of the New Module...

Страница 36: ...for a New Receiving Card page 33 step 3 4 5 Save the correction coefficients to the hardware so that they are retentive after a power failure See Setting Coefficients for a New Receiving Card page 33...

Страница 37: ...Click Save Calibration Coefficient on Receiving Card 4 3 8 Pre storing Picture About pre storing picture On the Pre store Picture interface you can save a picture as the prestored picture for the scr...

Страница 38: ...cards in the cabinet Click Test Effect to display the selected picture on the screen Click Save to Hardware to save the picture as a prestored picture to the hardware Click Check Store Picture to dis...

Страница 39: ...Setting Coefficients for a New Module How to set 1 First set the window to be greater than or equal to the actual screen pixel size Image 4 26 Screen size and count 2 In the main window click Control...

Страница 40: ...oefficient of the replaced spare module Image 4 29 Brightness calibration Import 5 Enter the location of the module that needs to resend the correction coefficient Image 4 30 Starting point setting 6...

Страница 41: ...pen the LED screen setting window on the screen parameter page 1 Next to Calibration Mode select Brightness 2 Next to Calibration select From Receiver Card 3 Click Save to Receivers Image 4 32 LED Scr...

Страница 42: ...R5915190 01 IEX series 42 LED Display Control Setting...

Страница 43: ...Solution Play Media 53 5 8 Saving and Opening a Playing Solution 54 5 9 LED Display Playing Setting Set the Count and Size of the Screen 55 5 10 LED Display Playing Setting Setting the Program Page 55...

Страница 44: ...most This Section introduces the Professional playing program only Mode selection Run the software to enter the main window Click Setting and select Switch schedule mode Image 5 1 Switching schedule m...

Страница 45: ...and to automatically activate a playing solution Image 5 4 Auto Run after Power on If you enable this function NovaStudio will run automatically the next time when the PC is started Restart Software...

Страница 46: ...gh you have inserted the USB flash drive to the PC 5 3 Professional Playing Solution Edit Time Segment How to edit 1 Create a playing solution On the main window of the software click Schedule and sel...

Страница 47: ...Program page If you select Specify Number of Times the next general program page is played after the preset Times to Play for the display window with the longest playing time on the current program pa...

Страница 48: ...e editing area or by using the short cut menu Image 5 10 Program Page Operation menu 5 5 Professional Playing Solution Edit Display Window How to edit 1 Adding a display window After adding a program...

Страница 49: ...size of the display window The location and size of the new window is generated randomly and can be adjusted based on actual conditions by using either of the following two methods 1 Directly specify...

Страница 50: ...indow Select the program or window Click the direction key to adjust the playing sequence Image 5 16 Move display window 5 6 Professional Playing Solution Edit the Media How to edit 1 Add the media Th...

Страница 51: ...setting window 2 Setting the media properties Different media have different properties After a medium in the media list is selected the property page of this medium is displayed below the selected me...

Страница 52: ...lay to modify the playing times by either entering a new value or selecting a value from the drop down list Image 5 20 Changing the Media Playing Times Double click Image 5 21 Changing the Media Playi...

Страница 53: ...ain toolbar to start the current playing mode Image 5 24 Play Key After play is activated the editing page is switched to the playing page Image 5 25 2 Clicking Pause or Stop on the toolbar can pause...

Страница 54: ...isplay the clock window you need to click Pause perform the Move Up operation to move the clock window to the front side of the common window and then click Play If the clock is displayed transparentl...

Страница 55: ...D screens and the starting position and size of the screen in the Screen Size and Count window Image 5 30 Screen size and count settings 5 10 LED Display Playing Setting Setting the Program Page About...

Страница 56: ...am page Image 5 32 Adding new Program page 2 After creating the program page click the Add button or right click on the program page node to bring up the add program window menu Image 5 33 Add Program...

Страница 57: ...Display Playing Setting Adjust Window Position and Size Method one Select the play window and then drag the mouse to adjust its size and position Method two Set it in the window properties Image 5 36...

Страница 58: ...he file window can be set to different duration and special effects Duration The time is required for all programs to play in this window File Count The number of programs within this window 5 12 LED...

Страница 59: ...14 LED Display Playing Setting Timed Playback and Control About timed playback and control 5 15 LED Display Playing Setting Timed Playback and Control How to set 1 Click Control Timing Command List to...

Страница 60: ...clude play pause play program power on LED display power off LED display show on LED display show off LED display set brightness show LED play screen hide LED play screen restart this application clos...

Страница 61: ...Shutdown Sequence 62 6 3 Daily Maintenance 62 6 4 Warm up Operation 62 6 5 Warm up Operation Setting the Pre stored Picture NovaLCT 62 6 6 Warm up Operation Ageing Operation 63 6 7 Warm up Operation...

Страница 62: ...sh to clear dust on the screen surface monthly in order to achieve an optimum displaying effect Check the parts in the distribution box quarterly Check whether the power cables and signal cables for t...

Страница 63: ...user Select Manual and set the brightness to 13 the brightness is about 5 by dragging the scroll bar below Brightness Adjustment Image 6 3 Manual brightness adjustment It is recommended that manual br...

Страница 64: ...3 15 1 h 4 20 1 h 5 25 1 h 6 30 1 h 7 40 1 h 8 50 1 h 9 60 1 h 10 80 1 h 6 7 Warm up Operation Aging Operation How to do If the display is not used for 14 consecutive days please follow the instructio...

Страница 65: ...65 R5915190 01 IEX series Image 6 6 Aging test Image 6 7 Screen test Startup Shutdown and Maintenance...

Страница 66: ...R5915190 01 IEX series 66 Startup Shutdown and Maintenance...

Страница 67: ...67 R5915190 01 IEX series 7 1 Common Faults and Troubleshooting Methods 68 7 2 Replacement of Main Components 69 Troubleshooting and Component Replacing 7...

Страница 68: ...xxxx scr Check whether the signal cable is connected to the cabinet receiving card If the receiving card is faulty replace the receiving card Check whether Displaying Position and Screen Size on the s...

Страница 69: ...signal which controls the related modules is faulty Troubleshooting method Check DC voltage for the modules Check the hub card ports or flat cables that control the modules 7 2 Replacement of Main Com...

Страница 70: ...the module from the back in an inclined manner Image 7 5 7 2 2 Replacement of Power Supply How to replace When replacing the power supply cut off the power supply to ensure your personal safety and eq...

Страница 71: ...aiming at the center of the module to make the magnet hold the module Image 7 6 2 Disconnect the AC power input DC power output 5 cables Image 7 7 3 Remove the power supply and replace it Image 7 8 B...

Страница 72: ...lace When replacing the receiving card cut off the power supply to ensure your personal safety and equipment safety When replacing the receiving card pay attention to the direction of the receiving ca...

Страница 73: ...the receiving card Image 7 14 Back maintenance steps Use a screw driver to remove 4 bolts which fixed the back cover Image 7 15 Pull out the connecting cable of the back cover and remove the back cov...

Страница 74: ...R5915190 01 IEX series 74 Image 7 17 Troubleshooting and Component Replacing...

Страница 75: ...75 R5915190 01 IEX series 8 1 Packaging 76 8 2 Transportation 76 8 3 Storage 76 Packaging Transportation and Storage 8...

Страница 76: ...horizontally and must be protected against the wind rain direct sunlight and corrosive liquid during transportation The stacking layers shall not exceed three layers for wood cases 8 3 Storage Overvi...

Страница 77: ...77 R5915190 01 IEX series Environmental information A...

Страница 78: ...o prevent possible harm to the environment or human health from uncontrolled waste disposal please separate these items from other types of waste and recycle them responsibly to promote the sustainabl...

Страница 79: ......

Страница 80: ...www barco com R5915190 01 2022 11 30...

Отзывы: