

HDQ series
Quick start guide
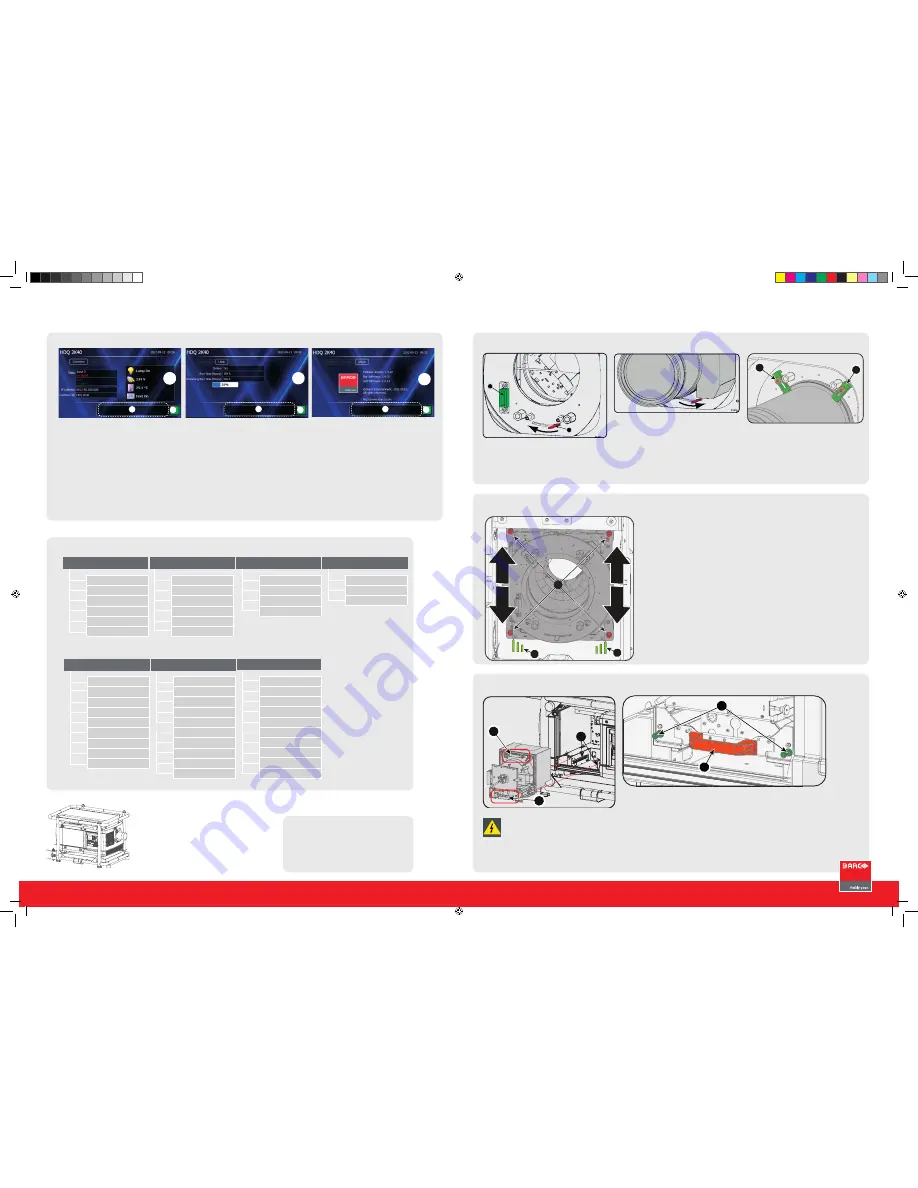
Mounting the lens
•
Remove foam in lens opening.
•
Place lens holder in unlock position. Handle A
towards socket B.
•
Gently insert the lens in such a way that the
lens connector matches the socket B.
•
Insert the lens until the connector seats into
the socket.
•
Secure the lens in the lens holder. Move
handle A into the lock position (away from
socket B).
•
Check if lens touches the front plate of the
lens holder.
•
Check if the lens is really secured by trying to
pull the lens out of the lens holder.
•
Place the 2 lens fixation brackets (1) into po-
sition and secure with a nut on each bracket
A
B
1
1
Mounting the lamp house
•
Remove housing on lamp house side.
•
Grip the lamp house by both handles (1)
•
Place the lamp house on the base plate inside
the lamp compartment.
•
Line up the foot of the lamp house with the
slots on the base (2).
1
1
2
3
1
Before installing the Lamp House, dis-
connect the power to the projector
mains terminals and unplug the power
cord at the UPS INLET for removal of all
power from the projector
•
Push the lamp house fully in.
•
Secure both retaining screws.
•
Mount the housing
1
2
2
Additional vertical shift
•
To extend lens shift in a specific direction.
•
Loosen the 4 screws (1) until central part of
lens holder becomes loose.
•
Shift the central part up or down.
•
Lowermost, middle and uppermost shift posi-
tions are marked on the lens holder (2).
•
Tighten the 4 screws.
Overview window
(A)
•
Main source
•
PiP source
•
IP address
•
Customer ID
•
Lamp status
•
Mains voltage
•
Ambient temperature
•
Text status (OSD)
Lamp overview window
(B)
•
Number of strikes
•
Run time (hours)
•
Remaining run time (hours)
•
% lamp used
About window
(C)
•
Package version in use
•
Mgr Software in use
•
GUI Software in use
Common parts
•
Error and warning area (1)
•
Projector status (2)
Green
:
projector works correctly
Red cross
:
projector has errors
Yellow triangle
: projector has warnings
C
1
2
B
1
2
A
A
1
2
Local LCD screens
Projector Address
Serial communication
Network
IR control
DMX
Buttons
Menu Position
Local LCD
Change Language
Scheduler
Menu structure
Slot Module Type
Input Locking
Native Resolution
No Signal
EDID
3D*
Image Settings
Aspect Ratio
Timings
Image File Services
Save Custom Settings
Splash image
Main Window
PiP Window
Layout File Services
Same Zoom/Focus
Lamp Power
Identification
Z-axis
Orientation
Lens
Warping
Blanking
Contrast/Intensity
Gamma
Internal patterns
Color Space
ScenergiX
Identification
Diagnostics
Int. Service Patterns
Factory Default
USB Memory
Reset Formatter
Refill mode
Save Custom Settings
Auto Dim overtemp.
Time and Date
INPUT
IMAGE
LAyOUT
LAMPS
ALIGNMENT
PROjECTOR CONTROL
SERvICE
* Only available with optional 3D input
www.barco.com/esupport
USA +
1 866 374 7878
EMEA
+32 56 368019
APAC
+86 400 88 22726
Support
R5905324 Rev. 01
HDQ-Quickstartguide4.indd 1
9-11-2012 14:22:37


