11. Layout
Use the
◄
or
►
key to select another character.
Note:
Digits can be entered with the digit keys on the remote control or the local keypad. When a digit is entered in that way,
the next character will be selected automatically. Arrow key left (
◄
) has the backspace functionality.
11.6 Lens behavior
What can be done ?
Different custom layouts can have different zoom/focus/shift (lens) settings, e.g. when using the projector on 2 different projector
distances or two different screen sizes (same image but 2 custom layouts needed due to different zoom/focus/shift settings).
Adjust the lens settings for the different situations and save these settings each in a different custom layout.
When using only one screen to project the different layouts, the same lens settings can be used for all custom layouts.
When using different screens, different lens settings can be used (settings saved in the custom
fi
le will be used). To use different
lens settings, it is important that the lens is calibrated so that the lens always returns to the saved position when opening a custom
layout.
Switching from a custom
fi
le (layout) to a standard
fi
le (layout) will not change the current lens settings.
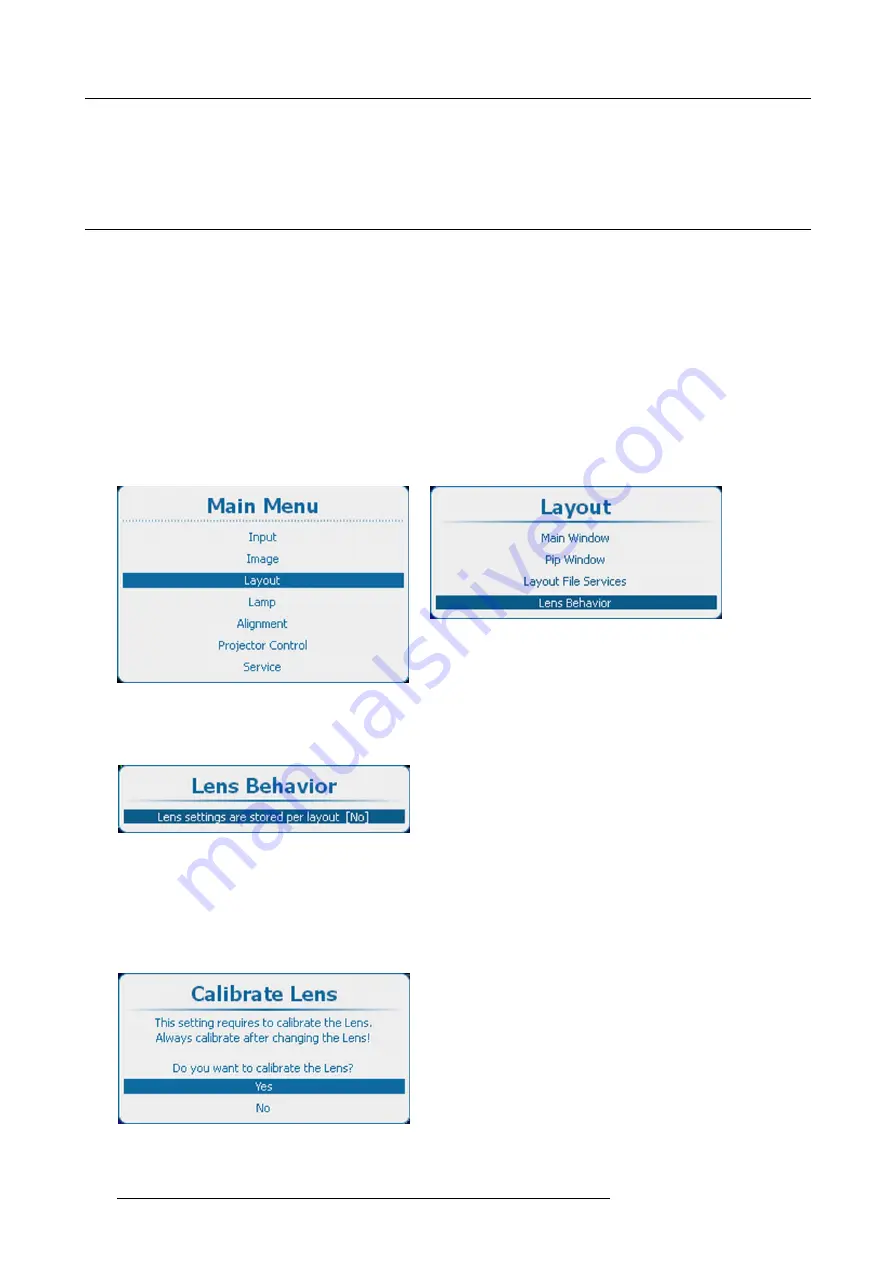
How to set the lens behavior
1. Press
Menu
to activate the menus and select
Layout
→
Lens behavior
.
Image 11-59
Main menu, layout
Image 11-60
Layout, Lens behavior
2. Press
ENTER
to select.
The
Lens behavior
window opens.
Image 11-61
Lens behavior setting
3. Press
ENTER
to toggle lens behavior between
[Yes]
or
[No]
.
[Yes] = each layout will use the same zoom/focus/shift settings. The zoom/focus/shift settings of the previous selected layout will
be applied to the next selected layouts.
[No] = each layout will use its own zoom/focus/shift settings. Lens should be calibrated, when using this setting.
4. If
[No]
is selected, the calibrate lens menu opens.
Image 11-62
Lens calibration
160
R5905303 HDQ 2K40 02/03/2015
Содержание HDQ--2K40
Страница 1: ...HDQ 2K40 User and Installation manual R5905303 09 02 03 2015 ...
Страница 4: ......
Страница 10: ...Table of contents 6 R5905303 HDQ 2K40 02 03 2015 ...
Страница 18: ...1 Safety 14 R5905303 HDQ 2K40 02 03 2015 ...
Страница 54: ...4 Input Communication 50 R5905303 HDQ 2K40 02 03 2015 ...
Страница 78: ...6 Getting started 74 R5905303 HDQ 2K40 02 03 2015 ...
Страница 118: ...9 Input 114 R5905303 HDQ 2K40 02 03 2015 ...
Страница 148: ...10 Image 144 R5905303 HDQ 2K40 02 03 2015 ...
Страница 166: ...11 Layout 162 R5905303 HDQ 2K40 02 03 2015 ...
Страница 176: ...12 Lamp 172 R5905303 HDQ 2K40 02 03 2015 ...
Страница 232: ...13 Alignment No settings are stored globally Yes settings are stored per layout 228 R5905303 HDQ 2K40 02 03 2015 ...
Страница 302: ...15 Service 298 R5905303 HDQ 2K40 02 03 2015 ...
Страница 318: ...17 Removal and installation of the projector covers 314 R5905303 HDQ 2K40 02 03 2015 ...
Страница 322: ...A Specifications 318 R5905303 HDQ 2K40 02 03 2015 ...
Страница 326: ...B Standard source files 322 R5905303 HDQ 2K40 02 03 2015 ...
Страница 330: ...C DMX chart 326 R5905303 HDQ 2K40 02 03 2015 ...
Страница 334: ...D Environmental information 330 R5905303 HDQ 2K40 02 03 2015 ...


