17. Alignment
17.7.3 Start up manual adjustment
How to start up
1. Press
Menu
on the remote control (RCU) or on the local keypad to activate the menus and select
Alignment
→
Warp
ing
→
.
Warp
adjust
.
The
Warp adjust
menu opens.
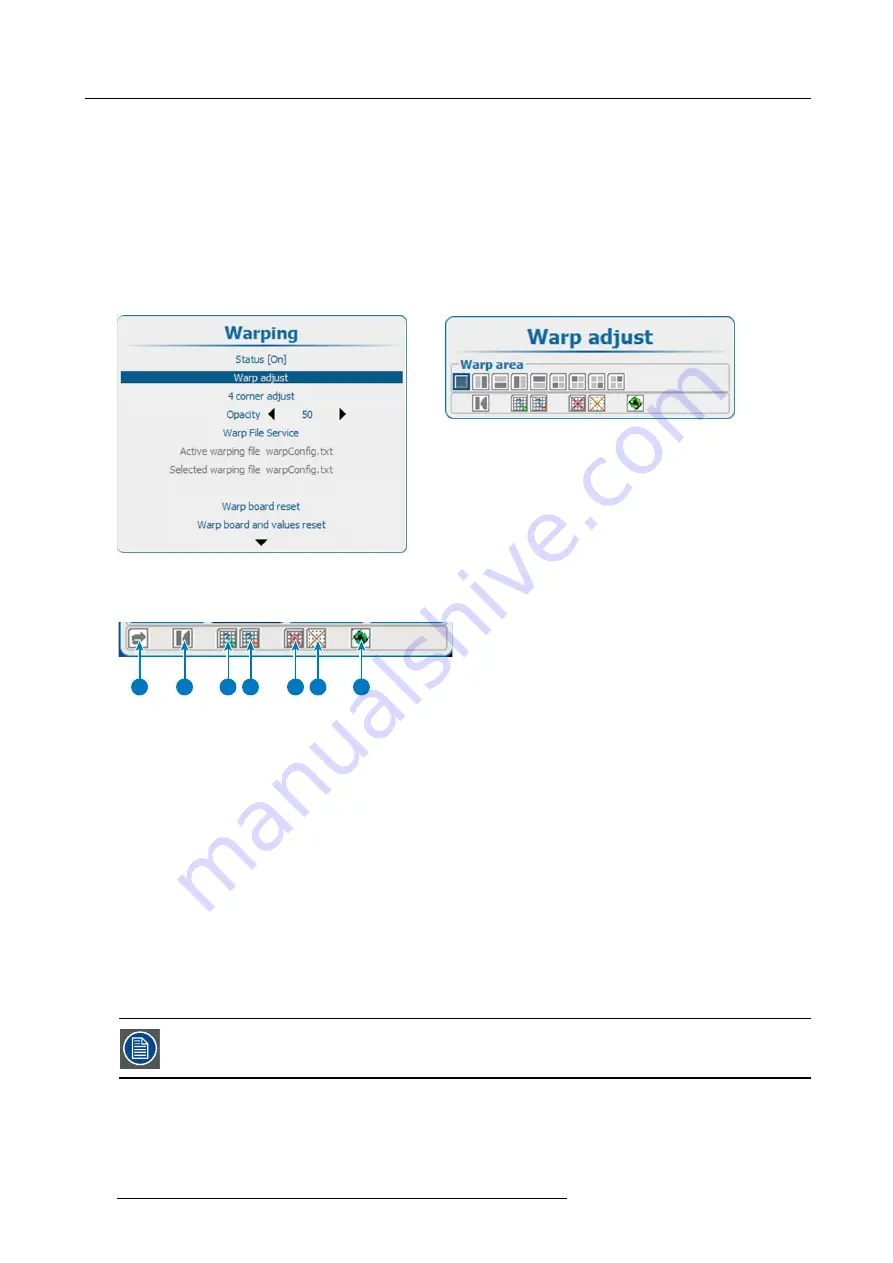
The content of this warp adjust menu depends on the selection. When no warp was done before, the menu starts as a sort of
wizard by opening only the warp area pane. It opens more and more panes depending on the selection. When manual warping
was done before the menu opens with the same layout as it was last used.
A warp grid and adjustment points is displayed on the screen. The maximum grid is 32 points by 32 points.
Image 17-13
Warping, Warp adjust
Image 17-14
Warp area
Warp adjust menu, general icons
1
2
3
4
5
6
7
Image 17-15
1
Undo / redo icon
2
Grid initialization (reset grid to original)
3
Increase the number of points. The current number of points (mode) is indicated with a digit inside the icon. By default 3
points are shown.
4
Reduce the number of points. The current number of points (mode) is indicated with a digit inside the icon.
5
Remove / show grid
6
Remove / show points
7
Hardware reset of warp module
17.7.4 Warp adjustment principle
Description
Warping adjustment enables the
relocation of pixel groups
in an image in order to introduce spacial distortion. To make the
procedure comprehensible, there are some rules and features.
The use of warping adjustment leads to image quality loss! The more geometry adjustment is applied, the
more quality loss.
Moving an anchor point causes pixels in the same region to be moved gradually with this one pixel, depending on their distance to
it. The size of the region of impact depends on the anchor point: some anchor pixels have impact on the full image, while others
have impact on a small area only. The full image is divided in
33 x 33 regions
. The smallest region of impact is one of these 1089
regions.
182
R5906730 HDF WLP SERIES 01/08/2017
Содержание HDF-W30LP
Страница 1: ...HDF WLP series User and Installation manual R5906730 05 01 08 2017...
Страница 4: ......
Страница 10: ...Table of contents 6 R5906730 HDF WLP SERIES 01 08 2017...
Страница 78: ...8 Input Communication 74 R5906730 HDF WLP SERIES 01 08 2017...
Страница 90: ...9 Getting started 86 R5906730 HDF WLP SERIES 01 08 2017...
Страница 94: ...10 Software upgrade Image 10 5 90 R5906730 HDF WLP SERIES 01 08 2017...
Страница 95: ...10 Software upgrade Image 10 6 R5906730 HDF WLP SERIES 01 08 2017 91...
Страница 98: ...10 Software upgrade Image 10 11 94 R5906730 HDF WLP SERIES 01 08 2017...
Страница 99: ...10 Software upgrade Image 10 12 R5906730 HDF WLP SERIES 01 08 2017 95...
Страница 100: ...10 Software upgrade Image 10 13 10 Clear the history log 96 R5906730 HDF WLP SERIES 01 08 2017...
Страница 108: ...11 Quick set up adjustment 104 R5906730 HDF WLP SERIES 01 08 2017...
Страница 172: ...15 Layout 168 R5906730 HDF WLP SERIES 01 08 2017...
Страница 180: ...16 Laser The Current light output panel is displayed Image 16 13 176 R5906730 HDF WLP SERIES 01 08 2017...
Страница 224: ...17 Alignment 220 R5906730 HDF WLP SERIES 01 08 2017...
Страница 258: ...18 Projector Control 254 R5906730 HDF WLP SERIES 01 08 2017...
Страница 272: ...19 Service 268 R5906730 HDF WLP SERIES 01 08 2017...
Страница 282: ...21 Maintenance procedures 278 R5906730 HDF WLP SERIES 01 08 2017...
Страница 300: ...C Standard source files 296 R5906730 HDF WLP SERIES 01 08 2017...
Страница 304: ...D DMX chart 300 R5906730 HDF WLP SERIES 01 08 2017...
Страница 310: ...E Stacking HDF WLP series projectors 306 R5906730 HDF WLP SERIES 01 08 2017...


