background image

25

R5916677 /00

G50

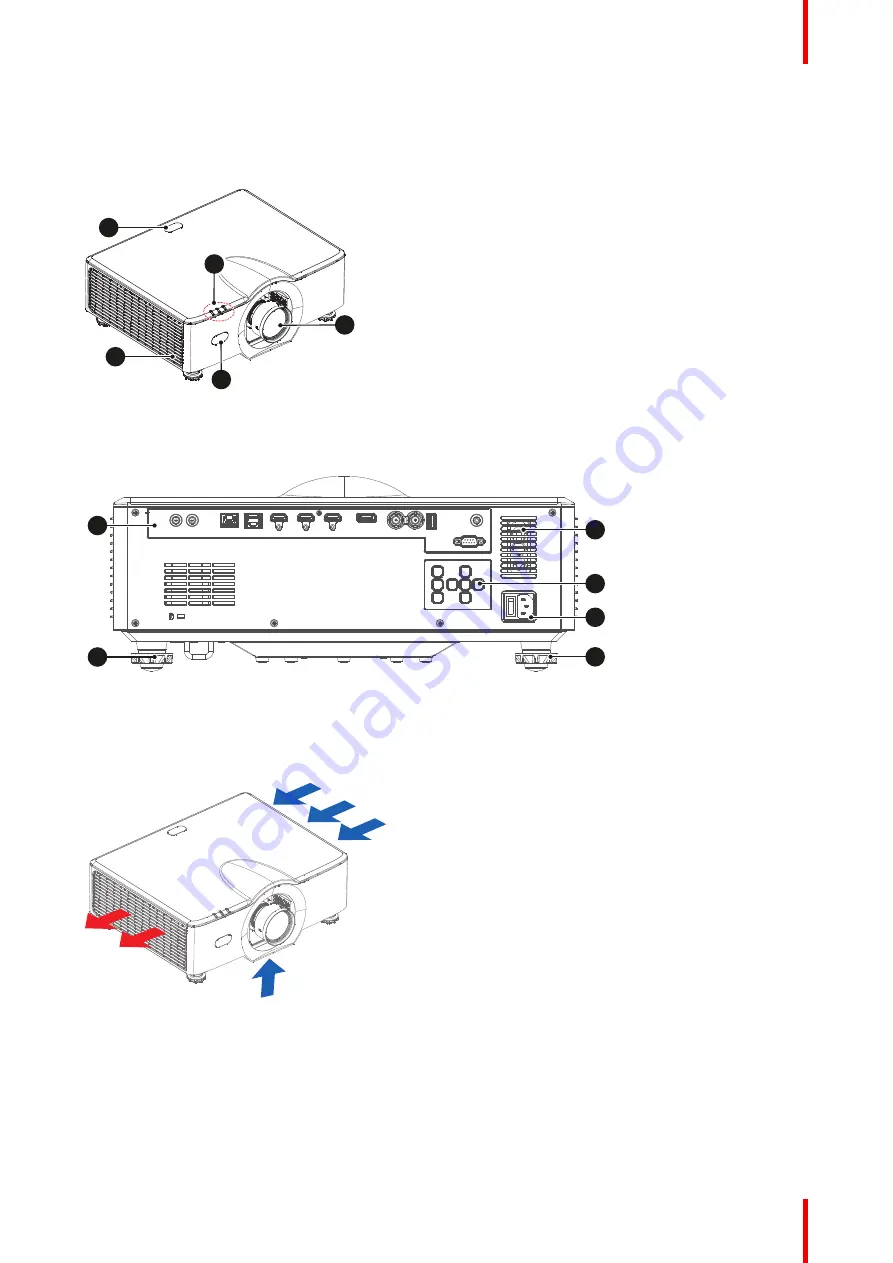
2.3 Main unit

Component locations

1

2

4

3

5

Image 2–5

1

IR receiver (top)

2

LED status indicators

3

Right speaker

4

IR receiver (front)

5

Projeciton lens

6

7

8

7

9

10

Image 2–6

6

Input/Output panel

7

Adjustable feet

8

Rear speaker

9

Control panel

10

Power switch and socket

Airflow

Image 2–7

Introduction

Содержание G50

Страница 1: ...ENABLING BRIGHT OUTCOMES Installation manual G50...

Страница 2: ...Registered office Barco NV President Kennedypark 35 8500 Kortrijk Belgium www barco com en support www barco com Barco NV Beneluxpark 21 8500 Kortrijk Belgium www barco com en support www barco com...

Страница 3: ...publication at any time without notice This publication could contain technical inaccuracies or typographical errors Changes are periodically made to the information in this publication these changes...

Страница 4: ......

Страница 5: ...t 25 2 4 Input Output ports 26 2 5 Control panel 27 2 6 Remote Control Unit 28 2 7 Lenses 29 3 Installation procedures 31 3 1 RCU battery installation 32 3 2 Installing the lens 33 3 3 Installing the...

Страница 6: ...3 Boresight Scheimpflug adjustment 53 6 G lens 0 37 0 4 1 UST 90 57 6 1 About the UST lens 58 6 2 Lens rotation mechanics 59 6 3 Lens support installation 63 6 4 UST lens support adjustment 67 List o...

Страница 7: ...you understand and follow all safety guidelines safety instructions and warnings mentioned in this chapter before installing the G50 projector Clarification of the term G50 used in this document When...

Страница 8: ...cess to live parts Safety standards also impose limits to the internal and external temperature rises radiation levels mechanical stability and strength enclosure construction and protection against t...

Страница 9: ...t place any reflective objects in the light path of the projector User definition Throughout this manual the term SERVICE PERSONNEL refers to Barco authorized persons having appropriate technical trai...

Страница 10: ...intensity or the energy per surface unit becomes lower than the applicable exposure limit on the cornea or on the skin The light beam is considered to be unsafe for exposure if the distance from a per...

Страница 11: ...boot area of projector TH Theater RZ Restriction Zone in the theater HD Hazard Distance LRZ Length Restriction Zone in the theater H Height between surface floor and the light beam SH Separation Heigh...

Страница 12: ...erve sales and installation records for a period of 5 years Variance holders may currently hold a variance for production of Class IIIB and IV laser light shows and or for incorporating RG3 LIPs Laser...

Страница 13: ...it is mandatory to create a restricted zone within the beam areas closer than any HD In the enclosed projection area the combination of two restricted zones are relevant The restricted zone of the pr...

Страница 14: ...cturer Lightning For added protection for this video product during a lightning storm or when it is left unattended and unused for long periods of time unplug it from the wall outlet This will prevent...

Страница 15: ...n its external surfaces and from ventilation ducts during normal operation which is both normal and safe Exposing flammable or combustible materials into close proximity of this projector could result...

Страница 16: ...ginal shipping carton and packing material They will come in handy if you ever have to ship your equipment For maximum protection repack your set as it was originally packed at the factory Unplug this...

Страница 17: ...substitutions may result in degraded performance and reliability fire electric shock or other hazards Unauthorized substitutions may void warranty Safety check Upon completion of any service or repai...

Страница 18: ...nd 1040 11 except for conformance as a Risk Group 2 LIP as defined in IEC 62471 5 Ed 1 0 For more information see Laser Notice No 57 dated May 8 2019 Warning mount above the heads of children Addition...

Страница 19: ...6677 00 G50 1 5 Regulatory UK Compliance UK This product is fit for use in the UK Authorised Representative Barco UK Ltd Address Building 329 Doncastle Road Bracknell RG12 8PE Berkshire United Kingdom...

Страница 20: ...ct Manual Product manuals and documentation are available online at www barco com td Registration may be required follow the instructions given on the website IMPORTANT Read Installation Instructions...

Страница 21: ...R5916677 00 G50 2 1 Installation requirements 22 2 2 Projector package overview 24 2 3 Main unit 25 2 4 Input Output ports 26 2 5 Control panel 27 2 6 Remote Control Unit 28 2 7 Lenses 29 Introduction...

Страница 22: ...produced by smoke or snow machines contaminants derived from chemical products such as e g disinfectants conducting types of dust excessive dust The projector must always be mounted in a manner which...

Страница 23: ...ntil the requirements are fulfilled Contact Barco in case uncertainty exist on the environmental conditions linked to air contamination prior to install and operate the projector Main power requiremen...

Страница 24: ...ter AV Mute Pattern Focus Lens H Lens V Keystone H Keystone V Zoom Enter Image 2 3 Remote Control Image 2 4 Power cord The product Safety Manual and Quick Start Guide are also included Download the co...

Страница 25: ...5 Image 2 5 1 IR receiver top 2 LED status indicators 3 Right speaker 4 IR receiver front 5 Projeciton lens 6 7 8 7 9 10 Image 2 6 6 Input Output panel 7 Adjustable feet 8 Rear speaker 9 Control pane...

Страница 26: ...RS232 AUDIO Out 12V Out REMOTE USB 5V 1 5A 1 2 3 4 5 6 7 8 9 10 11 12 13 1 DC 12V output 6 HDMI input port 1 10 3D sync output port 2 Wired remote input 7 HDMI output port 11 USB port type A 3 HDBaseT...

Страница 27: ...US 1 3 4 8 9 7 6 5 2 1 Adjust lens position 2 Confirm the settings 3 Adjust the image focus 4 Menu navigation buttons 5 Adjust horizontal vertical keystone 6 Back to parent menu or exit menu 7 Enter O...

Страница 28: ...urce 7 Select input source 8 Confirm menu selection 9 Menu navigation 10 Adjust brightness 11 Adjust contrast 12 Open OSD menu 13 Back to parent menu or exit menu 14 Preset color mode 15 Display test...

Страница 29: ...ort Throw Short Throw Wide Zoom Standard Long Zoom Ultra Long Zoom Throw Ratio 0 65 0 75 0 75 0 95 0 95 1 22 1 22 1 52 1 52 2 92 2 90 5 50 Zoom Ratio 1 15X 1 28X 1 25X 1 25X 1 9X 1 9X Throw Distance 0...

Страница 30: ...3 30 4 24 4 22 5 28 5 27 10 11 9 86 18 60 170 2 29 3 66 2 41 2 79 2 76 3 51 3 51 4 51 4 48 5 61 5 60 10 74 10 47 19 75 180 2 42 3 88 2 55 2 96 2 92 3 72 3 72 4 78 4 75 5 94 5 93 11 38 11 08 20 91 190...

Страница 31: ...projector with the power net 38 3 5 Connecting to a computer or laptop 39 3 6 Connecting to video sources 40 3 7 Ceiling mount installation 41 3 8 Software update 42 To install the UST lens see chapte...

Страница 32: ...emote control The liquid contents in the batteries is harmful to the skin do not touch the leakage with your bare hands directly When installing fresh batteries be sure to clean up the leakage thoroug...

Страница 33: ...will damage the projector 2 Gently insert the lens in the lens holder Ensure that the label TOP reference 1 is upwards oriented while inserting the lens 3 Rotate the lens clockwise to lock the lens 1...

Страница 34: ...Image 3 3 How to install the lens safety cable 1 Ensure that the safety cable and its accessories are in good condition not damaged 2 Paste four cable clips on the lens body between motor block and l...

Страница 35: ...able around the lens counterclockwise Click the cable into every clip it passes in this loop Note Make sure the cable passes between the lens and the cable bundle 5 Slide the cable through the loop en...

Страница 36: ...or rigging frame Caution The safety cable is mounted as backup so that the drop distance is as small as possible Keep the possible drop distance of the lens as short as possible How to mount the cabl...

Страница 37: ...e that both a part of the loop end and the outgoing part of the safety cable are placed in the enclosure 6 Close the U bolt and tighten it Note Make sure the safety cable is tightened around the lens...

Страница 38: ...he projector How to connect with the power net 1 Ensure that the power switch stands in the 0 OFF position reference 1 FOCUS 1 Image 3 13 2 Plug in the mains cord in the power input socket of the proj...

Страница 39: ...able 2 3D Sync cable 3 HDMI cable 4 HDMI input cable 5 DisplayPort cable 6 USB cable 7 RS232 cable 8 Audio cable The diagram shows the cables connectors that may be used to connect to various devices...

Страница 40: ...er Video cassette recorder 1 2 Image 3 15 1 HDMI cable 2 HDMI cable The diagram shows the cables connectors that may be used to connect to various devices Due to the difference in applications for eac...

Страница 41: ...nsure the screws used to install the mount to the projector meet the following specifications Screws M4 x 10 four pieces Mounting holes reference 1 see following illustration 140 233 170 240 1 85 M4x1...

Страница 42: ...ed click on New to myBarco and follow the instructions With the created login and password it is possible to log in where you can download the software 3 Connect your computer to the projector using a...

Страница 43: ...ackage format iso and confirm reference 2 Click Upgrade reference 3 to start the upgrade process The update file will be transferred to the projector and installed The projector will reboot when compl...

Страница 44: ...R5916677 00 G50 44 Installation procedures...

Страница 45: ...wering On the projector 46 4 2 Power off the projector 48 This chapter assumes that the power cord and all signal cables are securely connected For detailed instructions see installation manual Poweri...

Страница 46: ...up First installation or after a factory reset If yes a popup window appears with the request to accept Barco s End User License Agreement EULA Select CONTINUE to accept the EULA terms and to proceed...

Страница 47: ...47 R5916677 00 G50 WARNING Do not look directly into the lens when the projector is on The strong light may cause permanent eye damage Powering On Off the projector...

Страница 48: ...ation request will be prompted on the screen 2 Press the same button again to confirm Note If not confirmed after five seconds the confirmation request will disappear and the projector will remain on...

Страница 49: ...49 R5916677 00 G50 5 1 Adjusting the projector s position 50 5 2 Adjusting the lens offset 51 5 3 Boresight Scheimpflug adjustment 53 Adjusting the projected image 5...

Страница 50: ...rest of your equipment Here are some general guidelines Position the projector on a flat surface at a right angle to the screen Position the projector to the desired distance from the screen The dista...

Страница 51: ...ojector is 50 and the horizontal lens offset shift range is 15 The offset range is calculated in accordance with industry standards with which the image offset is calculated by full image size Please...

Страница 52: ...R5916677 00 G50 52 Horizontal Image Offset 20 20 20 100 Image 5 4 Adjusting the projected image...

Страница 53: ...and DMD plane Lp3 Lp4 SCREEN DMD Lp1 Lp2 Fp1 Fp2 SCREEN DMD Lp3 Lp4 Fp3 Fp4 Scheimpflug Image 5 5 Boresight Scheimpflug principle Required tools Allen wrench 4 mm Boresight extenders Boresight L shape...

Страница 54: ...o adjust If clear position is out of the screen close to projector rotate screw CCW and then screw CW for half amount that rotated repeat until both A and C are clear e g turning CCW in a circle then...

Страница 55: ...urn CW in half circle If clear position is in the screen far from projector rotate screw CW and then screw CCW for half amount that rotated repeat until both H and I are clear 1 3 2 Image 5 9 Note Thi...

Страница 56: ...R5916677 00 G50 56 Adjusting the projected image...

Страница 57: ...cs 59 6 3 Lens support installation 63 6 4 UST lens support adjustment 67 UST 90 sales kit The sales kit contains The UST lens The UST lens support Safety cable The UST lens must always be mounted wit...

Страница 58: ...ions This lens can be mounted on the G50 series of projectors and can be mounted in two positions facing upwards and to the left The motor housing must be turned to the correct position before the len...

Страница 59: ...astened to the Interface unit in increments of 90 1 5 5 2 3 4 Top Image 6 2 1 Lens body 2 Wire clamper 3 M3 cap screws eight pieces 4 Interface unit 5 PCBA module Apply some glue on the head of the sc...

Страница 60: ...tandard position to a 90 rotated position turn out the eight M3 screws Slide the interface a few mm to the backside of the lens Rotate the interface 90 until the red dot on the interface is next to th...

Страница 61: ...61 R5916677 00 G50 1 2 2 Top Image 6 6 90 rotated position 1 wire clamper 2 PCBA module Image 6 7 Up mark on the lens G lens 0 37 0 4 1 UST 90...

Страница 62: ...R5916677 00 G50 62 1 2 Image 6 8 1 Wire routing 2 Projection orientation Up G lens 0 37 0 4 1 UST 90...

Страница 63: ...6x22 8 Spring washer M6 8 Washer M6 10 Socket head screw M4x10 5 Required tools Allen wrench 5 mm Allen wrench 4 mm Allen wrench 3 mm Installation steps 1 Turn the projector up side down To avoid dama...

Страница 64: ...ens Rotate the UST lens clockwise to lock the lens Image 6 11 4 The lens holder module is preassembled with screws 2 3 Start loosen screws 2 3 before starting the next step Mount the lens holder modul...

Страница 65: ...amp part on the lens holder module using 2 screws M4x10 Image 6 16 Tighten with a torque between 3 5 and 9 8 Nm Image 6 15 Image 6 16 7 Mount the safety bar with 2 screws M4x10 on the side of the lens...

Страница 66: ...end and the outgoing part of the safety cable are placed in the enclosure Close the U bolt and tighten it 2 1 3 3 Image 6 19 10 Place the shackle through the free loop end of the safety cable Connect...

Страница 67: ...n direction Depending on your configuration the lens memory function is automatically disabled when used with unsupported lens Location of the adjustment screws Before adjusting the lens make sure tha...

Страница 68: ...the focus of the projected image vertically using points A and B on the following image as reference points The resolution balance between both points should be the same Use the focus software featur...

Страница 69: ...eptable when comparing between region C and D If yes tighten screws 1 and 4 If no push lens softly horizontal and check the image quality Tighten screws 1 and 4 when you have an acceptable image quali...

Страница 70: ...R5916677 00 G50 70 CAUTION Do not execute any lens movements when the UST lens is fixed in the Lens Support G lens 0 37 0 4 1 UST 90...

Страница 71: ...71 R5916677 00 G50 Allen wrench 3 mm Allen wrench 4 mm Allen wrench 5 mm Boresight extenders Boresight L shape socket tool List of tools...

Страница 72: ...R5916677 00 G50 72 List of tools...

Страница 73: ...ations 10 H Hazard Distance 10 12 Hazardous Chemicals 17 High Brightness precautions 10 I I O ports 26 Install Lens 33 UST 90 57 Installation 31 Installation Requirements 22 Introduction 21 L Labels S...

Страница 74: ...14 Labels 18 Prevent electrical shock 14 Prevent fire hazard 15 Prevent personal injury 14 Prevent projector damage 15 Safety Data Sheet SDS 17 Servicing 17 User definition 9 Safety cable Lens 34 Saf...

Страница 75: ......

Страница 76: ...www barco com R5916677 00 2023 06 28...

Отзывы: