5. Installation
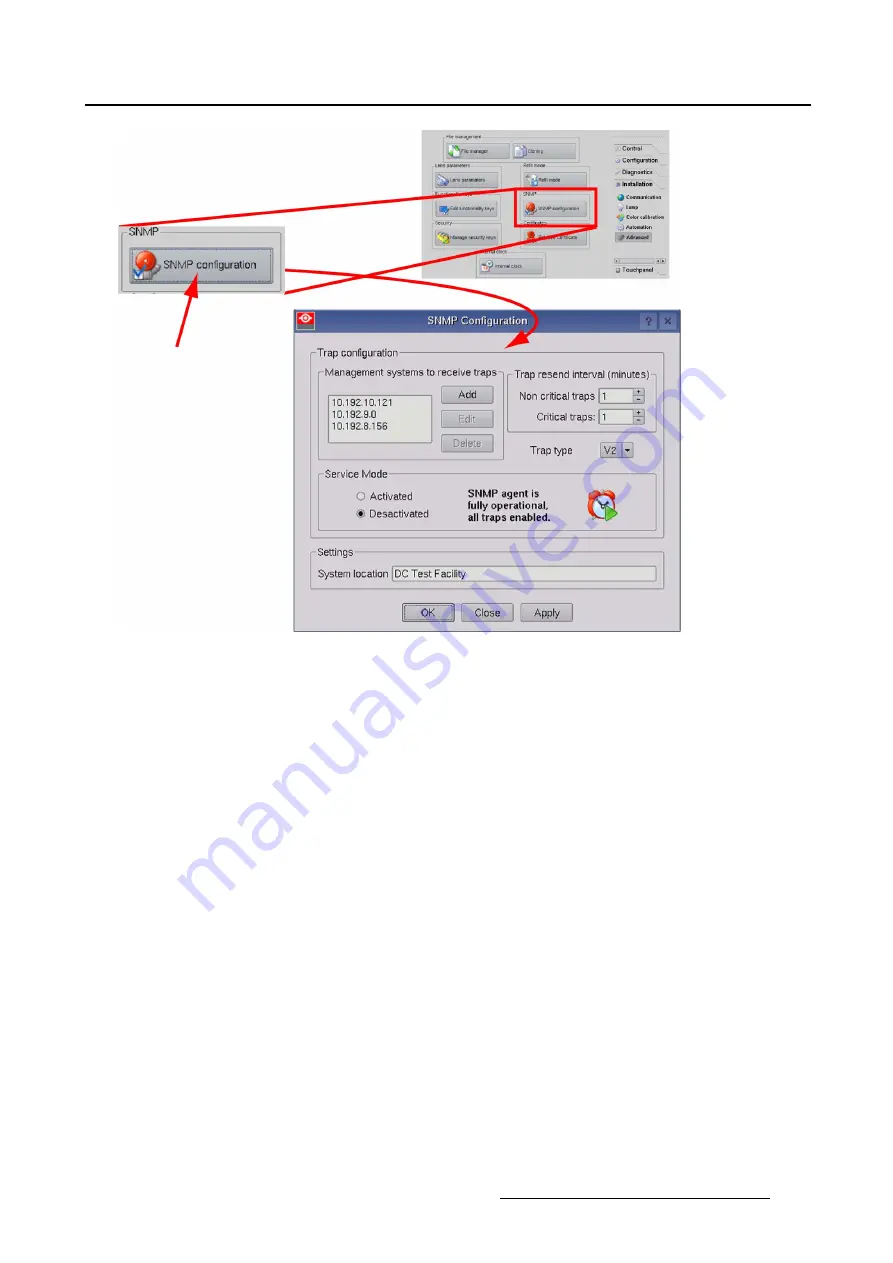
Image 5-67
SNMP con
fi
guration
Management System address to receive traps, add address
1. Tip on Add
The IP address input window opens.
2. Enter the IP address of the management server.
3. Tip on
OK
to activate.
The new server is added to the list of management servers.
Trap resend interval
Time between two traps to be send to the management servers. This time is set in minutes and can be
different for Non critical trap and Critical traps.
To change the time, tip on the up down control of the spin box of the corresponding trap type until the
desired interval is reached.
Trap type
SNMP exists in different versions. You have SNMP V1 and SNMP V2. The difference is basically the
format of the SNMP messages. Some management systems will support V1, others will support V2.
Depending on the management system used one should select V1 or V2 traps to be sent out to the man-
agement system.
To change the trap type, tip on the combo box next to Trap type and select the corresponding type.
R59770488 COMMUNICATOR TOUCH PANEL 06/06/2012
189
Содержание DP2K Series
Страница 1: ...Communicator Touch Panel User guide For DP2K DP4K series R59770488 05 06 06 2012 ...
Страница 10: ...Table of contents Index 277 6 R59770488 COMMUNICATOR TOUCH PANEL 06 06 2012 ...
Страница 36: ...2 Controls 32 R59770488 COMMUNICATOR TOUCH PANEL 06 06 2012 ...
Страница 88: ...3 Configuration Image 3 57 Save lens data to macro 84 R59770488 COMMUNICATOR TOUCH PANEL 06 06 2012 ...
Страница 138: ...5 Installation Image 5 15 Reset lamp info used lamp 134 R59770488 COMMUNICATOR TOUCH PANEL 06 06 2012 ...
Страница 145: ...5 Installation Image 5 20 Save coordinates to file R59770488 COMMUNICATOR TOUCH PANEL 06 06 2012 141 ...
Страница 169: ...5 Installation Image 5 42 Basic cloning Image 5 43 R59770488 COMMUNICATOR TOUCH PANEL 06 06 2012 165 ...
Страница 170: ...5 Installation Image 5 44 Image 5 45 166 R59770488 COMMUNICATOR TOUCH PANEL 06 06 2012 ...
Страница 173: ...5 Installation Image 5 47 Clone individual preset R59770488 COMMUNICATOR TOUCH PANEL 06 06 2012 169 ...
Страница 174: ...5 Installation Image 5 48 Pointed files Image 5 49 Save to zip file 170 R59770488 COMMUNICATOR TOUCH PANEL 06 06 2012 ...
Страница 176: ...5 Installation Image 5 50 Clone typical file type 172 R59770488 COMMUNICATOR TOUCH PANEL 06 06 2012 ...
Страница 180: ...5 Installation Image 5 54 Cloning TI board 176 R59770488 COMMUNICATOR TOUCH PANEL 06 06 2012 ...
Страница 182: ...5 Installation Image 5 56 Cloning Barco controller files 178 R59770488 COMMUNICATOR TOUCH PANEL 06 06 2012 ...
Страница 184: ...5 Installation Image 5 58 Restore clone file 180 R59770488 COMMUNICATOR TOUCH PANEL 06 06 2012 ...
Страница 201: ...5 Installation Image 5 76 Image orientation R59770488 COMMUNICATOR TOUCH PANEL 06 06 2012 197 ...
Страница 202: ...5 Installation 198 R59770488 COMMUNICATOR TOUCH PANEL 06 06 2012 ...
Страница 207: ...6 Maintenance Image 6 5 Launch DC update companion R59770488 COMMUNICATOR TOUCH PANEL 06 06 2012 203 ...
Страница 210: ...6 Maintenance Image 6 8 Barco release notes Image 6 9 IP selection 206 R59770488 COMMUNICATOR TOUCH PANEL 06 06 2012 ...
Страница 213: ...6 Maintenance Image 6 11 ICP software update R59770488 COMMUNICATOR TOUCH PANEL 06 06 2012 209 ...
Страница 214: ...6 Maintenance Image 6 12 IP selection 210 R59770488 COMMUNICATOR TOUCH PANEL 06 06 2012 ...
Страница 217: ...6 Maintenance Image 6 15 IP selection Image 6 16 Startup update R59770488 COMMUNICATOR TOUCH PANEL 06 06 2012 213 ...
Страница 239: ...7 Touch panel Image 7 17 R59770488 COMMUNICATOR TOUCH PANEL 06 06 2012 235 ...
Страница 245: ...7 Touch panel Image 7 23 Edit color palette R59770488 COMMUNICATOR TOUCH PANEL 06 06 2012 241 ...
Страница 274: ...8 Macro editor 270 R59770488 COMMUNICATOR TOUCH PANEL 06 06 2012 ...
Страница 280: ...A Source settings 276 R59770488 COMMUNICATOR TOUCH PANEL 06 06 2012 ...


