


R5900095 /03
CX-50
30
LEDs behavior
Explanation
red blinking
•
an error occurred
dark
•
deep standby/off
Power button
The button at the front of the Base Unit has a standby function once the Base unit is powered.
•
When the system is in normal operational mode, a push makes the system goes into a pre-defined standby
mode.
•
When the system is in standby, a push triggers the system to start up and it goes into normal operational
mode.
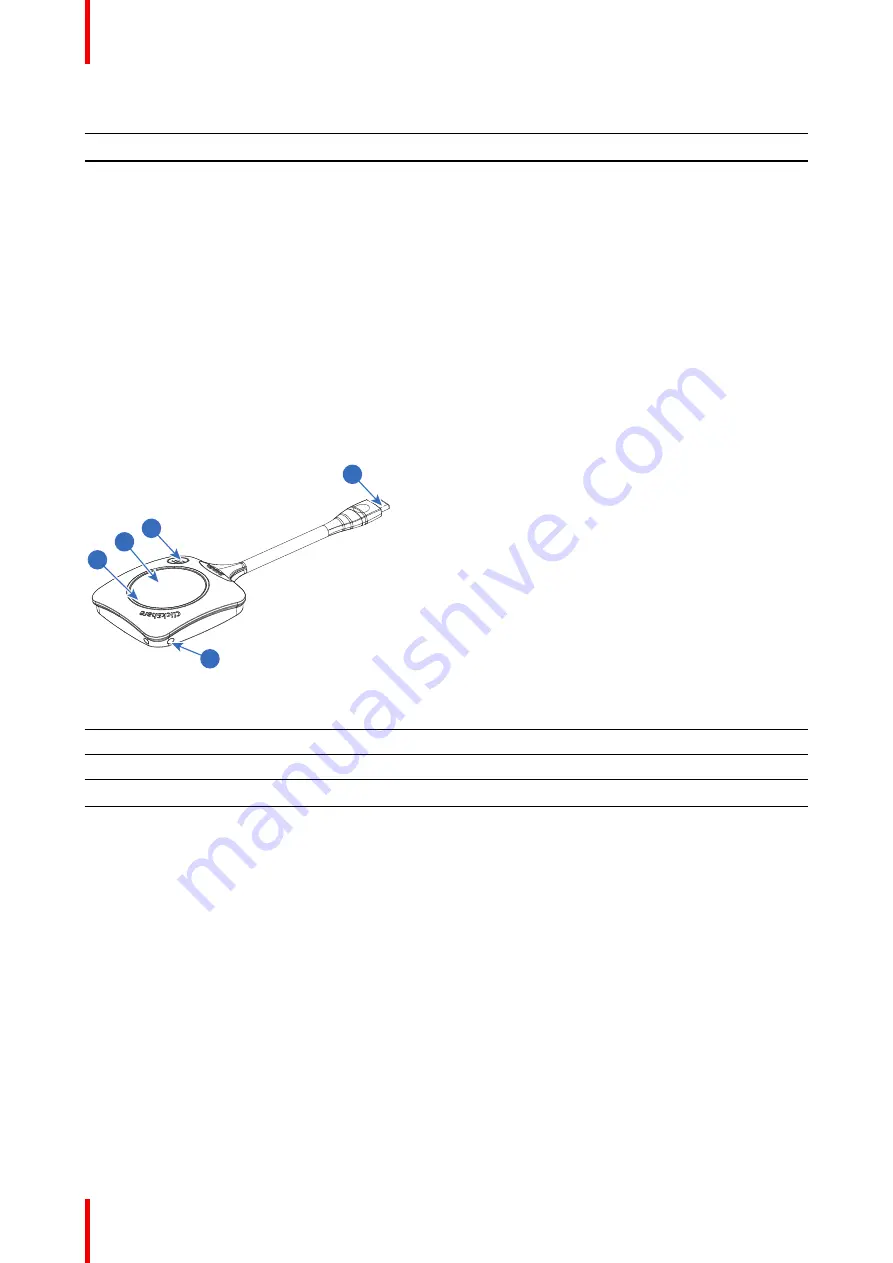
2.3 About the Button
Button layout
A Button consists of five main components
5
1
3
4
2
Image 2-3
1
USB Type-C
TM
connector
2
Quick access button
3
Button
4
LED ring
5
Strap hole
USB connector
Using the USB connector the Button can be plugged into a laptop (for sharing your screen) or the Base Unit
(for pairing the Button to the Base Unit or updating its software). Button R9861600D1C has a USB Type-C
TM
connector. Depending on the type of USB port on your laptop or on the Base Unit a convertor must be used.
Button
By inserting the Button, the peripherals attached to the Base Unit can be used in the tool of your preference.
Click the Button to display the content of the laptop's screen on the meeting room display. Clicking the Button
during the meeting will toggle the sharing of the screen. Click the small button to get additional functionality
and controls.
LED ring
The LED ring indicates the current status of your ClickShare.
Содержание C 5010S
Страница 1: ...ENABLING BRIGHT OUTCOMES User guide Model C 5010S R9861600D01C CX 50...
Страница 26: ...R5900095 03 CX 50 26 Introduction...
Страница 32: ...R5900095 03 CX 50 32 Introduction to CX 50...
Страница 46: ...R5900095 03 CX 50 46 Getting started...
Страница 47: ...47 R5900095 03 CX 50 Troubleshooting 4...
Страница 53: ...53 R5900095 03 CX 50 Environmental information 5...
Страница 57: ...R5900095 03 CX 50 57 Environmental information...