Baninni PLAYPEN FLESSI BNSF004 Скачать руководство пользователя страница 1

SLEEPOVER

COLLECTION

HANDLEIDING

MANUAL

MODE D’EMPLOI

GEBRAUCHSANLEITUN

PLAYPEN FLESSI

BNSF004

“WHERE DREAMS ARE MADE”

Conform aux exigences de sécurité

Conform all security regulations

Содержание PLAYPEN FLESSI BNSF004

Страница 1: ...SLEEPOVER COLLECTION HANDLEIDING MANUAL MODE D EMPLOI GEBRAUCHSANLEITUN PLAYPEN FLESSI BNSF004 WHERE DREAMS ARE MADE Conform aux exigences de sécurité Conform all security regulations ...

Страница 2: ... kind kunnen vormen 6 Alle montage elementen moeten goed worden vastgedraaid en er moet speciale aandacht worden besteed aan losse schroeven die aan het lichaam of de kleding van het kind kunnen haken bijvoorbeeld koorden of dummy lint Het kan een bedreiging vormen voor de gezondheid en het leven van het kind 7 Plaats de box niet in de buurt van vuur of andere hittebronnen 8 Bedek de box niet met ...

Страница 3: ...1 Haal het product uit de zak 2 Plaats het product zoals weergegeven in de onderstaande afbeelding MONTAGE 3 Open de box ...

Страница 4: ...4 Zet de box ondersteboven 5 Gebruik uw vinger om de riemen strakker te maken en op de buisconnector te bevestigen ...

Страница 5: ...6 Wikkel de riemen strak om de kruising van de buizen 7 Zet de versteviger recht en vergrendel hem ...

Страница 6: ...2 Verwijder riemen van de kruising van de buizen 3 Gebruik uw vinger om bevestigingsriemen van buisverbindingen te verwijderen DEMONTAGE 5 Vouw de box op en plaats hem in de tas Afbeeldingen zijn alleen ter referentie Het echte ontwerp van de producten kan afwijken van de gepresenteerde foto s ...

Страница 7: ...the child 6 All assembly elements must be properly tightened and special attention must be paid to loose screws which may hook on child s body or clothes It may pose a threat to the child s health and life 7 Do not position the playpen close to fire or other sources of heat 8 Do not cover the playpen with items which may hinder access of air or pose a threat to the child 9 Do not place the playpen...

Страница 8: ...1 Take the product out of the bag 2 Position the product as shown in the picture below ASSEMBLY 3 Open the playpen ...

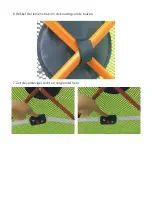
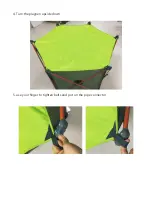
Страница 9: ...4 Turn the playpen upside down 5 use your finger to tighten belts and put on the pipe connector ...

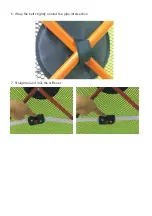
Страница 10: ...6 Wrap the belts tightly around the pipe intersection 7 Straighten and lock the stiffener ...

Страница 11: ...aypen upside down 2 remove the belts from the pipe intersections 3 Use your fingers to remove the fixing belts from the pipe connection DISASSEMBLY 5 Fold the playpen and put it in the bag Pictures may differ from the products you bought The pictures are for reference only ...

Страница 12: ... particulière doit être portée aux vis desserrées qui peuvent s accrocher au corps ou aux vêtements de l enfant par ex Cordons ou ruban fictif Cela peut constituer une menace pour la santé et la vie de l enfant 7 Ne placez pas la boîte près d un feu ou d autres sources de chaleur 8 Ne recouvrez pas la boîte d objets qui gênent l accès à l air ou qui représentent un danger pour l enfant 9 Ne placez...

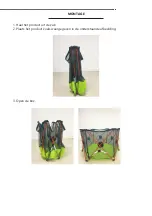
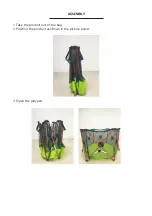
Страница 13: ...1 Retirez le produit du sac 2 Placez le produit comme indiqué sur l image ci dessous MONTAGE 3 Ouvrez la boîte ...

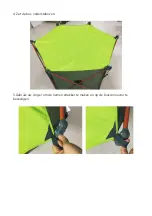
Страница 14: ...4 Retournez la boîte 5 Utilisez votre doigt pour serrer les sangles et fixez les au connecteur du tube ...

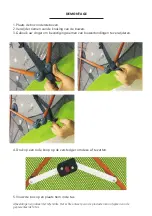
Страница 15: ...6 Enroulez les courroies fermement autour de la jonction des tubes 7 Redresser et verrouiller le raidisseur ...

Страница 16: ... 2 Enlevez les courroies de la jonction des tubes 3 Utilisez votre doigt pour retirer les sangles de fixation des raccords de tuyauterie DEMONTAGE 5 Pliez la boîte et placez la dans le sac Les images sont pour référence seulement Le design réel des produits peut différer des photos présentées ...

Страница 17: ...estgezogen werden und es muss besonders auf lose Schrauben geachtet werden die den Körper oder die Kleidung des Kindes verhaken kön nen Es kann eine Gefahr für die Gesundheit und das Leben des Kindes darstellen 7 Stellen Sie den Laufstall nicht in der Nähe von Feuer oder anderen Wärmequellen auf 8 Decken Sie den Laufstall nicht mit Gegenständen ab die den Zugang zu Luft behindern oder eine Gefahr ...

Страница 18: ...1 Nehmen Sie das Produkt aus dem Beutel 2 Positionieren Sie das Produkt wie in der Abbildung gezeigt MONTAGE 3 Öffnen Sie den Laufstall ...

Страница 19: ...4 Drehen Sie den Laufstall auf den Kopf 5 Verwenden Sie Ihren Finger um die Riemen anzuziehen und ziehen Sie den Rohrverbinder an ...

Страница 20: ...6 Wickeln Sie die Gurte fest um die Rohrkreuzung 7 Begradigen und verriegeln Sie die Versteifung ...

Страница 21: ...uf den Kopf 2 Entfernen Sie die Gurte von den Rohrkreuzungen 3 Entfernen Sie mit den Fingern die Fixierbänder vom Rohranschluss DEMONTIEREN 5 Falten Sie den Laufstall und legen Sie ihn in die Tasche Bilder können von den Produkten abweichen die Sie gekauft haben Die Bilder dienen nur als Referenz ...

Страница 22: ...IMPORTED BY IMPORTÉ PAR BANINNI VOORTSTRAAT 12 2490 BALEN BELGIUM www baninni com info baninni be ...

Отзывы: