background image

BSG TID-05-T30-01-005 


38 

The Configuration Software 

5.25. Global Writing Speed 

 
When creating steps, you can specify a delay time in milliseconds. This time value means 
that the keyboard program always waits the set time after the step has been executed. 
 
The global writing speed inserts an additional time value. This value determines how long 
the wait will be after a character is entered. 
Since not all machines can process fast entry of characters, an additional value can be set 
here. 
 

The following values can be selected 

  Low 

– 100 ms 

  Middle 

– 50 ms 

  High 

– 5 ms 


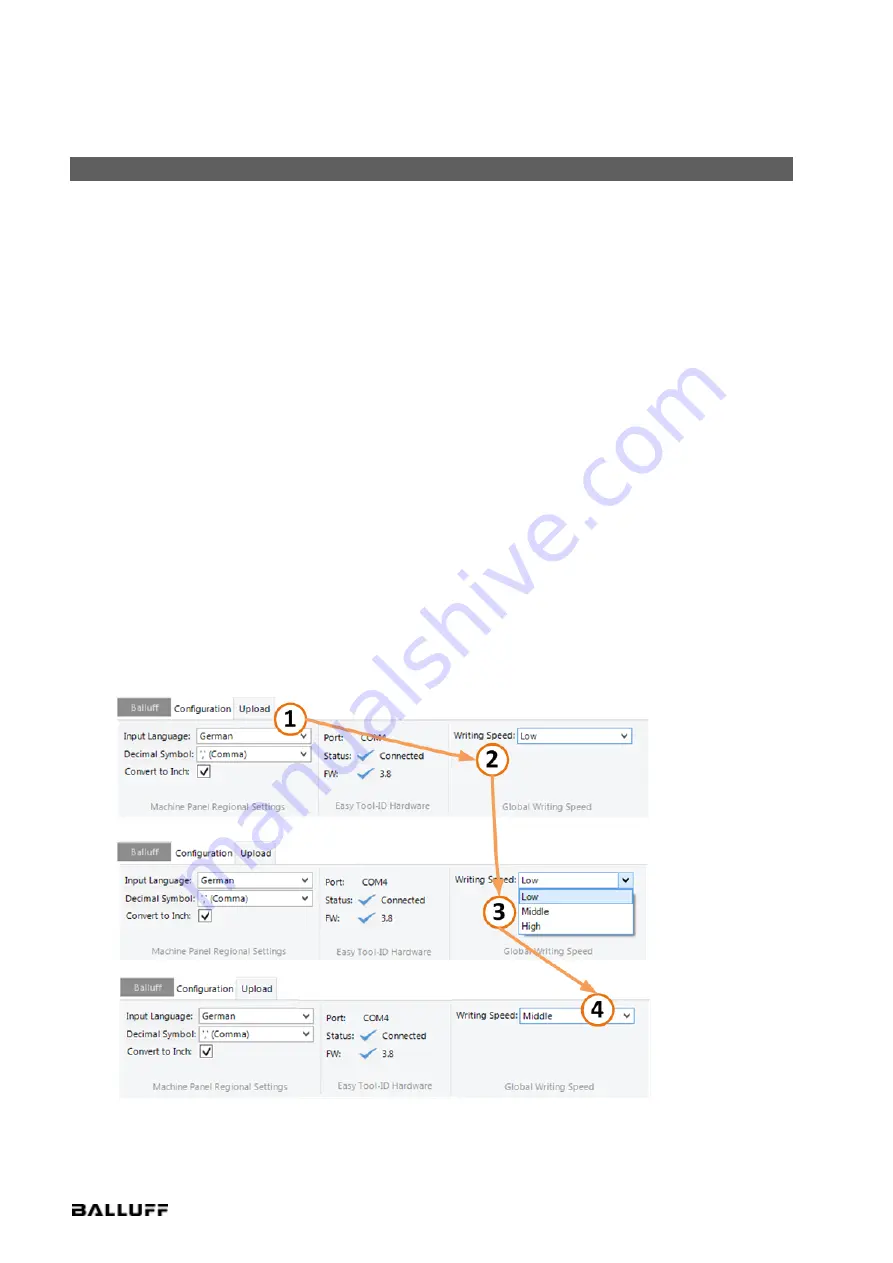
Specifying the keyboard writing speed 

  Open the 

Upload

 tab. (1) 

  Click on 

Writing Speed

. (2) 

  Select the desired value. (3, 4) 

  The setting is applied and sent at the next data transfer. 


Figure 32: Setting the writing speed 


Содержание Easy Tool-ID BSG TID-05-T30-00-005

Страница 1: ...BALLUFF Easy Tool ID BSG TID 05 T30 00 005 BSG TID 05 T30 01 005 Installation and Operation System...

Страница 2: ...1 System Requirements 14 5 2 Installation 15 5 3 Start and Function Overview 15 5 4 Creating Plans 16 5 5 Creating Multiple Plans 17 5 6 Entry Instructions 19 5 7 Deleting a Configuration Plan 20 5 8...

Страница 3: ...Updating the Firmware 41 6 1 Updating the Firmware 41 List of Illustrations 42...

Страница 4: ...erences Cross references indicate where additional information on the topic can be found e g see Section 5 Technical data 1 4 Symbols Note This symbol indicates a special note in your text Caution Thi...

Страница 5: ...2016 12 06 1 0 Final version 2017 02 07 1 1 Addition of the function Convert radius to diameter 2018 03 21 1 2 Addition of the functions Convert to inch Cancel function Copy and paste and Firmware up...

Страница 6: ...basic functions of tool identification Principle of tool identification using RFID All tool relevant data is stored without contact on a data carrier embedded in the tool holder Automatic loading into...

Страница 7: ...r the tool data into the screen at the ma chine automatically Balluff has developed a solution called Easy Tool ID enabling you to read tool data from the RFID chip and enter the data machine specific...

Страница 8: ...marily for identifying tools and is connect ed to the respective machine tools The microcontroller can be configured using configuration software see Section 5 and adapted to the input mask of the HMI...

Страница 9: ...supply BAE PS XA 1W 24 038 601 Various connection cables The stand can be secured to the ground via the mounting holes The power is supplied via the power supply unit integrated into the stand For inf...

Страница 10: ...B port on the machine tool expansion for external keyboard Power supply 100 240 V AC RFID data carriers attached to the tools e g BIS C 122 04 L or BIS M 122 02 A Presetter with integrated RFID functi...

Страница 11: ...ution The USB cable must not exceed 3 meters in length The system is now ready After selecting and installing the correct tool adapter you can begin processing data The following adapters are availabl...

Страница 12: ...his includes adhering to the permitted ambient conditions and regularly check ing the identification system with all associated components to ensure proper function Malfunctions If you find indication...

Страница 13: ...data carrier stores the infor mation and in which format it is stored Based on that the Easy Tool ID system can read the correct information out of the data carrier and transmit it to the machine tool...

Страница 14: ...sing time about 2 s the system begins outputting the contents in the HMI Caution To ensure the data is written correctly the HMI must not be manually controlled during the write operation In addition...

Страница 15: ...ion LED1 green When the system is executing a plan or a new configuration is being transmitted the LED is continuously lit If a plan is canceled the LED flashes in the rhythm long on short off long on...

Страница 16: ...y perform a reset Disconnect the system from the power and the USB port from the HMI wait a minute and then reconnect them The system does not output the data in the correct sequence or outputs the wr...

Страница 17: ...stall it in the program directory of Easy Tool ID usually C Program Files x86 Balluff GmbH Balluff Easy Tool ID Driver Note The drivers and configuration software only have to be installed on the comp...

Страница 18: ...pplication you are able to make various settings The following pages provide a detailed description of the respective configuration options Note Settings can be added activated or deleted deactivated...

Страница 19: ...ns Click the Create button 1 Enter a unique name 2 Enter a tool type number in the range from 0 to 30000 3 After entering valid values confirm them with Add 4 The configuration plan you just created w...

Страница 20: ...te multiple plans For different tool types there fore different entries may need to be made in the respective HMI For example Tool type 1 has only one cutting edge with a radius and a length The plan...

Страница 21: ...ld has to be stored on the RFID tag at bytes 116 and 117 step data 1 type Figure 11 Tool type number Then based on the number the microcontroller filters the respective plan on the RFID tag and execut...

Страница 22: ...n to the RFID chip by the presetter This means the values which are used there must also be entered in the Tool Type field We recommend using the Siemens tool types from the Siemens 840D Beginner s Ma...

Страница 23: ...ion Plan Select the configuration plan you wish to delete 1 Click the Delete button 2 You are prompted whether you really want to delete the plan Click on OK to delete the plan or on Cancel to not del...

Страница 24: ...BSG TID 05 T30 01 005 21 5 The Configuration Software 5 8 Sorting Plans Click the plan you wish to move 1 Click Up or Down to move the plan up or down in the list 2 Figure 14 Sorting plans...

Страница 25: ...n existing configuration plan Click the Edit button or double click the plan 1 Now you can change the plan name and the tool type number in the Edit window 2 The same rules apply as for creating plans...

Страница 26: ...figuration plan Click on Duplicate 1 Enter a new plan name and a new tool type number 2 3 The same rules apply as for creating plans Unique name and filter Confirm your entry by clicking on Add 4 The...

Страница 27: ...t the delay after execution of the step in milliseconds 4 Confirm your entry by clicking OK 5 The new step is displayed in the steps list Figure 17 Creating a shortcut Note A maximum of 2 keys can be...

Страница 28: ...ating a Data Step Click Add data 1 Select the desired data field 2 3 Enter a delay time after the step in milliseconds 4 Confirm your entry by clicking on Add 5 After the entry is saved the data field...

Страница 29: ...ma chine tool needs this value as a diameter To enable this through the Easy Tool ID system you can use the additional Convert to diameter function in the configuration software Select the Cross Dime...

Страница 30: ...ly ac cept less than three decimal places You can change the amount of decimal places in the software Select a data field with decimal places E g the Cross Dimension X data field 1 2 3 Select the amou...

Страница 31: ...BSG TID 05 T30 01 005 28 5 The Configuration Software 5 15 Sorting Steps Click on the step you wish to move 1 Click on Up or Down to move the step up or down in the list 2 Figure 21 Sorting steps...

Страница 32: ...0 01 005 29 5 The Configuration Software 5 16 Editing Steps Click the step you wish to edit 1 Clicking Edit or double clicking the step opens the Edit dialog 2 Modify the step as desired 3 Figure 22 E...

Страница 33: ...The Configuration Software 5 17 Deleting Steps Click on the step you wish to delete 1 Clicking on Delete deletes the selected step after the following security prompt is con firmed by clicking on OK 2...

Страница 34: ...Configuration Software 5 18 Duplicating Steps Click the step you wish to duplicate 1 Click Duplicate 2 If desired change the settings of the duplicated step 3 Click Duplicate to complete the duplicati...

Страница 35: ...and paste them into another Similar to Windows File Explorer you can select multiple steps Select the steps you wish to copy 1 Clicking the Copy button or Ctrl C copies the steps to the clipboard and...

Страница 36: ...tion Software 5 20 Loading a Configuration Clicking on Open opens the Open File dialog 1 Select the configuration you wish to open and click on Open 2 3 Figure 26 Loading a configuration Note Only fil...

Страница 37: ...ration Software 5 21 Saving a Configuration Clicking on Save opens the Save File dialog 1 Assign a location as well as a file name and lick on Save 2 3 Figure 27 Saving a configuration Note Only files...

Страница 38: ...Note The keyboard layout of the operating system is always determined and automatically entered when the program is started When a plan is loaded the keyboard layout is set according to the setting s...

Страница 39: ...ication and if Comma is set the number will appear as 100 23 in the application Note The default decimal separator is a dot Changing the decimal separator character Click on the Upload tab 1 The curre...

Страница 40: ...o inches when you create or edit a data step Figure 30 Converting to inches in the data step The setting for converting to inches is implemented globally All fields that can be converted are converted...

Страница 41: ...rts an additional time value This value determines how long the wait will be after a character is entered Since not all machines can process fast entry of characters an additional value can be set her...

Страница 42: ...automatically updated in the application Viewing the connection status Click on the Upload tab 1 The current connection status is displayed in the example no Easy Tool ID hardware is connected 2 A de...

Страница 43: ...y if there is an active connection Sending data to the hardware Click the Start transfer button 1 The Transfer Status window opens 2 When the transfer has finished close the window by clicking the Fin...

Страница 44: ...ID and selecting the Firmware Update software Run this software and follow the displayed steps Start the software If Easy Tool ID hardware is connected remove it and then reconnect it Repeat this proc...

Страница 45: ...ifying a configuration plan 22 Figure 16 Duplicating a configuration plan 23 Figure 17 Creating a shortcut 24 Figure 18 Creating a data field 25 Figure 19 Selecting the Convert to diameter function 26...

Страница 46: ...ww balluff com Balluff GmbH Schurwaldstrasse 9 73765 Neuhausen a d F Germany Tel 49 7158 173 0 Fax 49 7158 501 0 balluff balluff com No 932881 726 EN 02 127044 H18 Subject to modification replaces B17...

Отзывы: