background image

32

deutsch

6


WebUI / Webinterface (Fortsetzung)

6.4.3  LEDs

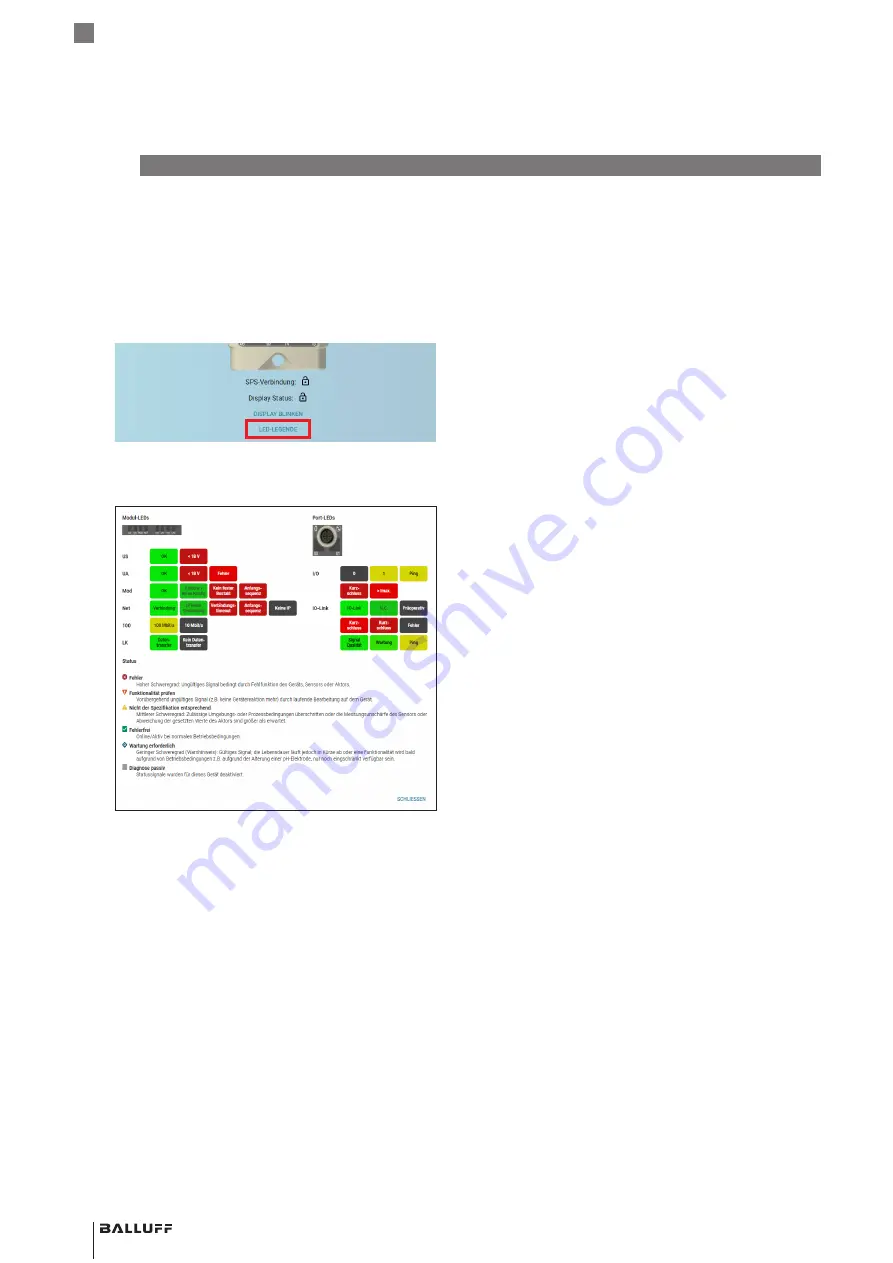
Über die LEDs des IO-Link-Masters werden Informationen 

über die aktuellen Prozessdaten und den Status des 

Moduls dargestellt. Die Bedeutungen der LEDs können in 

einer Legende eingesehen werden.

LED-Legende aufrufen


Auf 

led-legende

 klicken.

Bild 6-24:  LED-Legende aufrufen


Legende erscheint.

Bild 6-25:  LED-Legende

6.4.4  Display blinken

Mit 

d

iSplay


blinKen

 kann der IO-Link-Master visuell lokali-

siert werden. Das Display blinkt für 180 Sekunden.

BNI EIP-508-105-Z067

Netzwerkschnittstelle

Содержание BNI EIP-508-105-Z067

Страница 1: ...deutsch Konfigurationsanleitung english Configuration Guide BNI EIP 508 105 Z067 ...

Страница 2: ...www balluff com ...

Страница 3: ...BNI EIP 508 105 Z067 Konfigurationsanleitung deutsch ...

Страница 4: ...www balluff com ...

Страница 5: ...ramm 12 3 4 Fault State 13 3 5 IO Link Device Parametrierung 14 3 5 1 Read IO Link Parameter 14 3 5 2 Write IO Link Parameter 16 4 Prozessdaten 17 4 1 Prozessdateneingaben 17 4 1 1 Standard Eingabedaten 17 4 1 2 IO Link Eingabedaten 18 4 2 Prozessdatenausgaben 19 4 2 1 Standard Ausgabedaten 19 4 2 2 IO Link Ausgangsdaten 19 5 Display 20 5 1 Allgemeines 20 5 2 Adressvorgaben 20 5 3 Steuerung und Da...

Страница 6: ...figuration 28 6 4 3 LEDs 32 6 4 4 Display blinken 32 6 5 Diagnose 33 6 5 1 Status 33 6 5 2 Aktivitätsprotokoll 34 6 6 Einstellungen 35 6 7 Benachrichtigungen 41 6 8 REST API 41 6 8 1 Anmeldung 41 6 8 2 Abfrage der Geräteidentifikation des Moduls 41 6 8 3 Abfrage von Port Informationen 42 6 8 4 Abfragen eines IO Link Geräteparameters applicationSpecificTag 42 6 8 5 Setzen eines IO Link Geräteparame...

Страница 7: ...e vor der Umsetzung in Anlagen und Maschinen ob die hier verfügbare Beschrei bung für Ihre Anwendung bestimmt ist Mit Verwendung dieser kostenfrei zur Verfügung gestellten Beschreibung akzeptieren Sie die Gewährleistungs und Haftungsbe schränkung 1 2 Verwendete Symbole und Konventionen Einzelne Handlungsanweisungen werden durch ein vorangestelltes Dreieck angezeigt Handlungsanweisung 1 Handlungsab...

Страница 8: ... 3 Das Generic Ethernet Module als Ethernet Modul im Kommunikationspfad wählen 2 Systemintegration Bild 2 3 Generic Ethernet Module wählen 4 Tag Name eingeben benutzerdefiniert das allgemeine Format Data SINT wählen die IP Adresse des Moduls und die korrekten Verbindungsparameter eingeben und mit OK bestätigen Bild 2 4 New Module Dialog Das neue Modul und die entsprechenden Control ler Tags werden...

Страница 9: ...ie Tags über die Option Controller Tags beobachtet und angesteuert wer den Darauf achten den zuvor konfigurierten korrekten Tag Namen auszuwählen Die Eingabe Ausgabe und Konfigurationsdaten hierzu sind auf den nachfolgenden Seiten beschrieben Diese Tags können auch für die Programmierung eingesetzt werden Bild 2 7 Tag Erstellung beendet BNI EIP 508 105 Z067 Netzwerkschnittstelle ...

Страница 10: ...Link Ports 1 50 73 4 IO Link Port 2 Konfiguration des IO Link Ports 2 74 97 5 IO Link Port 3 Konfiguration des IO Link Ports 3 98 121 6 IO Link Port 4 Konfiguration des IO Link Ports 4 122 145 7 IO Link Port 5 Konfiguration des IO Link Ports 5 146 169 8 IO Link Port 6 Konfiguration des IO Link Ports 6 170 193 9 IO Link Port 7 Konfiguration des IO Link Ports 7 Tab 2 2 Konfigurationsdaten Modulkonfi...

Страница 11: ...evices bleiben gespeichert Gelöscht Datenhaltungsfunktionen deaktiviert gespei cherte Parameterdaten und Identifikationsdaten des IO Link Devices werden gelöscht Upload freigeben Wird nur der Upload freigegeben startet der Master in jedem Fall einen Upload der Parame terdaten Der Upload ist in diesem Fall unabhängig vom Uploadflag des IO Link Devices Wenn im Master Port keine Daten hinterlegt sind...

Страница 12: ...O Link Devices zu überschreiben Um das Uploadflag eines IO Link Devices zu aktivieren muss im Index 0x02 Subindex 0 der Datenwert 0x05 eingegeben werden Für Informationen zur Parametrierung über IO Link siehe I O Ports auf Seite 36 oder IO Link Device Parametrie rung auf Seite 14 2 Systemintegration Fortsetzung BNI EIP 508 105 Z067 Netzwerkschnittstelle ...

Страница 13: ...reitet QuickConnect über folgende Werte der Explicit Messages einstellen Klasse Instanz Attribute Wert 245 0xF5 1 0x01 12 0x0C 0 disabled default 1 enabled Tab 3 1 Mögliche Werte für Quick Connect Um QuickConnect zu ermöglichen muss die ACD Adress Conflict Detection ebenfalls aktiviert sein Diese ist standardmäßig eingeschaltet Die ACD Adress Conflict Detection kann über folgende Class Instance At...

Страница 14: ...ndung von Slave zu Slave mit einem Patch Kabel Für den Topologieaufbau ist nur die Lineartopologie mit maximal 20 Modulen auf der Toolseite zulässig Falls benötigt darf zwischen SPS und Ethernet IP Slave nur ein Managed Switch verwendet werden Zum Triggern der QuickConnect Sequenz wird ein Electrical Lock Signal benötigt das die Versorgungs spannung der QuickConnect Slaves über die Steue rung einl...

Страница 15: ...ate Aktivierung Deaktivierung Fault State Action Klasse Instance Attribute Value 9 0x09 1 m1 5 0 Output on 1 Hold last state 1 m Anzahl der Ausgänge Tab 3 4 Werte für Fault State Fault State Action Die Fault State Einstellungen sind nur temporär im Modul gespeichert Nach einem Power Reset werden diese wieder gelöscht Um eine dauerhafte Fault State Konfiguration zu gewährleisten muss die Konfigurat...

Страница 16: ...triert werden kann Hierfür werden im SPS Programm die MSG Bausteine verwendet siehe Bild 3 2 Bild 3 2 MSG Bausteine 3 5 1 Read IO Link Parameter Service Code Klasse Instanz Attribute 0x32 0x96 1 n1 0x03 Read Parameter 1 n Anzahl der Ports Tab 3 6 Werte Read IO Link Parameter Source Length muss mindestens den gelesenen Parame tern entsprechen kann aber auch größer eingegeben werden in diesem Beispi...

Страница 17: ...em Beispiel Index 0x4E Bild 3 4 Source Element Array eingeben Im Destination Array Read wird der ausgelesene Wert angezeigt Bei einem Parametrierfehler wird der Fehlercode dort ebenfalls angezeigt 3 Im Fenster Communication das Ethernet Modul auswäh len auf dem parametriert werden soll Bild 3 5 Ethernet Modul auswählen BNI EIP 508 105 Z067 Netzwerkschnittstelle ...

Страница 18: ...der zu schreibenden Parameterdaten haben In diesem Beispiel wird im Source Element Array Write der Index 0x4E Subindex 0 Wert 0x02 geschrieben Bei einem Parametrierfehler wird im Destination Ele ment Array Read ein Fehlercode angezeigt Bild 3 6 Configuration 2 Im Tab Communication das Ethernet Modul auswählen auf dem parametriert werden soll Bild 3 7 Ethernet Modul auswählen Die Explicit Messages ...

Страница 19: ...ssdateneingaben am IO Link Port 6 344 391 IO Link Port 7 Prozessdateneingaben am IO Link Port 7 Tab 4 1 Prozessdateneingaben BNI EIP 508 105 Z067 4 1 1 Standard Eingabedaten Byte Bit Beschreibung 7 6 5 4 3 2 1 0 0 I32 I34 I22 I24 I12 I14 I02 I04 Eingabedaten I04 Eingabe an Port 0 Pin 4 Nur wenn der Port als IO Link Port konfiguriert ist ist das Ergebnis 0 1 I72 I74 I62 I64 I52 I54 I42 I44 2 S3 S2 ...

Страница 20: ...n ungültig 42 Herstellercode 1 Herstellercode 43 Herstellercode 2 44 Gerätecode 1 Gerätecode 45 Gerätecode 2 46 Gerätecode 3 47 Mode Type 0 Event 1 Modus 0 Reserviert 1 Einzel Event 2 Event gehend 3 Event kommend Type 0 Reserviert 1 Meldung 2 Warnung 3 Fehler 48 Event code hoch 49 Event code niedrig 50 Mode Type 0 Event 2 51 Event code hoch 52 Event code niedrig 53 Mode Type 0 Event 3 54 Event cod...

Страница 21: ...t 7 Tab 4 4 Prozessdatenausgaben BNI EIP 508 105 Z067 4 2 1 Standard Ausgabedaten Byte Bit Beschreibung 7 6 5 4 3 2 1 0 0 O32 O34 O22 O24 O12 O14 O02 O04 Ausgabedaten O04 Ausgabe an Port 0 Pin 4 Um diese Funktion an einem IO Link Port zu verwenden muss der Port als Ausgang konfiguriert sein 1 O72 O74 O62 O64 O52 O54 O42 O44 2 R32 R34 R22 R24 R12 R14 R02 R04 Neustart Neustart der Ausgabe nach festg...

Страница 22: ... Display 4 Adresse Typ Cursor 2 Pfeil Taste 5 Set Taste 3 Octett Cursor 6 LEDs Bild 5 1 Erklärung der Bedienfläche 5 4 Display Informationen Cursor zur Auswahl des Adresstyps Cursor zur Auswahl des Oktetts 0 1 2 3 IP SN GW IP IP Adresse 3 erstes Oktett SN Subnetzadresse 2 zweites Oktett GW Gateway Adresse 1 drittes Oktett 0 viertes Oktett Bild 5 2 Erklärung des Displays 5 5 Design und Symbole In d...

Страница 23: ...rch das Hauptmenü zu scrollen Pfeil Taste drücken um das Menü aufzurufen 5 8 IP Setup Bild 5 3 IP Editiermodus Editiermodus X Statisch DHCP Statisch DHCP X Statisch X DHCP X Statisch DHCP IP Setup Die Set Taste lange drücken um den Bearbeitungsmo dus aufzurufen Die Konfiguration des bevorzugten Werts erfolgt durch kurzes Drücken der Pfeil Taste BNI EIP 508 105 Z067 Netzwerkschnittstelle ...

Страница 24: ...ufen Durch kurzes Drücken der Set Taste wird der eingege bene Wert gespeichert und zum nächsten Oktett weitergescrollt Das 4 Oktett stellt den Beginn des Editiervorgangs dar Die vollständig eingegebene Adresse wird durch kurzes Drücken der Set Taste bei Bearbeitung des ersten Oktetts gespeichert Der eingegebene Wert erscheint unmittelbar im Anschluss auf der IP Übersichtsanzeige Manuelle Veränderu...

Страница 25: ... nächsten Stelle zu gelangen 5 Nach der letzten Stelle die Set Taste kurz drücken um zur nächsten Oktett der Adresse zu gelangen bzw um nach dem letzten Oktett die neue Nummer zu überneh men Um mit der neuen Konfiguration zu arbeiten muss das Modul neu gestartet werden 5 11 Modulinformationen Bild 5 6 Modulinformationen Mit kurzem Drücken der Pfeil Taste durch das Menü Modul Informationen scrollen...

Страница 26: ...Rückkehr zur vorherigen Anzeige Durch kurzes Drücken der Set Taste kann der Ping Modus vorzeitig verlassen werden Empfängt das Modul einen doppelten Ping oder mehr erscheint das Wort Ping im Display Die Anzeige kann nur durch kurzes Drücken der Set Taste verlassen werden Es erfolgt die Rückkehr zur Anzeige vor dem Ping Die LED Funktion der Display LEDs kann anwender spezifisch durch das Einstellen...

Страница 27: ...cons einen Wechsel zwischen den verschiedenen Dialogen des Web interface ermöglicht Startseite siehe Seite 28 Diagnose siehe Seite 33 Einstellungen siehe Seite 35 Benachrichtigungen siehe Seite 41 Benutzermenü siehe Seite 25 Bild 6 1 Startseite Diagnose Einstellungen Benachrichtigungen Benutzermenü Navigationsleiste Per Mouseover werden die Bezeichnungen der verschiedenen Icons angezeigt 6 3 Benut...

Страница 28: ...nutzerinfor mationen das Passwort und dessen Bestätigung in ver deckter Ansicht sowie die Rolle des Benutzers angegeben Bild 6 7 Benutzerverwaltung Berechtigungen sind rollenabhängig Berechtigung Benutzerrolle ADMIN EXPERTE NUTZER Geräteparameter lesen X X X Geräteparameter schreiben X X Benutzer hinzu fügen X Benutzer löschen X Tab 6 1 Benutzerrechte Die Bearbeitung für Felder und Schaltflächen k...

Страница 29: ...zögerungen führen Um über das Webinterface auf dem IO Link Master Konfi gurationseinstellungen vornehmen zu können muss zuvor eine Anmeldung mit der Rolle EXPERTE oder ADMIN erfolgen Eine Anmeldung mit der Rolle NUTZER schaltet weitere Dialoge lediglich zur Einsicht frei Der aktuelle Status lässt sich jederzeit am Benutzer Icon erkennen Nicht angemeldet Angemeldet Bild 6 10 Benutzer Icon Anmelden ...

Страница 30: ... 6 4 2 Portübersicht Konfiguration Ist ein IO Link Gerät an einem der konfigurierten IO Link Ports angeschlossen werden in der Abbildung auf der linken Seite die Moduldaten an den Ports und die Geräte daten in Schaltflächen angezeigt Nach Wählen einer dieser Schaltflächen wird der entsprechende Portdialog aufgerufen Der Standardwert des angezeigten DeviceAlias ist an die Frontbedruckung angepasst ...

Страница 31: ...umb wählen Alternativ den Zielport über die Breadcrumb Navigation in der Kopfzeile wählen Bild 6 16 IO Link Port in der Breadcrumb Navigation wählen Die Daten des IO Link Geräts werden nur ange zeigt wenn der Port als IO Link Port konfiguriert ist zu erkennen an der grün leuchtenden Port LED 6 WebUI Webinterface Fortsetzung BNI EIP 508 105 Z067 Netzwerkschnittstelle ...

Страница 32: ... IO Link Master hochgeladen ist siehe Bild 6 18 Bild 6 18 IODD Sollte dies nicht der Fall sein gelangt man mit einem Klick auf IODD hochladen zum Reiter Einstellungen Auf Basis der verbundenen IO Link Geräte kann hier die passende Gerätebeschreibung zum Upload ausgewählt werden Prozessdaten Unter Prozessdaten werden nur dann interpretierte Daten angezeigt wenn eine passende IODD hinterlegt ist Um ...

Страница 33: ...ezeigt siehe Bild 6 22 Analog zum Vorgehen bei den Geräteidentifikationsdaten können Parameterwerte und zugehörige Texte aus der hinterlegten IODD je nach Parameter über Lesen bzw Alle lesen einge stellt werden Sofern vorhanden kann mit Klick auf das Icon eine Dropdown Liste geöffnet und ein Wert ausgewählt werden bzw ein Wert innerhalb eines bestimmten Bereichs ausge wählt und mit Schreiben bestä...

Страница 34: ... dargestellt Die Bedeutungen der LEDs können in einer Legende eingesehen werden LED Legende aufrufen Auf LED LEGENDE klicken Bild 6 24 LED Legende aufrufen Legende erscheint Bild 6 25 LED Legende 6 4 4 Display blinken Mit Display blinken kann der IO Link Master visuell lokali siert werden Das Display blinkt für 180 Sekunden BNI EIP 508 105 Z067 Netzwerkschnittstelle ...

Страница 35: ...tabel larische Darstellung der Log Informationen Die Informatio nen können mit Klick auf das Drucker Icon z B für eine Service Anfrage als PDF gedruckt werden Wenn Sie eine detaillierte Frage zu einem kon kreten Fall haben speichern bzw drucken Sie diese Website als PDF Datei und senden uns diese zur technischen Unterstützung zu Die entsprechenden Kontaktdaten finden Sie unter www balluff com 6 5 ...

Страница 36: ...Critical Der IO Link Master hat einen Defekt an sich selbst Hardware oder Software festgestellt was im Normal betrieb nicht vorkommen darf Tritt dieser Fall ein muss das Modul gewartet oder ausgetauscht werden Externer Fehler Error Warning Der IO Link Master hat ein möglicherweise unzuläs siges Ereignis festgestellt das von außen auf das Modul einwirkt Eine Störungssuche in der Anlage könnte notwe...

Страница 37: ...olgt eingestellt werden 1 Unter Modul siehe Bild 6 28 die Modulzeit entweder manuell über einen Klick auf das Kalender Icon oder über den Dialog Vom PC einstellen die aktuelle Uhrzeit des Browsers auf den IO Link Master übertragen Bild 6 28 Modulzeit einstellen 2 Mit SPEICHERN die Einstellungen dauerhaft überneh men Die Modulzeit wird nicht permanent gespeichert Nach einem Reset Reboot oder einer ...

Страница 38: ...ALLE SETZEN öffnet sich ein Dialogfenster in dem die Aktion bestätigt oder abgebrochen werden kann Bei entsprechender Auswahl erscheint im unteren Teil der Website die Meldung I O Portkonfiguration en erfolgreich gespeichert Bild 6 31 Alle Setzen Dialog Die Ports können auch einzeln jeweils über Eingabe bzw Auswahl der Punkte Geräte Alias Modus Pin 4 Zykluszeit und Modus Pin 2 Class_A konfiguriert...

Страница 39: ...Parameterwerte Änderungen der aktuellen Parame terwerte werden gespeichert Bei Anschluss eines gleichen IO Link Devices werden die Parameterwerte wiederhergestellt V1 1 Wiederher stellung Keine Automa tische Sicherung der Parameter werte Änderungen der aktuellen Para meterwerte werden nicht gespeichert Bei Anschluss eines gleichen IO Link Devices werden die Parameterwerte wiederhergestellt Zyklusz...

Страница 40: ...ch ist Verbundene IO Link Geräte Bei angeschlossenen IO Link Geräten und aktivierten IO Link Ports zeigt der Dialog eine Tabelle mit Informatio nen über die IO Link Geräte an Diese kann über das Aktualisierungs Icon aktualisiert werden Bild 6 33 Verbundene IO Link Geräte Verfügbare IODDs Die zur Verfügung stehenden IODDs sind unter dem Punkt Verfügbare IODDs gelistet und können bei Bedarf über das...

Страница 41: ...einer eingeschränkten Namenslänge Da IODD Dateien in der Regel mit langen Dateinamen veröffentlicht werden müssen diese zur Abspeicherung auf den IO Link Master nach einem bestimmten Schema umbenannt werden Dies geschieht bei IODD Dateien automatisch im Hintergrund Wird über DATEI HOCHLADEN eine einzelne Bilddatei für den Upload ausgewählt die den Namensanforderungen nicht entspricht öffnet sich e...

Страница 42: ...ne andere Firmware Version hochgeladen werden Es werden nur Dateien im BFW Format unterstützt Bild 6 37 Ansicht Firmware Ausgangstest Über den Dialog Ausgangstest kann jeder Ausgangs Pin online getestet werden Um den Ausgang entweder auf 0 oder auf 1 zu setzen muss der jeweilige Pin zuvor über den Dialog I O Ports als Digital Output konfiguriert wer den An einem physikalischen Port können variante...

Страница 43: ... JSON for IO Link REST API beschreibt eine weitere Funktionalität für Prozess daten und Parametern welche IODD Unterstüt zung benötigt Auch diese Funktionalität ist in der aktuellen Version nicht vollständig implementiert Das Modul unterstützt nur das Hochladen von IODDs Das Schreiben Lesen von Prozessdaten oder Parametern mit deren Namen wird nicht unterstützt Im Folgenden wird an einigen Beispie...

Страница 44: ...r folgende Adresse möglich http ip address iolink v1 devices deviceAlias parame ters index value Der deviceAlias entspricht der Gerätebezeichnung des IO Link Geräts z B Port_00 Der Index reflektiert die zu setzende ISDU Parametervariable im IO Link Gerät im Fall des applicationSpecificTag wäre das der Wert 24 Zum Setzen von Werten muss außerdem ein JSON Objekt mitgegeben werden in dem entsprechend...

Страница 45: ...BNI EIP 508 105 Z067 Configuration Guide english ...

Страница 46: ...www balluff com ...

Страница 47: ...C program 12 3 4 Fault State 13 3 5 IO Link device parameterization 14 3 5 1 Read IO Link parameters 14 3 5 2 Write IO Link parameters 16 4 Process data 17 4 1 Process data inputs 17 4 1 1 Standard input data 17 4 1 2 IO Link input data 18 4 2 Process data outputs 19 4 2 1 Standard output data 19 4 2 2 IO Link output data 19 5 Display 20 5 1 General 20 5 2 Address details 20 5 3 Control and displa...

Страница 48: ...erview configuration 28 6 4 3 LEDs 32 6 4 4 Display flashing 32 6 5 Diagnosis 33 6 5 1 Status 33 6 5 2 Activity log 34 6 6 Settings 35 6 7 Notifications 41 6 8 REST API 41 6 8 1 Login 41 6 8 2 Requesting the device identification of the module 41 6 8 3 Requesting port information 42 6 8 4 Requesting an IO Link device parameter applicationSpecificTag 42 6 8 5 Setting an IO Link device parameter app...

Страница 49: ... in systems and machines please check whether the description provided here is intended for your application The use of this free description shall be deemed to imply acceptance of the warranty and liability limitation 1 2 Symbols and conventions Individual action instructions are indicated by a preceding triangle Instruction 1 Action sequences are numbered consecutively 1 Instruction 1 2 Instruct...

Страница 50: ...Module 3 Select the Generic Ethernet Module as Ethernet module in the communication path 2 System integration Fig 2 3 Select Generic Ethernet Module 4 Enter tag name user defined select the general format Data SINT enter the IP address of the module and the correct connection parameters and confirm with OK Fig 2 4 New Module dialog The new module and the corresponding controller tags are automatic...

Страница 51: ...nload is completed the tags can be monitored and activated using the Controller tags option Make sure to select the previously configured correct tag name The entry output and configuration data are described on the following pages These tags can also be used for programming Fig 2 7 Tag creation completed BNI EIP 508 105 Z067 Network interface ...

Страница 52: ... Link Port 1 50 73 4 IO Link Port 2 Configuration of the IO Link Port 2 74 97 5 IO Link Port 3 Configuration of the IO Link Port 3 98 121 6 IO Link Port 4 Configuration of the IO Link Port 4 122 145 7 IO Link Port 5 Configuration of the IO Link Port 5 146 169 8 IO Link Port 6 Configuration of the IO Link Port 6 170 193 9 IO Link Port 7 Configuration of the IO Link Port 7 Tab 2 2 Configuration data...

Страница 53: ... the IO Link devices remain in the memory Deleted Data retention functions deactivated saved parameter data and identification data of the IO Link devices are deleted Enable upload If only the upload is enabled in each case the master starts an upload of the parameter data In this case the upload is performed irrespective of the upload flag of the IO Link device If there are no data in the master ...

Страница 54: ...eter data of the same IO Link device In order to activate the upload flag of an IO Link device the data value 0x05 must be entered in the index 0x02 subindex 0 For information on setting parameters via IO Link see I O ports on page 36 or IO Link device parameterization on page 14 2 System integration continued BNI EIP 508 105 Z067 Network interface ...

Страница 55: ...Set QuickConnect using the following values of the Explicit Messages Class Instance Attribute Value 245 0xF5 1 0x01 12 0x0C 0 disabled default 1 enabled Tab 3 1 Possible values for Quick Connect The ACD Address Conflict Detection must also be activated to enable QuickConnect This is switched on by default The ACD Address Conflict Detection can be checked and changed via the following Class Instanc...

Страница 56: ...able Connection from slave to slave with patch cable For the topology structure only the linear topology with maximum 20 modules is permitted on the tool side If required only one Managed Switch may be used between PLC and Ethernet IP slave An Electrical Lock Signal is required for triggering the QuickConnect sequence which reads the supply voltage of the QuickConnect slaves via the control 3 3 PL...

Страница 57: ...e Activation Deactivation Fault State Action Class Instance Attribute Value 9 0x09 1 m1 5 0 Output on 1 Hold last state 1 m Number of outputs Tab 3 4 Values for Fault State Fault State Action The Fault State settings are only stored temporarily in the module They are deleted again after a power reset In order to ensure a permanent Fault State configuration the configuration must be programmed via ...

Страница 58: ...be parameterized via Explicit Messages The MSG modules are used in the PLC program see Fig 3 2 Fig 3 2 MSG modules 3 5 1 Read IO Link parameters Service code Class Instance Attribute 0x32 0x96 1 n1 0x03 Read parameters 1 n Number of ports Tab 3 6 Values for read IO Link parameters Source Length must at least correspond to the read parameters but can also be bigger in this example 100 bytes 1 As a ...

Страница 59: ...example Index 0x4E Fig 3 4 Enter Source Element Array The read value is displayed in the Destination Array Read The error code is also displayed there in the event of a parameterization error 3 In the Communication window select the Ethernet module for which parameters should be set Fig 3 5 Select Ethernet module BNI EIP 508 105 Z067 Network interface ...

Страница 60: ...ngth as the parameter data to be written In this example the index 0x4E subindex 0 value 0x02 are written in the Source Element Array Write In the event of a parameterization error an error code is displayed in the Destination Element Array Read Fig 3 6 Configuration 2 In the Communication tab select the Ethernet module for which parameters should be set Fig 3 7 Select Ethernet module The Explicit...

Страница 61: ...k Port 6 Process data inputs for the IO Link Port 6 344 391 IO Link Port 7 Process data inputs for the IO Link Port 7 Tab 4 1 Process data inputs BNI EIP 508 105 Z067 4 1 1 Standard input data Byte Bit Description 7 6 5 4 3 2 1 0 0 I32 I34 I22 I24 I12 I14 I02 I04 Input data I04 Input for port 0 pin 4 The result is only 0 when the port is configured as an IO Link Port 1 I72 I74 I62 I64 I52 I54 I42 ...

Страница 62: ... 42 Manufacturer code 1 Manufacturer code 43 Manufacturer code 2 44 Device code 1 Device code 45 Device code 2 46 Device code 3 47 Mode Type 0 Event 1 Mode 0 reserved 1 Single event 2 Event outgoing 3 Event incoming Type 0 reserved 1 Message 2 Warning 3 Error 48 Event code high 49 Event code low 50 Mode Type 0 Event 2 51 Event code high 52 Event code low 53 Mode Type 0 Event 3 54 Event code high 5...

Страница 63: ...Process data output for the IO Link Port 7 Tab 4 4 Process data outputs BNI EIP 508 105 Z067 4 2 1 Standard output data Byte Bit Description 7 6 5 4 3 2 1 0 0 O32 O34 O22 O24 O12 O14 O02 O04 Output data O04 Output at port 0 pin 4 The port must be configured as an output in order to use this function at an IO Link Port 1 O72 O74 O62 O64 O52 O54 O42 O44 2 R32 R34 R22 R24 R12 R14 R02 R04 Restart Rest...

Страница 64: ...ursor 2 Arrow button 5 Set button 3 Octet cursor 6 LEDs Fig 5 1 Explanation of the control panel 5 4 Display information Cursor to select the address type Cursor to select the octet 0 1 2 3 IP SN GW IP IP address 3 First octet SN Subnet address 2 Second octet GW Gateway address 1 Third octet 0 Fourth octet Fig 5 2 Explanation of display 5 5 Design and symbols In the following diagrams a number of ...

Страница 65: ...t button briefly to scroll through the main menu Press the arrow button to bring up the menu 5 8 IP Setup Fig 5 3 IP Edit mode Edit mode X Static DHCP Static DHCP X Static X DHCP X Static DHCP IP Setup Press the Set button for several seconds to bring up Edit mode The preferred value is configured by briefly pressing the arrow button BNI EIP 508 105 Z067 Network interface ...

Страница 66: ... pressing the arrow button for several seconds Briefly press the Set button to save the input value and scroll to the next octet The 4th octet marks the start of the editing process The full address entered is saved by briefly pressing the Set button when editing the first octet The entered value appears immediately on the IP overview display Manual changes to IP subnet or gateway lead to an autom...

Страница 67: ...t button to go to the next position 5 After the last position briefly press the Set button to go to the next octet of the address or to apply the new number after the last octet The module must be restarted to work with the new configuration 5 11 Module information Fig 5 6 Module information Scroll through the Module information menu by briefly pressing the arrow button The information displayed i...

Страница 68: ...veral seconds Then the display returns to the previous display Ping mode can be exited early by briefly pressing the Set button If the module receives a double ping or more the word ping appears on the display The display can only be exited by briefly pressing the Set button The display returns to the display before the ping The LED function of the display LEDs can be defined specific to the user ...

Страница 69: ...p window area there is a navigation bar which enables you to switch between the different dialogs of the web interface by clicking on the corresponding icons Homepage see page 28 Diagnosis see page 33 Settings see page 35 Notifications see page 40 User menu see page 25 Fig 6 1 Homepage Diagnosis Settings Notifications User Menu Navigation bar Hover the mouse over the different icons to see the cor...

Страница 70: ... inactive the user name user information password and its confirmation in hidden view as well as the user s role is specified Fig 6 7 User Management Authorizations are role dependent Authorization User role ADMIN EXPERT USER Read device parameters X X X Write device parameters X X Adding users X Deleting users X Tab 6 1 User rights Click on the pen icon to edit fields and buttons see Fig 6 8 Fig ...

Страница 71: ...allel accesses can result in response delays To make configuration settings on the IO Link master via the web interface you must first log in with the EXPERT or ADMIN role Logging in with the USER role activates further dialogs in view only mode The user icon indicates the current status at all times Not logged in Logged in Fig 6 10 User icon Login 1 Login see Fig 6 2 on page 25 opens the login di...

Страница 72: ...Port overview configuration If an IO Link device is connected to one of the configured IO Link ports the module data at the ports and the device data are displayed in buttons on the left hand side of the figure After one of these buttons is selected the corresponding port dialog opens The default value of the DeviceAlias displayed is adapted to the front label e g Port 00 for Port 1 The port numbe...

Страница 73: ...in the breadcrumb Alternatively select the target port via the breadcrumb navigation in the header Fig 6 16 Selecting the IO Link port in the breadcrumb navigation The IO Link device data is only displayed if the port is configured as an IO Link port can be identified by the green port LED 6 WebUI web interface continued BNI EIP 508 105 Z067 Network interface ...

Страница 74: ...ed to this port is uploaded to the IO Link master see Fig 6 18 Fig 6 18 IODD If this is not the case click on Upload IODD to access the Settings tab page Based on the connected IO Link devices the corresponding device description can be selected for upload Process data Under Process Data interpreted data is only shown if a suitable IODD is saved To display the data more clearly information from th...

Страница 75: ...ayed in the form of a table see Fig 6 22 Similarly to the process for device identification data parameter values and associated texts from the saved IODD can be configured depending on the parameter via Read or Read all If available click on the icon to open a dropdown list and select a value or select a value within a specific range and confirm with Write If there is no Read button next to subin...

Страница 76: ...odule status The meanings of the LEDs can be viewed in a legend Opening the LED legend Click on LED LEGEND Fig 6 24 Opening the LED legend The legend appears Fig 6 25 LED legend 6 4 4 Display flashing With Display flashing the IO Link Master can be pinpointed visually The display flashes for 180 seconds BNI EIP 508 105 Z067 Network interface ...

Страница 77: ...le the Activity Log tab page contains a table view of the log information The information can be printed as a PDF by clicking on the printer icon e g for a service request If you have a specific question about a specific case save or print this website as a PDF file and send it to us for technical support You can find the corresponding contact details at www balluff com 6 5 1 Status Via the Status...

Страница 78: ... Alert Critical The IO Link master has found an internal defect hardware or software which should not normally occur If this occurs the module must be maintained or replaced External error Error Warning The IO Link master has found a potentially impermissible event which is affecting the module from outside Troubleshooting in the system might be necessary Event Informational Notice The IO Link mas...

Страница 79: ...The module time can be set as follows 1 Under Module see Fig 6 28 either enter the Module Time manually by clicking on the calendar icon or transfer the current browser time to the IO Link master via the Set from PC dialog Fig 6 28 Setting the module time 2 Apply the settings permanently by clicking on SAVE The module time is not permanently stored After a reset reboot or a deenergized phase the t...

Страница 80: ...L to open a dialog window in which the action can be confirmed or canceled With a corresponding selection the message I O port configuration s successfully saved appears in the bottom part of the website Fig 6 31 Set All dialog The ports can also be configured individually by entering or selecting the Device Alias Modus Pin 4 Cycle Time and Modus Pin 2 Class_A points The inputs are confirmed with ...

Страница 81: ...e V1 1 Backup and recovery Automatic backup of parameter values Changes to the current parameter values are saved The parameter values are restored when a similar IO Link device is connected V1 1 Recovery No automatic backup of parameter values Changes to the current parameter values are not saved The parameter values are restored when a similar IO Link device is connected Cycle Time if the IO Lin...

Страница 82: ...vided in the Ports dialog Connected IO Link devices When IO Link devices are connected and IO Link ports are activated the dialog shows a table with information on the IO Link devices This can be updated by clicking on the refresh icon Fig 6 33 Connected IO Link devices Available IODDs The available IODDs are listed under Available IODDs and can be removed by clicking on the recycle bin icon if ne...

Страница 83: ... with a restricted name length Since IODD files are usually published with long file names these must be renamed according to a specific schema for storage on the IO Link master This is done automatically in the background for IODD files If an individual image file is selected for upload via UPLOAD FILE which does not meet the naming requirements a dialog will open with a corresponding message Fig...

Страница 84: ...N for IO Link standardized by the IO Link community The Connected IO Link devices bar also displays help in the form of a list of currently connected IO Link devices as well as the associated required IODD file name column IODD Filename To avoid manual renaming of the associated image files we recommend uploading ZIP files with the IODD content Firmware Under Firmware you can see which version of ...

Страница 85: ...em changes or modifications are made POST methods chapters 6 8 5 and 6 8 6 require the use of a login 6 8 1 Login Login is possible by entering the following address http ip address api balluff v1 users login A JSON object is also specified in which as shown below a user name and password are specified see chapter 6 3 5 on page 27 username username password password If the login was successful you...

Страница 86: ...IO Link devices can be set via the following address http ip address iolink v1 devices deviceAlias parameters index value The deviceAlias corresponds to the device designation of the IO Link device e g Port_00 The Index reflects the ISDU parameter variable to be set in the IO Link device In the case of the applicationSpecificTag this would be the value 24 To set values a JSON object must also be s...

Страница 87: ......

Страница 88: ...Chengshan Rd 8F Building A Yunding International Commercial Plaza 200125 Pudong Shanghai Phone 86 400 820 0016 Fax 86 400 920 2622 service cn balluff com cn DACH Service Center Germany Balluff GmbH Schurwaldstrasse 9 73765 Neuhausen a d F Phone 49 7158 173 370 service de balluff de Eastern Europe Service Center Poland Balluff Sp z o o Ul Graniczna 21A 54 516 Wrocław Phone 48 71 382 09 02 service p...

Отзывы: