background image

Spa Device Buttons

G

TP700 

USER GUIDE   


42370 Rev A

13

12

Balboa Water Group   |   Your Single Source Solution

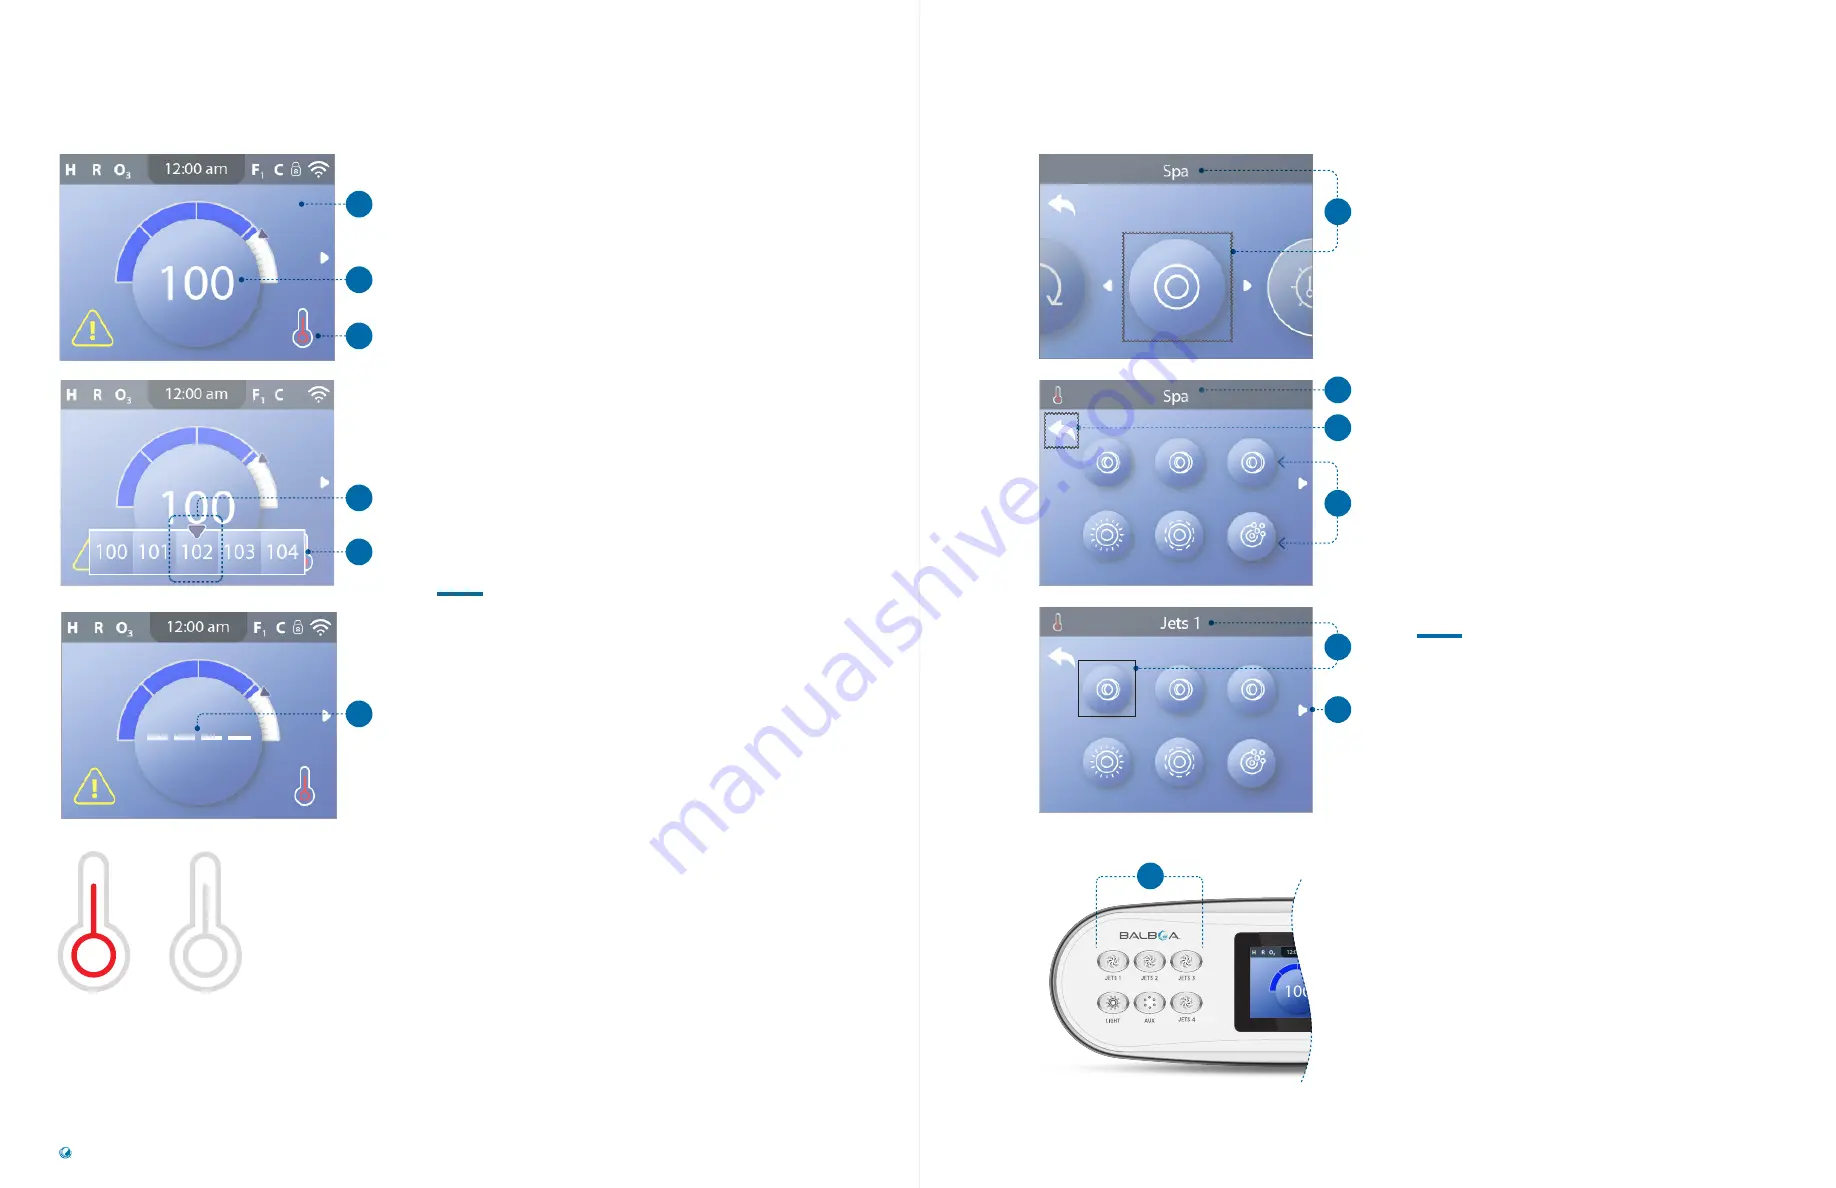
Follow these steps to change the Set Temperature:

1 - Start at the Main screen (A). Press the SELECT 

navigation button to view the temperature menu (E). 

2 - Press the RIGHT and/or LEFT navigation buttons to 

change the Set Temperature.

The center box (D) indicates the current Set 

Temperature. In this example the current Set 

Temperature is 102.

3 - Once your desired Set Temperature is in the center 

box (D), press the SELECT navigation button, or just 

wait a few seconds.  

The change is complete. 


How do I view the Water Temperature?

The Water Temperature is displayed here (B) on the 

Main screen.

How do I view the Set Temperature?

Start at the Main screen (A), and press the SELECT 

navigation button. The Set Temperature is displayed in 

the center box of the temperature menu (D).

How do I know when the water heater is On?

The center of the Heater Status icon turns red (C) when 

the heater is On, and it turns white when the  

heater is Off.

What do the dashes indicate (F)?

When the spa is powered On, four dashes appear 

(F) in the Water Temperature display for one minute. 

The dashes indicate that the spa is checking the 

water temperature. After the pump runs for 1 minute, 

the dashes disappear and the water temperature is 

displayed (B). The dashes may reappear after the pump 

has not run for one hour.

CHANGE THE  

SET TEMPERATURE

Main Screen

A

C

E

B

D

Heater On

Note: the Heater Status icon flashes 

during heater start-up; this is normal.

F

There are two ways to run  

spa devices.

#1 - Run spa devices by pressing any of  

these buttons (G).

#2 - Run spa devices from the Spa screen by 

following these steps.

1 - Navigate to the Spa menu (A).* 

2 - Press the SELECT navigation button to view the  

Spa screen (B). Each icon (D) shown in the Spa screen 

represents a spa device. 

3 - Select Jets 1 (E). When you select an icon, its name 

appears at the top of the screen (E). 

4 - Press the SELECT navigation button to run  

the spa device. 

The spa device is running. 

If you want to navigate back to the Main screen, select 

the Back button (C) and press the SELECT navigation 

button. The Main screen will appear.

The functionality of each spa device may vary. For 

example, some devices may have a single speed or 

state, while other spa devices may have multiple speeds 

or states. Your spa configuration will determine the 

number of spa devices and the functionality of  

each device.  

One Spa screen (B) can display a maximum of six 

devices. If your spa has more than six, a menu arrow 

will appear (F). Press the RIGHT navigation button to 

view and/or run the other spa devices.

RUN SPA DEVICES

C

* View page 10 for information on navigating the Settings menu.

A

B

D

Heater Off

E

F

Содержание TP700

Страница 1: ...TP700 PANEL User Guide Your Single Source Solution 42369 Rev A ...

Страница 2: ...ter Group Your Single Source Solution THANK YOU for using Balboa Water Group spa controls TP700 PANEL BP CONTROL SYSTEM Software Version 7 0 and later Home Page www BalboaWaterGroup com TP700 Video Tutorials www BalboaWater com TP700 Quick Tips ...

Страница 3: ... SPA DEVICES 14 SET FILTER CYCLE TIMES 16 RESTRICT OPERATIONS 17 INVERT DISPLAY 18 SPA BEHAVIOR 20 HEAT SETTINGS 26 FILL IT UP 28 SETTINGS 30 PANEL MESSAGES 30 GENERAL MESSAGES 30 HEATER RELATED MESSAGES 32 SENSOR RELATED MESSAGES 33 SYSTEM RELATED MESSAGES 34 REMINDER MESSAGES 36 MISCELLANEOUS 36 MESSAGE NOTES 38 DIAGNOSTICS 38 SYSTEM INFORMATION 39 FAULT LOG 40 GFCI TEST 42 WARNING Notes ...

Страница 4: ...ion Arrow J Heat Status K Selection Box L Message May Appear Information Reminder Error Normal Error or Warning Error Spa will not function until fixed M Water Temperature Fahrenheit temperatures are displayed without decimal points For example 100 F is displayed as 100 Celsius temperatures are displayed with decimal points For example 37 5 C is displayed as 37 5 N Water Temperature Bar O Set Temp...

Страница 5: ... Navigation arrow D corresponds to the RIGHT navigation button The left Navigation arrow M corresponds to the LEFT navigation button etc Back Button Use the Back button L to navigate back in the menus Use the navigation buttons to select the Back button The Selection box L indicates that the Back button is selected Press the SELECT navigation button On Off Switches In this example the Reminders se...

Страница 6: ...dicates more menu items View Message Screen 1 Start from the Main screen A and press the LEFT navigation button to select the Message icon B 2 Pressing the SELECT navigation button to view the Message screen 3 The Message screen may have an Exit button or a Clear button Select the button on the screen and press the SELECT navigation button View Exit and Clear Buttons on page 31 for more informatio...

Страница 7: ...te the dashes disappear and the water temperature is displayed B The dashes may reappear after the pump has not run for one hour CHANGE THE SET TEMPERATURE Main Screen A C E B D Heater On Note the Heater Status icon flashes during heater start up this is normal F There are two ways to run spa devices 1 Run spa devices by pressing any of these buttons G 2 Run spa devices from the Spa screen by foll...

Страница 8: ...g the filter cycle 2 In Rest Mode heating only occurs during the filter cycle 3 Purges happen at the start of each filter cycle on most systems For example if your spa is set up for 24 hour circulation except for shutting Off when the water temperature is 3 F 1 5 C above the set temperature that shutoff does not occur during filter cycles Model AX10 Model AX20 Model AX40 Auxiliary Panels A B Keep ...

Страница 9: ...proximately 5 seconds After 5 seconds the toggle switch will move to the right and turn blue G and a lock icon will appear E You have locked the Settings Follow the same steps to lock unlock the Settings and or Panel 5 Navigate back to the Main screen The lock icon on the Main screen H indicates that the Settings are locked Can Settings and Panel be locked simultaneously Yes The lock icon H appear...

Страница 10: ...ut period If your spa does not have a circulation pump Pump 1 will run at low speed when the blower or any other pump is on If the spa is in Ready Mode view page 22 Pump 1 low may also activate for at least 1 minute every once in a while to detect the spa temperature polling and then to heat to the set temperature if needed When the low speed turns on automatically it cannot be deactivated from th...

Страница 11: ...ode 2 REST MODE Rest Mode only heats the water during filter cycles If you do not use your spa for an extended period of time you may want to use Rest Mode 3 READY IN REST MODE This mode is a sub feature of Rest Mode When your spa is in Rest Mode and you press the JETS 1 button Rest Mode will automatically switch to Ready In Rest Mode for one hour During this hour the control system will attempt t...

Страница 12: ...w the current Heat Mode on the Main screen The current Heat Mode is displayed here with an icon E In this example the current Heat Mode is Ready The following list shows which icons may appear on the Main screen HEAT SETTINGS TEMPERATURE RANGES E A View page 10 for information on navigating the Settings menu B C Main Screen Heat Mode Icons Ready Rest Ready in Rest D Follow these steps to view the ...

Страница 13: ...llow these steps to view the current M8 setting and or turn it On Off 1 Navigate to Heat A 2 Press the SELECT navigation button to view the Heat screen B The current M8 will appear here C In this example the current M8 setting is Off 3 Press the SELECT navigation button to change the M8 setting from Off to On D M8 is turned On The change takes effect immediately No need to press a Save button Note...

Страница 14: ...water temperature Follow these steps to prime any one speed pump including a circulation pump Press the button JETS 1 JETS 2 etc for that pump once to turn it On Run the pump for 2 minutes If priming is not complete after 2 minutes turn Off the pump and repeat the process Which pump is the heater pump When the spa has just entered Priming Mode press the LIGHT button B and see if any water flows If...

Страница 15: ...n power to the spa Drain Mode Optional Some spas have a special feature that allows Pump 1 to be employed when draining the water When available this feature is a component of Hold CLEANUP CYCLE Optional When a pump or blower is turned On by a button press a Cleanup cycle begins 30 minutes after the pump or blower is turned Off or times out The pump and the ozone generator will run for 30 minutes ...

Страница 16: ...in again after about 1 minute See Flow Related Checks below The water flow has failed Message Code M017 There is not enough water flow through the heater to carry the heat away from the heating element and the heater has been disabled See Water Flow Checklist on page 37 After the problem has been resolved reset the message The heater may be dry Message Code M028 Possible dry heater or not enough w...

Страница 17: ...service organization Configuration error The spa will not Start Up Contact your dealer or service organization The GFCI test failed System Could Not Test the GFCI Message Code M036 North America Only May indicate an unsafe installation Contact your dealer or service organization A pump may be stuck On Message Code M034 Water may be overheated POWER DOWN THE SPA DO NOT ENTER THE WATER Contact your ...

Страница 18: ...ay appear on a regular schedule i e every 30 days The GFCI or RCD is an important safety device and must be tested on a regular basis to verify its reliability Every user should be trained to safely test the GFCI or RCD associated with the hot tub installation A GFCI or RCD will have a TEST and RESET button on it that allows a user to verify proper function Change the water May appear on a regular...

Страница 19: ...Selection box defaults to the Clear or Exit icon A on the Message screen Press the LEFT navigation button to move the Selection box to the Error Warning Reminder icon B and then press the SELECT navigation button to go to the System Information screen view page 38 37 TP700 USER GUIDE 42370 Rev A 36 Balboa Water Group Your Single Source Solution Control System No Communications Panel Cable Panel WA...

Страница 20: ...ault Log is an actual fault For example message code MO19 is inserted into the fault log to identify each time the spa restarts A Each time a fault occurs it is assigned a unique number starting with number 1 The next fault is assigned number 2 and so on Up to 24 faults can be stored in memory In this example the fault number is 2 24 C This means it is the second fault in a list of 24 faults The f...

Страница 21: ...systems that do not have the automatic GFCI test the manual GFCI test must be done FORCING A MANUAL GFCI TRIP TEST The installer can cause the GFCI Trip Test to occur at any time by activating Test A on the GFCI Test screen The GFCI should trip within several seconds and the spa should shut down If it does not shut down the power and manually verify that a GFCI breaker is installed and that the ci...

Страница 22: ...er differentiel avant d utiliser le bain Lire la notice technique Lorsque l appareillage est installe dans une fosse on doit assurer un drainage adequat Employer uniquement a l interieur d une cloture CSA Enclosure 3 Connecter uniquement a un circuit protege par un disjoncteur differentiel de Class A Afin d assurer une protection permanente contre le danger de shock electrique lors de l entretien ...

Страница 23: ...ice is available M F 7 00AM to 6 00PM PT Corporate Office Balboa Water Group 3030 Airway Avenue Costa Mesa CA 92626 MEXICO OPERATIONS Balboa Water Group Aguila Azteca 6011 Baja Maq El Aquila Mexico 22221 EUROPEAN OPERATIONS Balboa Water Group HydroAir International ApS Roustvej 50 6800 Varde Denmark TP700 PANEL ...

Отзывы: