2.3 Advanced setup
The following sections describe the procedures for completing the configuration of your
HygroPro
transmitter.
2.3.1 Setting up the pressure/temperature
displays
The following steps set the displayed pressure and
temperature values to live (changing with the current
measurements) or constant (remaining the same,
regardless of the current measurements). If constant is
selected, the desired numerical value must be set.
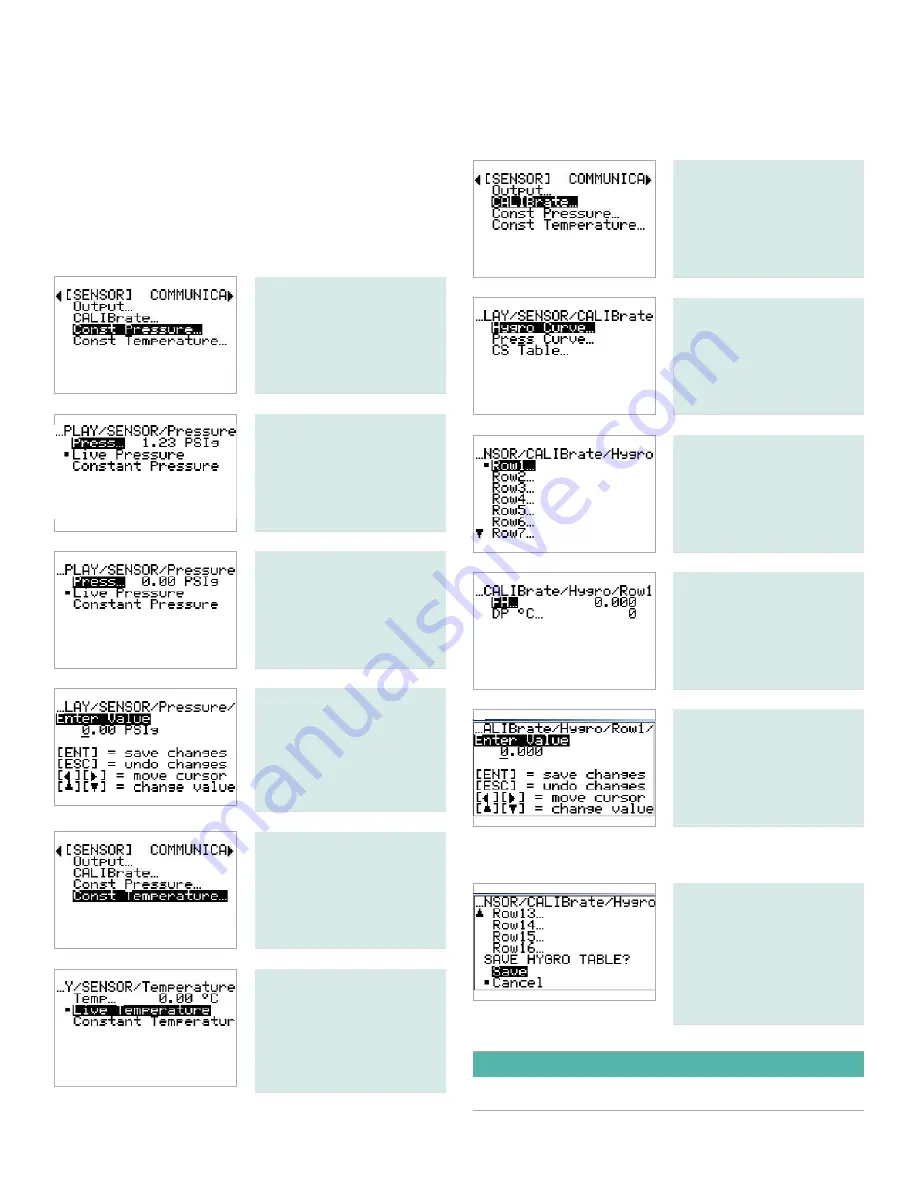
To set the pressure display,
enter your password
and use the arrow keys
to select
const pressure
.
Press
enter
.
Use the arrow keys to
select either
live pressure
or
constant pressure
and
press
enter
.
If you selected constant
pressure, use the arrow
keys to select press... and
press
enter
.
Use the arrow keys to
enter
the desired pressure
value and press enter. The
screen will be updated to
show the new pressure
value.
To set the temperature
display, enter your
password and use the
arrow keys to select const
temperature. Press
enter
.
Use the same procedure
to set the temperature
mode, and if
constant
temperature
is selected,
to enter the constant
temperature value.
2.3.2 Entering sensor calibration data
Enter your password and
use the arrow keys to scroll
to
calibrate
. Press
enter
.
Select
Hygro curve
and
press
enter
.
Select
row 1
and press
enter
.
Select the desired units
and press
enter
.
Use the arrow keys to enter
a value and press
enter
.
Repeat the previous steps until all of your
Hygro Curve
data
points have been entered.
To save the data you
have entered, scroll to the
bottom of the Hygro Curve
options list to the SAVE
HYGRO tABLE? section.
Then, select save and
press
enter
.
IMPORTANT
Any data not saved at the above prompt will be lost.
14
Содержание Panametrics HygroPro
Страница 1: ...HygroPro User s manual 916 099 Rev D...
Страница 2: ...ii...
Страница 3: ...HygroPro Moisture transmitter User s manual 916 099 Rev D November 2012 iii...
Страница 4: ...no content intended for this page proceed to next page iv...


