


3.5.6a NAMUR filtering
There may be situations where the NAMUR signaling
behavior is undesirable (see Table 4 below). For example,
a process operating at or near the
Aurora H2O
calibration
limits, or when connected to a SCADA or DCS system that
cannot correctly distinguish between a measurement
and an error signal. In these cases, the NAMUR reporting
behavior can be suppressed (“inhibited”). From the output
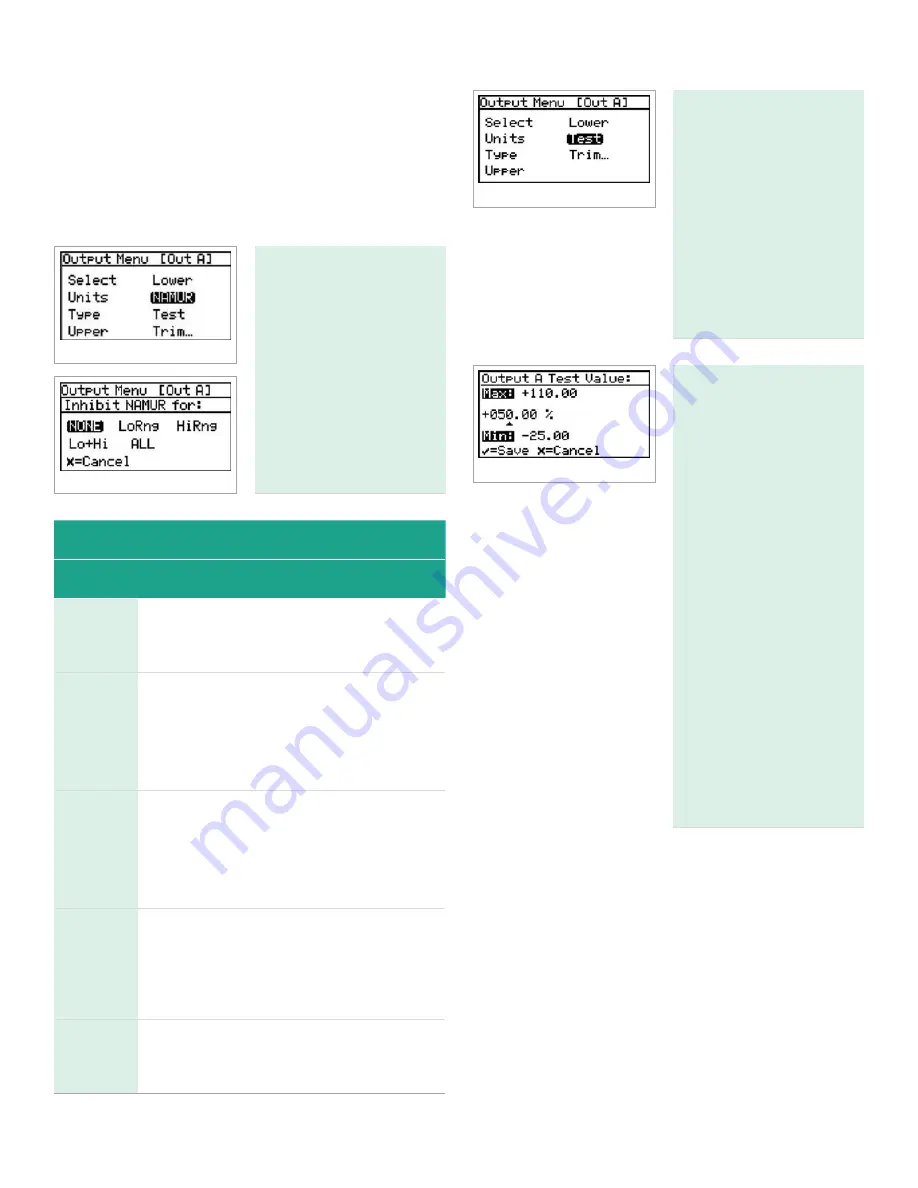
menu, select NAMUR:
Then select the error(s)
to inhibit:
Table 4: NAMUR errors
Selection
Result
NONE
No errors are inhibited;
NAMUR signaling will occur for any error
as shown in the table above.
LoRng
Under range errors are inhibited;
NAMUR signaling will NOT occur for
under range error conditions.
NAMUR signaling will occur for
all other errors in the table above.
HiRng
Over range errors are inhibited;
NAMUR signaling will NOT occur for
over range error conditions.
NAMUR signaling will occur for
all other errors in the table above.
Lo+Hi
Under range AND over range errors
are inhibited; NAMUR signaling will NOT
occur for these error conditions.
NAMUR signaling will occur for
all other errors in the table above.
ALL
ALL errors are inhibited; NAMUR signaling
will NOT occur for any error
in the table above.
3.5.7 Testing the output
The test menu causes the
Aurora H2O
to generate
a 0- or 4-20mA output
at the percent of scale
selected. For example, in
4-20 operation, 0% = 4mA,
50% = 12mA, 100% = 20mA.
This allows the proper
function of recording or
SCADA equipment to be
verified. In 0-20 operation,
0% = 0mA, 50% = 10mA,
100% = 20mA.
To test system output,
from the output menu
select test and press
enter. The
Aurora H2O
will proceed to check the
settings, and a screen
similar to this display will
appear.
Use the left and right
arrow keys to select
each digit to be changed,
and the up and down
arrow keys to increase or
decrease its value. Press
enter to save (or cancel to
keep) the previous value,
and return to the output
menu.
Check your output
wiring. If the reading on
your SCADA or DCS is off
slightly, then you may use
the trim feature to trim the
output zero or span.
31
Содержание Panametrics Aurora H2O
Страница 2: ...ii...
Страница 4: ...no content intended for this page proceed to next page iv...
Страница 20: ...no content intended for this page 10...
Страница 32: ...no content intended for this page 22...
Страница 65: ...2 AuroraView boots up and displays a screen similar to Figure 55 below Figure 55 AuroraView main screen 55...
Страница 71: ...Figure 74 Exporting a simplified image Figure 75 Selecting enhanced metafile 61...
Страница 80: ...no content intended for this page 70...


