background image


17 

17 

OPERATION 


Initial Operation 

 
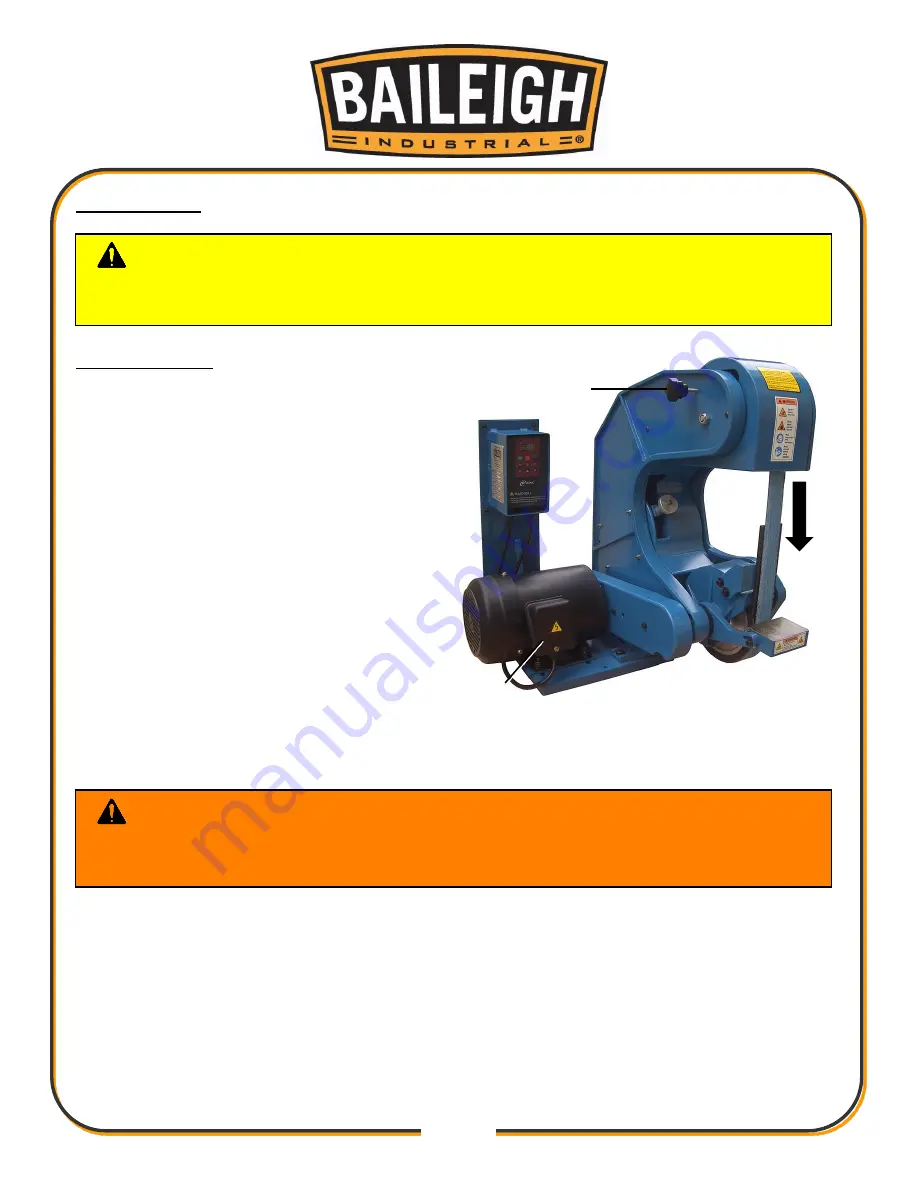
1.  Start the motor by pressing the ON button. 

The belt should rotate smoothly with the 
belt traveling downward (A) past the 
grinding area. If either of these conditions 
is not met immediately turn the machine 
OFF. 

a.  If the abrasive belt does not remain 

centered on the contact wheel while 
the belt is moving use the tracking 
adjustment (B) on the upper left 
side of the machine to track the 
belt. Turning this control CW to 
cause the belt to track to the left, 
conversely turn the control CCW to 
cause the belt to move to the right. 

b.  If the belt runs in reverse (upward), you must correct this unsafe condition by 

changing the main drive motor rotation direction. 


2.  Reverse the motor direction of a single phase motor by reversing leads within the metal 

wiring box (C) located on the motor. Follow the diagram or other instructions on the actual 
motor label. These diagrams are usually on the inside of the motor connection cover. 

3.  If the abrasive belt tensions, and tracks properly, but has excessive vibration turn the 

machine OFF and call the factory for assistance. 


CAUTION: 

Always  wear  proper  eye  protection  with  side  shields,  safety 

footwear, and leather gloves to protect from burrs and sharp edges. 
When handling large heavy materials, make sure they are properly supported. 

WARNING:

 Disconnect the machine from its power source opening any 

covers or making any repairs. A competent electrician should perform all electrical 
work. 

Содержание BG-260-3-110

Страница 1: ...GH INDUSTRIAL INC IS PROHIBITED Baileigh Industrial Inc does not assume and hereby disclaims any liability for any damage or loss caused by an omission or error in this Operator s Manual resulting fro...

Страница 2: ...FICATIONS 10 TECHNICAL SUPPORT 10 UNPACKING AND CHECKING CONTENTS 11 Cleaning 11 TRANSPORTING AND LIFTING 12 INSTALLATION 13 Securing the Base 14 Anchoring the Machine 14 ELECTRICAL 15 OPERATION 17 Gr...

Страница 3: ...e to Seller of any suspected defect in the Goods prior to the expiration of the warranty period The original end user must also obtain a RGA from Seller prior to returning any Goods to Seller for warr...

Страница 4: ...or further remedies provided under this Agreement or at law or equity Attorney s Fees In the event legal action is necessary to recover monies due from Buyer or to enforce any provision of this Agree...

Страница 5: ...tion of the functional parts of the machine Capacity charts Set up and start up instructions Machine operation Scheduled maintenance Parts lists GENERAL NOTES After receiving your equipment remove the...

Страница 6: ...es a hazard or unsafe practice that will result in severe Injury or Death Safety signs with signal word DANGER or WARNING are typically near specific hazards General precautions are listed on CAUTION...

Страница 7: ...against objectionable or uncomfortable loud noises DUST HAZARD Wear appropriate dust mask Dust created while using machinery can cause cancer birth defects and long term respiratory damage Be aware o...

Страница 8: ...if normal safety precautions are overlooked or ignored personal injury to the operator may result Safety equipment such as guards hold downs safety glasses dust masks and hearing protection can reduc...

Страница 9: ...imes DO NOT reach over or across a running machine 12 Stay alert Watch what you are doing and use common sense DO NOT operate any tool or machine when you are tired 13 Check for damaged parts Before u...

Страница 10: ...piece of material at a time 31 Warning The dust generated by certain materials can be injurious to your health Always operate machinery in well ventilated areas and provide for proper dust removal Use...

Страница 11: ...ipment when it requires maintenance or correction 39 Install and use high quality abrasive belts wheels discs media etc as appropriate to your machine Understand and follow the operating requirements...

Страница 12: ...support desk for purchased machines Tech Support handles questions on machine setup schematics warranty issues and individual parts needs other than die sets and blades For specific application needs...

Страница 13: ...age painted surfaces Follow manufacturer s label instructions when using any type of cleaning product After cleaning wipe unpainted metal surfaces with a light coating of quality oil or grease for pro...

Страница 14: ...olts that attach the machine to the pallet Approaching the machine from the side lift the machine on the frame taking care that there are no cables or pipes in the area of the forks Move the machine t...

Страница 15: ...ELING The machine should be sited on a level concrete floor Provisions for securing it should be in position prior to placing the machine The accuracy of any machine depends on the precise placement o...

Страница 16: ...machine such that operators have safe and unobstructed access to the machine The work place should be free from floor obstructions trip points and other faults that may reduce operator safety Anchori...

Страница 17: ...voltage will damage the motor In the event of a malfunction or breakdown grounding provides a path of least resistance for electric current to reduce the risk of electric shock This tool is equipped w...

Страница 18: ...ed below LENGTH AMP RATING 25ft 50ft 100ft 1 12 16 16 14 13 16 14 12 12 17 20 12 12 10 21 30 10 10 No WIRE GAUGE An undersized cord decreases line voltage causing loss of power and overheating All cor...

Страница 19: ...ndition by changing the main drive motor rotation direction 2 Reverse the motor direction of a single phase motor by reversing leads within the metal wiring box C located on the motor Follow the diagr...

Страница 20: ...estal and or floor point connect the power to its source 2 Adjust the work support A and work support arm to the desired position Take care that the gap between the face of the abrasive belt and the w...

Страница 21: ...causing and ejection 7 When grinding is complete Press the STOP button to stop the belt MATERIAL SELECTION When selecting materials keep these instructions in mind Material must be clean and dry witho...

Страница 22: ...ld and emergency stop button are in good working order Weekly Maintenance On a weekly basis clean the machine and the area around it Lubricate threaded components and sliding devices Apply rust inhibi...

Страница 23: ...intenance actions required All bearings are sealed for life and require no additional lubrication Idler Wheel Alignment When idler wheels are removed and or replaced they must be installed such that t...

Страница 24: ...ntrol until the wheels are on the exact same plane That is when their radial centers are aligned 6 Repeat step 3 and 4 until both conditions are satisfied That is the upper and rear idlers are aligned...

Страница 25: ...23 23 PARTS DIAGRAM...

Страница 26: ...ock 1 13 Button head cap screws GB T70 2 M5X12 6 14 Flat washer GB T95 12 3 15 Block pivot 1 16 Flat washer GB T95 8 1 17 Hexagon socket set screws GB T712 2 M8 1 18 Washer GB T95 5 18 19 Socket head...

Страница 27: ...46 Pawl 1 47 Nipple pipe 1 48 Strip 1 49 Compression Spring 1 50 Button 1 51 Knob 1 52 Panel hex nut GB T6172 1 M5 12 53 Washer GB T93 3 3 54 Panel hex nut GB T6172 1 M3 3 55 Spring pin GB T897 1 2 5...

Страница 28: ...ead cap screws GB T70 1 M5X16 2 77 Bracket for platen 1 78 Platen 1 79 Socket head cap screws GB T70 1 M6X20 1 80 Bolt GB T5783 M10X40 1 81 Flat washer GB T95 10 12 82 Base 1 83 Main frame 1 84 Flat H...

Страница 29: ...27 27 NOTES...

Страница 30: ...28 28 NOTES...

Страница 31: ...29 29 NOTES...

Страница 32: ...INDUSTRIAL LTD UNIT D SWIFT POINT SWIFT VALLEY INDUSTRIAL ESTATE RUGBY WEST MIDLANDS CV21 1QH UNITED KINGDOM PHONE 44 0 24 7661 9267 FAX 44 0 24 7661 9276 WWW BAILEIGHINDUSTRIAL CO UK BAILEIGH INDUST...

Отзывы: