-56-
25.
THREAD WINDING ADJUSTMENT
STANDARD
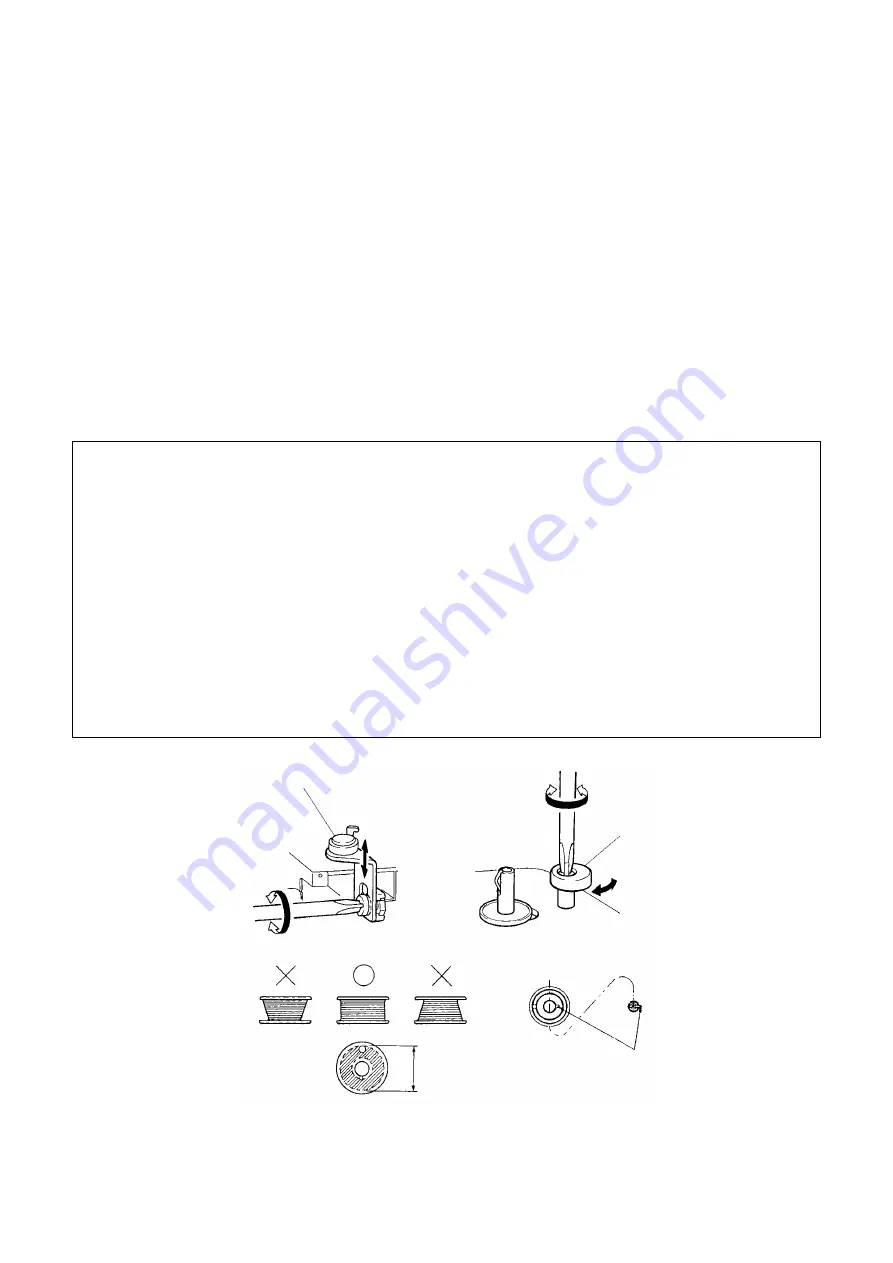
The thread should be wound parallel to the bobbin and 75-85 percent of the outer diameter of the bobbin.
ADJUSTMENT
1.
Wind the thread and check the status of the thread wound onto the bobbin.
2.
Slightly loosen the screw securing the lower thread winding thread guide.
3.
Move the lower thread winding thread guide up and down to adjust the bobbin winding.
4.
Tighten the screw securing the lower thread winding thread guide.
5.
Loosen the screw securing the bobbin presser by turning it back two-three rotations.
6.
Rotate the bobbin presser and adjust the thread winding amount.
7.
Tighten the screw securing the bobbin presser.
8.
Again wind thread and check the status of the thread wound onto the bobbin.
Adjustment Points
1. 8. Wind to the thread onto the bobbin with the bobbin set correctly on the thread winding shaft.
(The bobbin groove and the thread winding shaft spring position should be aligned.)
2.
If the thread winding thread guide screw is loosened too much, the nut will fall into the sewing machine, so
be careful not to loosen this screw too much.
3.
When adjusting the bobbin winding, for the case shown in (B) lower the lower thread winding thread guide;
for the case shown in (C) raise the lower thread winding thread guide.
4.
If the screw securing the thread winding thread guide is tightened excessively, the rib supporting the nut
may be broken, so be careful not to tighten this screw excessively. (Tightening torque 0.4-0.6 Nm (4-6
kgf-cm))
5.
If the screw securing the bobbin presser is loosened too much, the nut will fall into the sewing machine, so
be careful not to loosen this screw too much.
7.
If the screw securing the bobbin presser is tightened excessively, the rib supporting the nut may be
broken, so be careful not to tighten this screw excessively. (Tightening torque 0.4-0.6 Nm (4-6 kgf-cm))
Bobbin presser
Lower thread winding thread guide
75-85%
Align positions
and
(A)
(C)
(B)
Содержание BL-6800
Страница 1: ...6 2001...
Страница 4: ...2 1 MECHANICAL CHART...
Страница 8: ...6 3 ELECTRONIC PARTS ARRANGEMENT CHART BL6800 only...
Страница 31: ...29 2 LEAD WIRES ARRANGEMENT BL6800 BL6300...
Страница 72: ...70 SS VR board BL6800 only 1 pin Start Stop switch Speed volume...
Страница 76: ...BL 6800 BL 6300 H1060208...


