background image

Documentation

 KNXEASY


KNXEASY 

Version 1  

b.a.b-technologie gmbh  43 


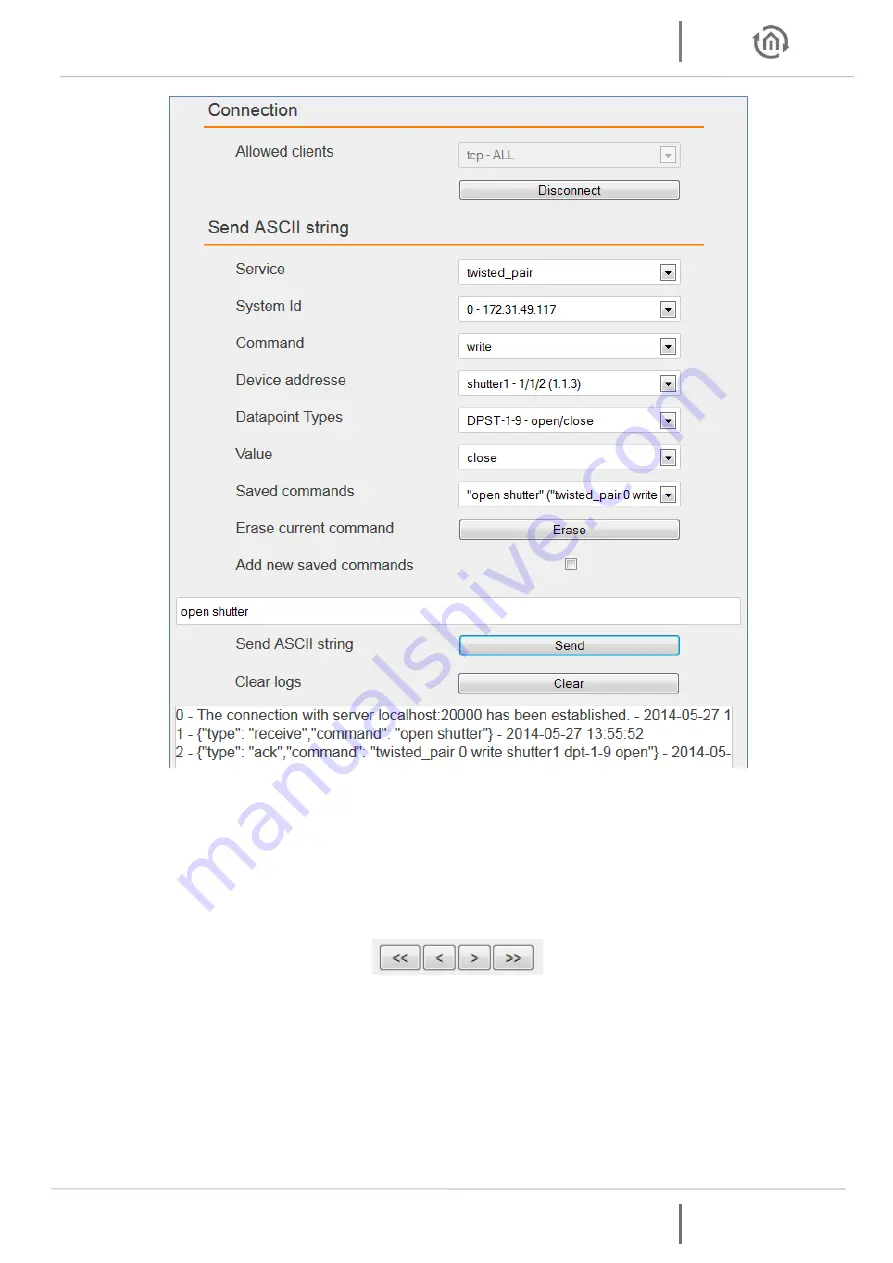
Figure 49: Send/receive saved command 


AUTOMATIC COMMAND LEARNING 

In the Client simulation, click on the checkbox “Add new saved command”. An “Automatic learning” 

button, an “Associated command” text input and a “Save” button appears. Connect via TCP for example, 

click “Start” on the “Automatic learning” button. Every telegrams received will be saved in a list, you can 

then navigate in this list with these appeared buttons: 


-


“<<”: Display the frst command in the list. 

-


“<”:   Display the precedent command in the list. 

-


“>”:   Display the next command in the list. 

-


“>>”: Display the last command in the list. 


When you have chose the received command in the list, enter your associated command in the 

“Associated command” text input and click on the save button. A new saved saved command is added. 

Содержание KNXEASY

Страница 1: ...b a b technologie gmbh KNXEASY documentation Version 1 2 Documentation version I Actual state 06 2013 Date 18 September 2014 EN...

Страница 2: ...tion KNXEASY 2 b a b technologie gmbh KNXEASY version 1 b a b technologie gmbh im INHOUSE Dortmund Rosemeyerstr 14 44139 Dortmund info bab tec de Tel 49 0 231 476 425 30 Fax 49 0 231 476 425 59 www ba...

Страница 3: ...1 2 4 Initial operation 11 LCD configuration 11 Date and time 11 Network 11 General 12 KNX 12 Web interface 13 Access to the web interface 13 Log in to the web interface 13 User administration 13 Rese...

Страница 4: ...igure 21 Group addresses list 20 Figure 22 Alarm States Green 21 Figure 23 Alarm State Red 21 Figure 24 Alarms list 22 Figure 25 Alarm configuration 22 Figure 26 Alarm States Green 23 Figure 27 Alarm...

Страница 5: ...n buttons integrated to the device Thus a PC is not necessary For depth requirements the web interface allows you to sharpen your configuration and access to specific functions Any up to date standard...

Страница 6: ...itted operating temperature of the EIB unit The line with integrated choke cannot be used as the operating voltage of 12 30 V DC Safety and regulatory compliance standards DIN EN 55024 Einrichtungen d...

Страница 7: ...RJ45 socket for Ethernet LAN 4 Navigation buttons 5 LCD display 6 Front USB socket 7 Bottom USB socket 8 RJ45 socket for serial port RS232 9 Connector KNX EIB POWER SUPPLY CONNECTOR The power supply c...

Страница 8: ...button go left for configuration of KNX and IP addresses hosts names 3 Down button navigate to lower menu increase numbers next letter of alphabet 4 Right button go right for configuration of KNX and...

Страница 9: ...ng update process the power LED may blink red STATUS LED The Status LED turns green when the device is totally started and usable The Status LED blinks red in case of error warning or info messages Du...

Страница 10: ...nect the power supply according to the marking with the spring clips For power supply the non choked output of an EIB power supply can be used if available Please consider of adequate power reserves T...

Страница 11: ...configure the right date When it is done press OK button You should see a OK field on the display press OK button again to confirm your configuration You should be back to the three submenus Date Time...

Страница 12: ...n as you save the name setting is updated This name will be the name of the KNXnet IP server visible on ETS and your hostname Therefore you will be able to access to the web interface with the hostnam...

Страница 13: ...and password In delivery status the following access data is valid Enter now the default username admin and password admin After logging in you reach the menu page At any moment you can go back at th...

Страница 14: ...In the LCD menu navigate to Reset Config The security question you have been configuring appears on the LCD display Push OK button to answer Write your answer If you push OK again you can write number...

Страница 15: ...To configure date and time in the web interface go to Configuration General Click on the datetime button in the Systemtime field A window will open and ask for synchronize with pc time click on OK Da...

Страница 16: ...ing it Type the IP address or the hostname you want to check in the IP address Hostname field and press on the Ping button If it is found and available Found will be written and the little square will...

Страница 17: ...configuration KNX In the Web interface go to Configuration KNX KNX DATE TIME In order to synchronize KNXEASY s time to a KNX Date Time device enter both KNX group addresses in the KNX Date Time setti...

Страница 18: ...l those useful information are available directly in the KNXEASY s clients simulation Click on Browse and search for the archive you have exported from ETS 4 Finally click on Upload selected project C...

Страница 19: ...nternally saved with a timestamp so that you know exactly when a log occurred and you are able to follow the evolution in case of problem You can clear these logs with the button Clear Figure 18 Servi...

Страница 20: ...address field you can choose a group address in the list This list contains every group addresses in your ETS4 project having its datatype configured Figure 21 Group addresses list Attention You must...

Страница 21: ...nit It contains also a list of date value Those are datetimes when an alarm occurred and with which value the limit has been reached Finally an Empty dates button will simply clear the list of date va...

Страница 22: ...a KNX Physical Address and a period for which this physical address will be checked For example click on Add in order to add a new alarm Figure 25 Alarm configuration In the Physical address field you...

Страница 23: ...k directly the physical address see Check KNX Physical Address If the physical address is found and available the text color stays or turns green Otherwise the text color stays or turns red Alarm noti...

Страница 24: ...9 Alarm configuration In the IP address field you can enter the IP Address or hostname you want to link an alarm to Then you have to configure the check period Every x minutes where x is the period in...

Страница 25: ...turns green Otherwise the text color stays or turns red Alarm notification If an alarm occurs it will be notified by different processes First of all the Alarm States field is updated The first alarm...

Страница 26: ...ections 3 2 1 1 DEFAULT CONNECTIONS In the first place a UDP and a TCP default connections are pre configured Connections are configured in the web interface go to Configuration KNXEASY There stands t...

Страница 27: ...to enable or disable the connection If the connection is disabled the client linked to that connection will not be able to connect and send receive messages from the server PROTOCOL It allows you to...

Страница 28: ...rt checkbox and Specify client s Hostname IP Address appear You can now specify which Hostname or IP address is allowed to connect and send received messages to from the server Thus it allows you to g...

Страница 29: ...in each character It can be 5 for Baudot code 6 rarely used 7 for true ASCII 8 for most kinds of data STOP BITS Stop bits sent at the end of every characters allow the receiving signal hardware to det...

Страница 30: ...as the service used to send KNX telegrams Not specify service in the ASCII string will set ROUTING as the service used If the default service is ROUTING see Service routing knxnet ip Any string withou...

Страница 31: ...e route table or delete it HOSTNAME IP ADDRESS Enter the hostname or IP address of the KNXEASY SYSTEM ID Enter the System ID of the KNXEASY SERVICE Enter the default service of the KNXEASY If there is...

Страница 32: ...m with underscore character _ Remember that the protocol is not case sensitive therefore lamp1 and LAMP1 are the same DATATYPE Datatype represents the KNX Datapoint Type For example type 1 and subtype...

Страница 33: ...configuration FORCE SEND TELEGRAMS If this field is checked it will cause extra behaviours KNXEASY can be use without importing an ETS 4 project It will try to get the datatype from the ASCII string...

Страница 34: ...e of the receive string type receive command command For example type receive command twisted_pair 0 write shutter1 dpt 1 9 close open close DISPLAY SERVICE If this field is checked when a KNX telegra...

Страница 35: ...ng This unit is found in the datatype details For example datatype dpt 5 3 has the unit angle degrees 4 CLIENT SIMULATION In the web interface go to KNXEASY Client simulation is made to help you build...

Страница 36: ...in the route table COMMAND You can choose between read and write DEVICE ADDRESSES If an ETS 4 project has been imported you can choose a device in the the list of devices Each device shows its name gr...

Страница 37: ...erwise you can enter a value ASCII STRING FIELD This field displays the generated ASCII string It is also editable therefore do not hesitate to test all different possibilities SEND ASCII STRING Send...

Страница 38: ...on example HTTP SEND ASCII STRINGS You are also able to send ASCII strings via HTTP POST and GET POST POST is used to send a write command to KNXEASY The address for this POST is http IP address knxea...

Страница 39: ...irectly from the Client simulation just like you do with the other protocols with the send button GET GET is used to send a read command to KNXEASY The address for this GET is http IP address knxeasy...

Страница 40: ...the ETS 4 project Addresses are http IP address knxeasy rest knxeasy path Group Addresses path is groupaddresses Contains every information about group addresses you configured in your ETS 4 project...

Страница 41: ...orresponding to a normal KNXEASY ASCI command For example for normal KNXEASY ASCI command twisted_pair 0 write shutter1 dpt 1 9 open you can enter your own string for example open shutter From now KNX...

Страница 42: ...ng write your own associated command in the Associated command text input and finally click on the save button As soon as you save saved commands are now available and the list of these saved commands...

Страница 43: ...or example click Start on the Automatic learning button Every telegrams received will be saved in a list you can then navigate in this list with these appeared buttons Display the frst command in the...

Страница 44: ...in to b a b technologie gmbh Before updating do not forget to create a backup of your configuration so that you will just need to restore it with the new version of KNXEASY see Backup restore configu...

Отзывы: