Quick Setup Guide - Elster EnergyAxis
Please contact your utility company for support
Visit myaztech.ca for product User Manual and Configuration Manual
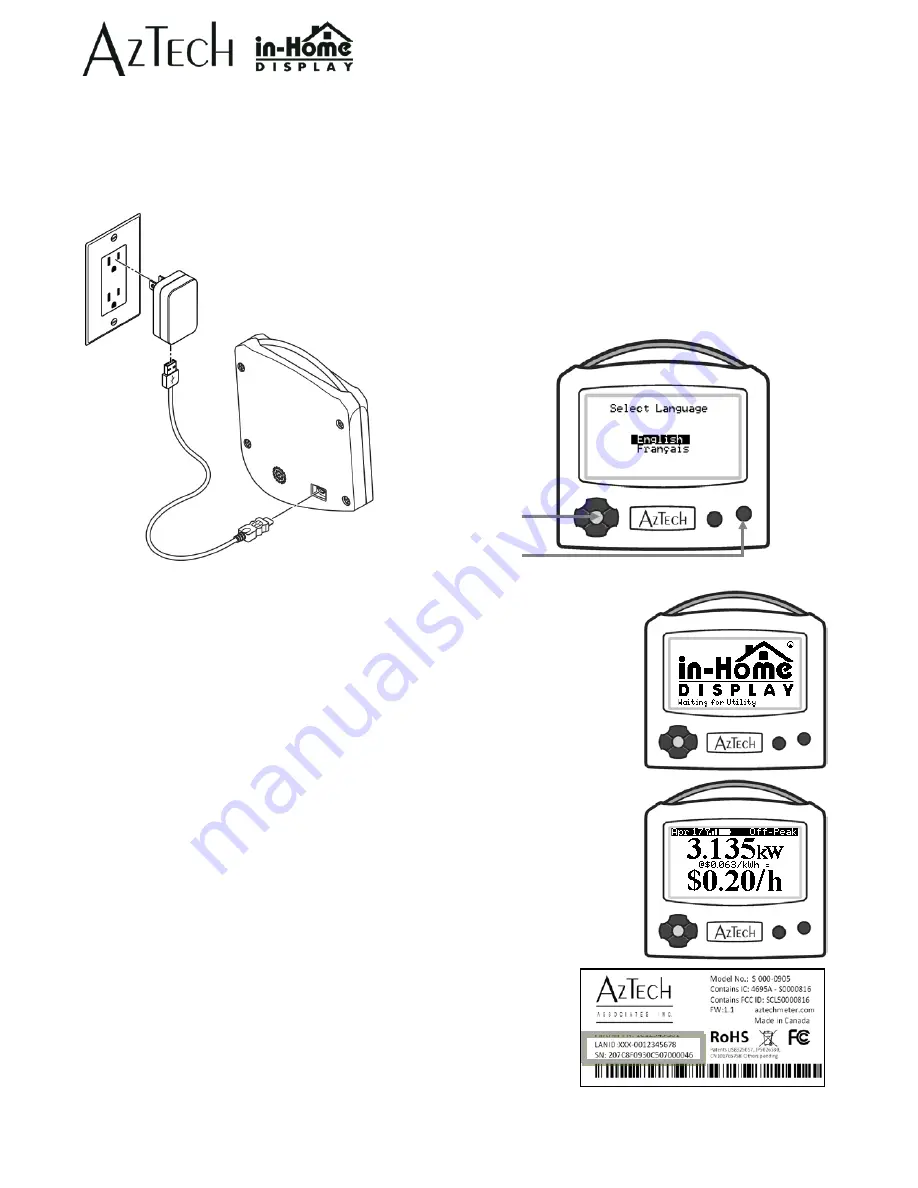
Step 1: Power up your In-Home Display (IHD)
Plug the AC power adaptor into a 120 V AC wall outlet and press the Power button on the right side of your IHD.
While your
IHD is normally plugged in, you can unplug it and use Quick Read mode* to spot-check the energy efficiency of your appliances.
Initially, the IHD must be plugged in for at least 4 hours to charge the battery.
Step 3: Wait for IHD to connect to your meter
During this process,
•
“Waiting for Utility” will be displayed
•
and the light bar will glow red, sweeping back and forth.
When the meter connection is found,
•
the information screens will become available for viewing
•
and the IHD will begin receiving information from the Smart meter.
Most Smart meters will provide new data every minute. If you are not consuming
much electricity, it may take several minutes or longer to notice any changes.
Note: some meters only provide data hourly.
If no connection is found after 15 minutes,
•
move the IHD closer to the meter and allow additional time for the IHD to
connect to the meter.
If no connection is found after moving closer to your meter,
please contact
your utility to confirm that your IHD has been registered. Please provide the
following information to your utility:
•
LAN ID
•
Serial Number
This information is found on the label on the bottom of your IHD.
* Use Quick Read Mode to check the impact of any given appliance on your electricity usage by
comparing the change in usage readings before and after starting the appliance.
NOTE: ALL COSTS ARE FOR INFORMATIONAL AND EDUCATIONAL PURPOSES ONLY AND NOT FOR BILLING.
Step 2: Select Language
•
Select the language by using the up or down buttons to scroll.
•
Press the center navigation button to select the desired language.
This selection impacts labels on the information screens and menus.
Select
Power
Aztech Associates Inc. provides a limited one year warranty for this product. For details or to obtain warranty support, please visit myaztech.ca
Copyright © 2013 by Aztech Associates, Inc. All rights reserved. No part of this manual may be reproduced, distributed, or transmitted in any form or by
any means, including photocopying, recording, or other electronic or mechanical methods, without the prior written permission of Aztech Associates Inc.


