background image

AXIS 262 Installation Guide

Page 5

EN

GLISH

Setting the IP address

The AXIS 262 is designed for use on an Ethernet network and must be assigned an IP address 

to make it accessible. 

Installation methods

The available methods for setting or discovering the IP address

 are listed below.

AXIS IP Utility

 - Using this free Windows application is the recommended method for set-

ting an IP address. AXIS IP Utility can be used on networks with or without a DHCP server. 

Note that the AXIS 262 must be installed on the same network segment. 

ARP/Ping

 - Use these commands to manually set the IP address. Note that the AXIS 262 

must be installed on the same network segment. See page 6 for more information.

DHCP Server 

- View the admin pages for the DHCP server on your network to discover the 

IP address assigned to the AXIS 262. For more information see the DHCP server’s own 

documentation, and/or contact your network administrator.

Notes: 

• DHCP is enabled by default in the AXIS 262.
• The AXIS 262 has the default IP address 192.168.0.90
• If setting the IP address fails, check that there is no firewall blocking the operation.

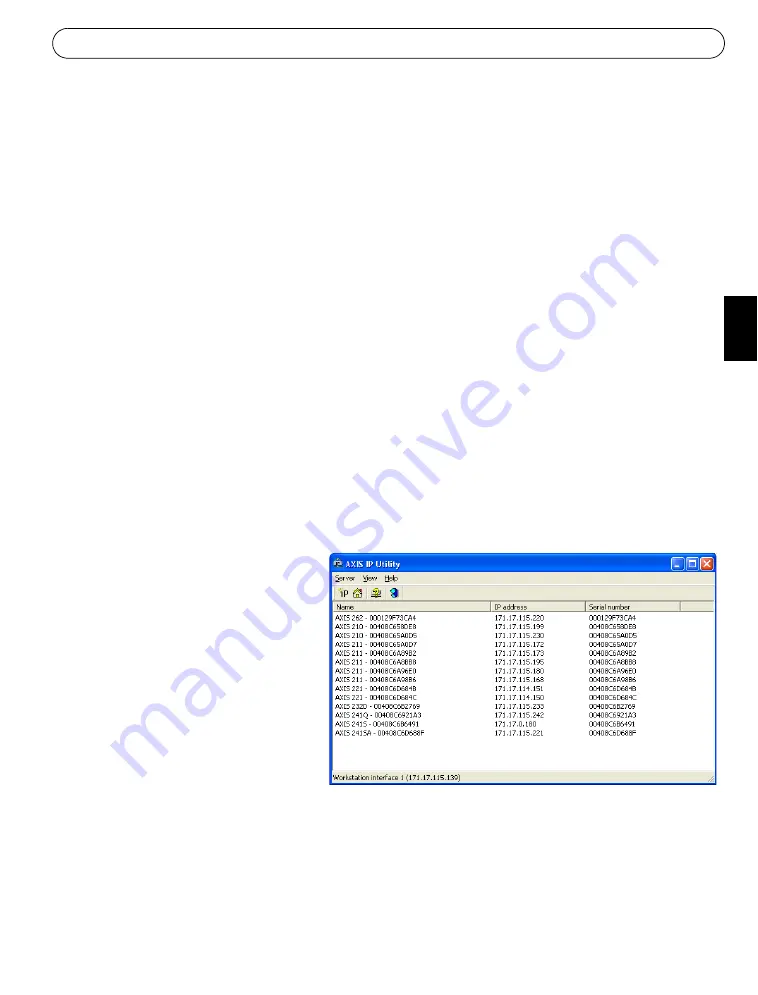
AXIS IP Utility

AXIS IP Utility is a free Windows 

application that discovers and lists 

Axis devices on your network. 

The application can also be used to 

manually set a static IP address. 

Note that you must install the AXIS 

262 on the same network segment 

(physical subnet) as the computer 

running AXIS IP Utility.

AXIS IP Utility is available on the 

CD supplied with this product, or it 

can be downloaded from www.axis.com/techsup

Automatic discovery with AXIS IP Utility

1. Check that the AXIS 262 is connected to the network and that power has been applied.
2. Start AXIS IP Utility. When the AXIS 262 appears in the window, double-click it to open 

the network video recorder’s home page. 

3. See page 7 for information on accessing the AXIS 262.

Содержание 24941

Страница 1: ...ENGLISH DEUTSCH JAPANESE AXIS 262 Network Video Recorder Installation Guide ...

Страница 2: ......

Страница 3: ...62 See page 4 3 Set an IP address See page 5 for information on the available methods 4 Enter the default password and access the unit See page 7 Package contents Overview front panel The indicators on the front panel provide useful information about the current status of the AXIS 262 For a complete listing of LED indicator functions please see the online help or the AXIS 262 User s Manual Item No...

Страница 4: ... AXIS 262 User s Manual for more information Factory setup button Used to reset the unit to the factory default settings See page 8 Power button To shut the unit down correctly press and hold this button until a beep sound is heard Shutdown will then complete after approximately 20 seconds To start the unit press the button once Power adapter connector Attach the supplied power adapter here Power ...

Страница 5: ...information see the DHCP server s own documentation and or contact your network administrator Notes DHCP is enabled by default in the AXIS 262 The AXIS 262 has the default IP address 192 168 0 90 If setting the IP address fails check that there is no firewall blocking the operation AXIS IP Utility AXIS IP Utility is a free Windows application that discovers and lists Axis devices on your network T...

Страница 6: ...nit AXIS IP Utility can be used to change a dynamically set IP address to a static one Manual Installation with ARP Ping 1 Acquire an unused IP address on the same network segment as your computer 2 If already powered up shut the AXIS 262 down by pressing the power button on the rear panel 3 Locate the serial number S N on the label on the rear panel 4 Open a Command Prompt on your computer 5 Chec...

Страница 7: ...r browser This requires administrator rights on the computer 3 Enter the same user name and password for the video login and click OK The Main View page is displayed with links to the Setup tools and online help Notes To maintain security the default password should be changed as soon as possible This is done from Setup System Options Users The default administrator user name root is permanent and...

Страница 8: ...ator on the front panel displays steady green which can take up to 3 minutes the AXIS 262 has been reset to the factory default settings If the IP address was affected by the reset it will now be set to 192 168 0 90 This should be changed to an IP address suitable for use on your network See page 5 If there is a DHCP server on your network a new IP address valid on your network will automatically ...

Страница 9: ...3 Legen Sie eine IP Adresse fest Die möglichen Verfahren werden auf Seite 11 beschrieben 4 Geben Sie das Standardkennwort ein um auf die Einheit zuzugreifen Siehe Seite 14 Lieferumfang Übersicht Vorderseite Die Anzeigen auf der Vorderseite bieten nützliche Informationen zum aktuellen Status von AXIS 262 Eine umfassende Liste der LED Anzeigefunktionen entnehmen Sie der Online Hilfe oder dem Benutze...

Страница 10: ...Weitere Informationen entnehmen Sie dem AXIS 262 Benutzerhandbuch Werkseinstellungstaste Zum Zurücksetzen des Geräts auf die werkseitigen Voreinstellungen Siehe Seite 15 Betriebstaste Zum korrekten Herunterfahren drücken Sie diese Taste so lange bis ein Piepen ertönt Das Herunterfahren ist dann nach ca 20 Sekunden beendet Um das Gerät zu starten drücken Sie einmalig die Taste Netzsteckeranschluss ...

Страница 11: ...zwerk segment installiert sein muss Einzelheiten finden Sie auf Seite 12 ARP Ping Mit diesen Befehlen können Sie die IP Adresse manuell festlegen Beachten Sie dass AXIS 262 im selben Netzwerksegment installiert sein muss Einzelheiten finden Sie auf Seite 13 DHCP Server Rufen Sie die Administrationsseiten für den DHCP Server in Ihren Netz werk auf um die IP Adresse zu ermitteln die AXIS 262 zugewie...

Страница 12: ...f AXIS 262 zugreifen erfahren Sie auf Seite 14 IP Adresse mit AXIS IP Utility manuell festlegen 1 Ermitteln Sie eine nicht benutzte IP Adresse die sich im selben Netzwerksegment wie Ihr Computer befindet 2 Wenn AXIS 262 bereits eingeschaltet ist stellen Sie das Gerät mithilfe der Betriebstaste an der Rückseite aus 3 Klicken Sie auf die Schaltfläche IP Adresse mithilfe der Seriennummer festlegen Ge...

Страница 13: ... ein 5 Stellen Sie sicher dass das Netzwerkkabel angeschlossen ist Schalten Sie AXIS 262 ein indem Sie erneut die Betriebstaste drücken 6 Wenn die Meldung Antwort von 192 168 0 125 o s ä erscheint wurde die IP Adresse zugewiesen Schließen Sie die Eingabeaufforderung Hinweise Setzen Sie die IP Adresse mit dem AXIS IP Utility innerhalb von zwei Minuten nach dem Gerätestart Um unter Windows die Einga...

Страница 14: ...ie Admini stratorzugriffsrechte für den Computer 3 Geben Sie denselben Benutzernamen und dasselbe Kennwort für die Video Anmeldung ein und klicken Sie auf OK Es erscheint die Seite Hauptansicht Sie enthält Links zu den Setup Werkzeugen und zur Online Hilfe Hinweise Für eine maximale Sicherheit sollte das Standardkennwort umgehend geändert werden Rufen Sie dazu Setup Systemoptionen Benutzer auf Der...

Страница 15: ...rseite durchgehend grün leuchtet was bis zu drei Minu ten dauern kann wurde AXIS 262 auf die werkseitigen Voreinstellungen zurückgesetzt Wurde die IP Adresse geändert gilt als neue Einstellung 192 168 0 90 Dieser Wert für die IP Adresse ist an die jeweiligen Netzwerkverhältnisse anzupassen Siehe Seite 12 Wenn das Netzwerk einen DHCP Server umfasst wird dem Gerät automatisch eine neue gül tige IP A...

Страница 16: ......

Страница 17: ...ください 2 AXIS 262 を接続します コネクタ類の位置については 18 ページを参照してください 3 IP アドレスを設定します IP アドレスの設定方法については 19 ページを参照してください 4 デフォルトのパスワードを入力して AXIS 262 にアクセスします 詳しくは 21 ページを参照して ください パッケージの内容 CD の使用方法 1 付属の CD をお使いのコンピュータの CD ROM ドライブに挿入してください 2 CD が自動的に起動します お使いのオペレーティングシステムの言語設定に合った画面が表示さ れます 画面左下の国旗をクリックして 表示言語を切り替えることができます 英語 ドイツ語 日本語 3 各ボタンをクリックして AXIS IP Utility を起動したり マニュアルを表示したりすることができま す 日本語のマニュアルを表示する場合は 画面左...

Страница 18: ...ブルを使用して AXIS 262 をお使いの ネットワークに接続してください I O ターミナルコネクタ 外部デバイスの接続に使用します 詳しくは ユーザーズマニュアルを参照 してください ファクトリセットアップボタン AXIS 262 を工場出荷時の状態にリセットするときに使用します リ セットの手順については 22 ページを参照してください 電源ボタン AXIS 262 を正しくシャットダウンするには ビーッと音が鳴るまで電源ボタンを押し続 けてください シャットダウンは約 20 秒後に完了します もう一度電源ボタンを押すと AXIS 262 が 起動します 電源アダプタコネクタ 付属の電源アダプタを接続するためのコネクタです Power インディケータ Network インディケータ Status インディケータ Disk インディケータ 電源アダプタ コネクタ 9 ピン I O タ...

Страница 19: ...ネットワーク上の DHCP サーバの管理ページを開いて AXIS 262 に割り 当てられた IP アドレスを確認してください 詳しくは DHCP サーバのマニュアルを参照するか ネットワーク管理者に相談してください 注意 AXIS 262 は デフォルトで DHCP が利用できるよう設定されています AXIS 262 のデフォルトの IP アドレスは 192 168 0 90 に設定されています IP アドレスが設定できない場合は ファイアウォール等によって設定操作が妨げられていないかど うか確認してください AXIS IP Utility AXIS IP Utility は ローカルネットワーク上の Axis 製 品を検出して一覧に表示する Windows 専用ユーティリ ティソフトウェアです また AXIS IP Utility を利用して固定の IP アドレスを手 動で設定すること...

Страница 20: ...す AXIS IP Utility を利用して 動的に割り当てられた IP アドレスを固定の IP アドレスに変更すること ができます arp コマンドと ping コマンド 1 ネットワーク管理者から お使いのコンピュータと同じセグメント上の未使用の IP アドレスを入手 します 2 AXIS 262 がすでに起動している場合は リアパネルの電源ボタンをビーッという音がするまで押 し続けてシャットダウンしてください 3 AXIS 262 のリアパネルに記載されているシリアル番号 S N を書き留めます 4 コマンドプロンプトを開いて 次のコマンドを実行します 5 ネットワークケーブルが接続されていることを確認します 続いて AXIS 262 の電源ボタンを押 して本体を起動してください 6 しばらくすると コマンドプロンプト画面に Reply from 192 168 0 125 のよう...

Страница 21: ...ctiveX コンポーネントをイン ストールしてください ActiveX のインストールを行うには Administrator の権限を持つユーザ でコンピュータにログインしている必要があります 3 ビデオユーザ名に root パスワードに pass を入力して OK をクリックします メイン画面が表示されます このページには セットアップツールやオンラインヘルプへのリンクが含 まれています 注意 セキュリティの面から デフォルトのパスワードはできるだけ早く変更することをおすすめしま す パスワードの変更は セットアップ システムオプション ユーザ ページで行えます root ユーザ あらかじめ定義されている管理者権限を持つユーザ を削除することはできません パスワードを忘れてしまった場合 AXIS 262 を工場出荷時の状態にリセットする必要があります セットアップツール オンラインヘル...

Страница 22: ...す AXIS 262 が工場出荷時の状態にリセットされると フロントパネル上の Status インディケータが緑色 で点灯します 3 分ほどかかる場合があります IP アドレスが変更されるリセットを実行した場合 IP アドレスはデフォルトの 192 168 0 90 に設定さ れます お使いのネットワーク上で AXIS 262 を使用するために 適切な IP アドレスを設定し直してく ださい 詳しくは 19 ページ IP アドレスの設定 を参照してください お使いのネットワーク上で DHCP サーバが動作している場合は AXIS 262 に対して自動的に IP アドレ スが割り当てられます AXIS IP Utility を利用して 動的に割り当てられた IP アドレスを確認するこ とができます また DHCP サーバの管理ページから確認することもできます 重要 製品の詳細情報 AXIS ...

Страница 23: ......

Страница 24: ...AXIS 262 Installation Guide v1 0 July 2005 Copyright Axis Communications AB 2005 Part No 24941 ...

Отзывы: