

The following instructions will help you
install your SwitchView 130 KVM switch.
Should you require further assistance,
please contact Avocent Technical Support.
The SwitchView 130 2-port switch
enables access and management of
attached DVI/USB PCs, while supporting
audio and microphone capabilities.
1
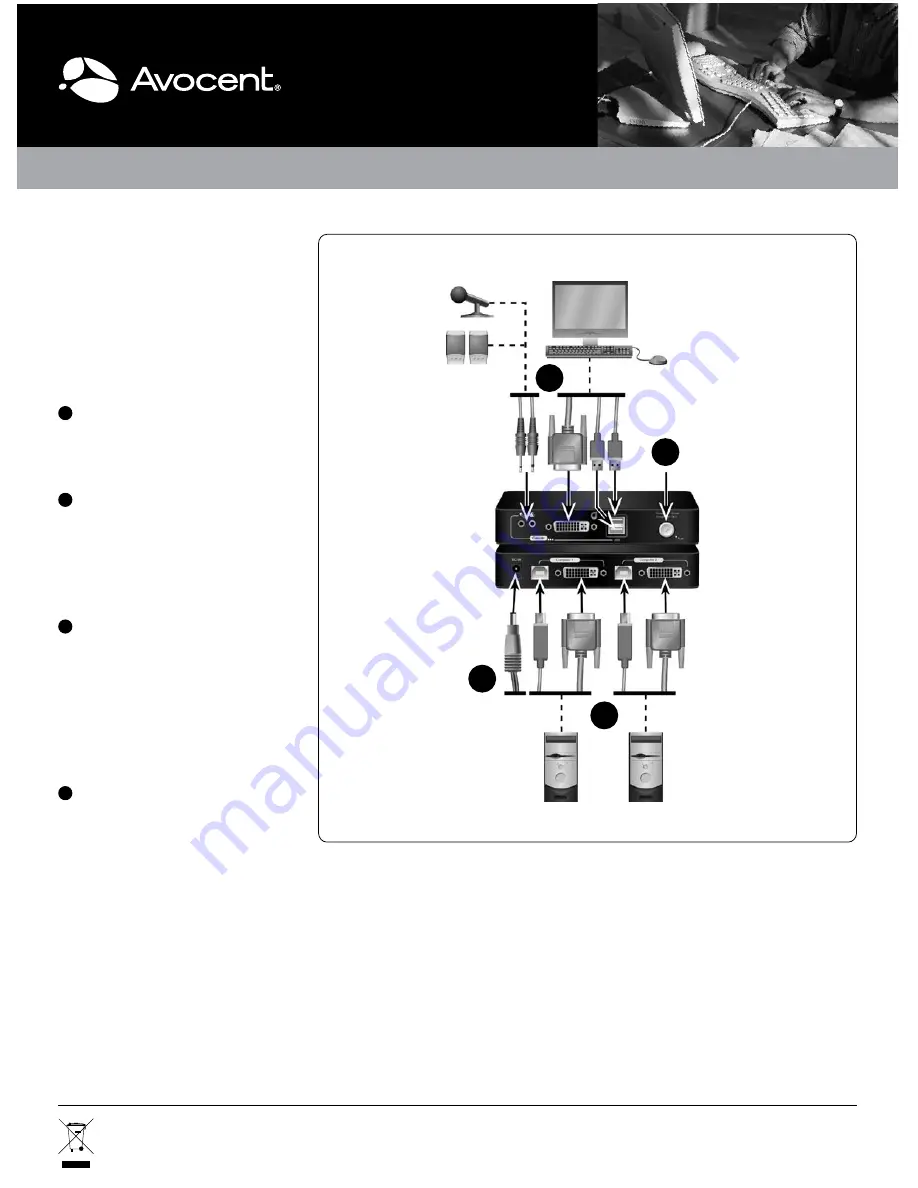
Connecting power
Plug in the power adaptor to the power
receptacle located on the back of the
SwitchView 130 switch.
2
Connecting local peripherals
Connect the keyboard, monitor, mouse,
speakers and microphone to the
appropriate console connectors on the
front of the SwitchView 130 switch
using the supplied cables.
3
Connecting your PCs
Connect one end of the included DVI
cable to the switch, then connect the
other end to a PC. Connect the included
USB cable with Type A connecting to
the PC and Type B connecting to the
switch. Repeat these steps to connect
your second PC.
4
Operating the SwitchView 130
switch
There are two ways to switch channels
(PCs) on the SwitchView 130 switch: a
front panel push-button or a configurable
hotkey sequence.
Using the front panel button
Press the front panel button to switch
PCs. The button will illuminate green for
Port 1 and blue for Port 2.
Using the hotkey sequence
To select your PC, activate the hotkey
sequence by pressing ScrLk + ScrLk.
You will automatically switch PCs.
Each keystroke must be pressed within
two seconds to validate the hotkey
sequence.
QUICK INSTALLATION GUIDE
SwitchView
®
130
2-port DVI/USB KVM Switch
To Contact Avocent Technical Support: Visit www.avocent.com
590-872-501A
Avocent, the Avocent logo, The Power of Being There and SwitchView are registered trademarks of Avocent Corporation or its affiliates in the U.S. and other countries. ©2008 Avocent Corporation.
2
3
4
1
Back
User
PCs
Front
SwitchView 130 switch (2-port)


