A Proposal for NewPresentations
MULTI PROJECTOR
User’s Manual
MP-20E
English
Deutsch
Français
Español
Страница 1: ...A Proposal for New Presentations MULTI PROJECTOR User s Manual MP 20E English Deutsch Fran ais Espa ol...
Страница 2: ...ion pixel CCD camera is built in It provides faithful and clear reproduction of the detailed neutral tones of color documents with its full color 16 77 million colors Enlarged display without changing...
Страница 3: ...e wires or cause fire or electric shock Always hold the plug itself when pulling it out of the power outlet Do not damage the power cable If the power cable is damaged e g the core is exposed or cut c...
Страница 4: ...h Avoid scratching the glass surface Take care not to scratch the glass surface of the scanner with hard or pointed objects Scratches on the glass may distort the projected image Battery When insertin...
Страница 5: ...ed status may cause injury if it rolls over Refer to Adjusting the Tilt on page E 22 for the adjusting procedure Do not do the followings Do not put anything heavy on the projector Do not step on the...
Страница 6: ...witch Off the Power E 21 Adjustment of the Projection Image E 22 Adjusting the Projection Image E 22 Making Focus Zoom Adjustments E 22 Adjusting the Tilt Slant E 22 Regular Operation E 23 Select the...
Страница 7: ...k Please check that the supplied parts are included Lens cap MP 20E Projector Power cable 3 m Remote control Coin type lithium battery CR2025 Inside the remote control User s Manual PC connection cabl...
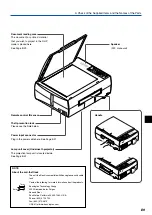
Страница 8: ...anel The buttons used for regular op eration are located here See Page E 11 Air intake vent Air filter Air is drawn into the projector from here There is an air filter to prevent dust from entering th...
Страница 9: ...onnector Plug in the power cable here See Page E 21 Lamp unit cover Underneath projector The projection lamp unit is located inside See Page E 42 Handle NOTE About the anti theft lock The anti theft l...
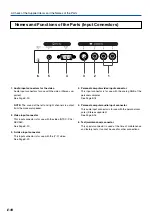
Страница 10: ...e with the video NTSC PAL SECAM See Page E 20 3 S video input connector This input connector is for use with the Y C video See Page E 20 4 Personal computer video input connector This input connector...
Страница 11: ...reen is adjusted to match the width See Page E 25 7 BRIGHTNESS Buttons These buttons adjust the brightness of the projection screen See Page E 24 8 SCROLL Buttons Sets the selection of the item or the...
Страница 12: ...pointer is being displayed See Pages E 26 E 27 E 28 and E 31 8 SET POINTER Button During menu display this button advances the menu to the next level This button finalizes the setting at the time of...
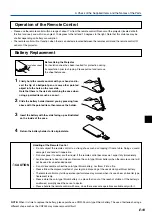
Страница 13: ...it from a table Doing so could damage it and render it inoperable Do not expose it to water or other liquid If the remote control becomes wet wipe it dry immediately Avoid exposure to heat and steam R...
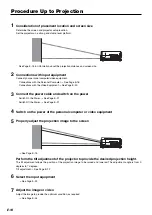
Страница 14: ...e E 21 Switch Off the Power See Page E 21 4 Switch on the power of the personal computer or video equipment 5 Properly adjust the projection image to the screen 6 Select the input equipment See Page E...
Страница 15: ...ses mirrors and other optical parts and cause a degradation of image quality Do not place the projector in a location where the ventilation vents will be blocked or in closed areas having poor ventila...
Страница 16: ...otebook computer will result in a proper display The method of switching off the display of the notebook computer will differ depending on the PC manufacturer Please read the instruction manual of the...
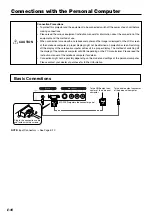
Страница 17: ...ND 1 NC 2 SDA DDC2B 3 H SYNC 4 V SYNC 5 SCL DDC2B q RED VIDEO w GREEN VIDEO e BLUE VIDEO r GND t NC Connections with Personal Computers NOTE After connecting the MPC VGA cable please set the personal...
Страница 18: ...Suspend Resume switch Correspondence List for Connection Problems with the Personal When the Image of the Personal Computer Screen Is Not Projected The screen of the personal computer is correct but t...
Страница 19: ...es 1280 960 85Hz 1280 960 85 9 85 No 1280 1024 60Hz 1280 1024 64 0 60 Yes 1280 1024 75Hz 1280 1024 80 0 75 No 1280 1024 85Hz 1280 1024 91 1 85 No 1600 1200 60Hz 1600 1200 75 0 60 No 1600 1200 65Hz 160...
Страница 20: ...ections have been made S video will be given priority for display When a video signal have a lot of noise the image may be displayed in monochrome Should this occur make a setting with the Video selec...
Страница 21: ...ing the Power Cable The ON STANDBY LED on the operation panel will go off The projector is now able to make a projection 3 Switch on the power of the connected equipment Do not disconnect the power ca...
Страница 22: ...usted Press the left right tilt adjustment lever and raise the front of the projector Release the lever when the de sired height has been reached Rotating the lowest portion of the tilt foot permits f...
Страница 23: ...he input using the INPUT SELECT buttons NOTE The input mode at starting time will be the same as it was the last time the projector was switched off When the power of the projector is switched on the...
Страница 24: ...ndition A press of the projector INPUT SELECT buttons or one of the remote control OHP PC VIDEO buttons during a still image display will cancel the still image of the PC or video deck OHP will retain...
Страница 25: ...ntrol Press the SCROLL buttons and scroll the projec tion image up or down NOTE When the orientation of the projection image is changed even if the zoom function is in use the display of the switched...
Страница 26: ...n with the Projector A list display of captured images is not available from the operation panel of the projector Operation with the Remote Control Press the THUMBNAIL button Full screen Display of Th...
Страница 27: ...ngth ratio 4 times is permitted Regular Operation Operation with the Projector Press the ZOOM button Enlarge the size of the projected image Reduce the size of the projected image Operation with the R...
Страница 28: ...e has been an absence of an operation for 15 seconds during the display of the above confirmation message the projector automatically enters the standby mode Operation with the Projector The ability t...
Страница 29: ...as not been closed however in this instance unnec essary items may be projected which will make the image difficult to view When paper having luster such as magazine covers are placed on the projector...
Страница 30: ...O Common During PC Input During VIDEO Input This item is added only when the menu is displayed during the full screen dis play of the OHP history The adjustment setting items and content will differ d...
Страница 31: ...em contents Names and Functions of the Menu Parts Menu tab Switches to the various menus when selected Adjustment bar Indicates the adjustment condition according to the increase or decrease of the ba...
Страница 32: ...example 1 Press the MENU button and display the menu 2 Select Settings with the SCROLL buttons Each press of the SCROLL button switches the menu one step in the sequence of Pntr setting Image adjustm...
Страница 33: ...ns while checking the projection image SCROLL button Each press causes the numerical value to decrease The lower portion of the projection im age becomes narrower SCROLL button Each press causes the n...
Страница 34: ...only while the OHP history screen is being projected Next page in history Switches to the history screen that is stored in memory after the currently projected history screen During the display of OH...
Страница 35: ...amongst 5 levels As the numerical value increases the sharpness of the image is enhanced Sub menu Sync adjustment Clock Adjusts the horizontal size of the pro jected image in the range of 50 to 50 Ph...
Страница 36: ...he range of 50 to 50 As the numerical value be comes lower the color becomes greenish and as the numerical value increases the color becomes red dish Sharpness Selects the sharpness of the pro jected...
Страница 37: ...When you do not wish to have the resolution degradation set the projector on a level platform and set the numerical value of the Keystone menu to 0 no correction Compared to when keystone correction i...
Страница 38: ...Front front projection and Rear rear projec tion Economy mode ON Economy mode The brightness of the lamp will be approximately 80 The lamp ser vice life will be extended OFF High brightness mode The b...
Страница 39: ...n an operation ambient temperature of 0 C 32 F to 35 C 95 F Are the ventilation vents blocked Rearrange the setup location of the projector and separate the projector from surrounding objects See Do N...
Страница 40: ...5 C 95 F Are the ventilation vents blocked Is the air filter blocked Breakdown of an internal cir cuit could be the problem Please use the projector in an operation ambient tempera ture of 0 C 32 F to...
Страница 41: ...amp unit model MPLK C1 CAUTION Guideline for lamp replacement Usage time when used only in the high brightness mode 1900 hours Usage time when used only in the economy mode 2900 hours Note that the La...
Страница 42: ...and pull it up and out 4 Install a new lamp unit Take the lamp unit and press it into the projec tor Check that the 2 positioning protrusions are firmly inserted into the 2 holes Tighten the 2 mounti...
Страница 43: ...set in a lamp kit therefore please also replace the air filter at the same time as lamp unit replacement See Page E 44 Lamp units can be disposed of using the same disposal method as household fluores...
Страница 44: ...emove the air filter from the cover and use a vacuum to suck away the dust from the outside surface of the air filter 3 Install Installation is performed by following the steps for removal in reverse...
Страница 45: ...connected input been selected Is the cable of the connected equipment properly connected Have Brightness and Contrast of the Image adjustment menu been set all the way to the minus side Have you check...
Страница 46: ...problem contact the dealer where you bought the product When asking for repair service provide your dealer with the following information Description of the problem as many details as possible Date o...
Страница 47: ...ls color CCD camera 288 mm 216 mm 11 3 in 8 5 in Separate Signal System Analog 0 7Vp p 75 Separate composite TTL Level positive negative Sync on green 0 3 Vp p Negative 15 pin Mini D sub 1 ch NTSC PAL...