background image

 42

ZK830 Counting Scale User Instructions

Options

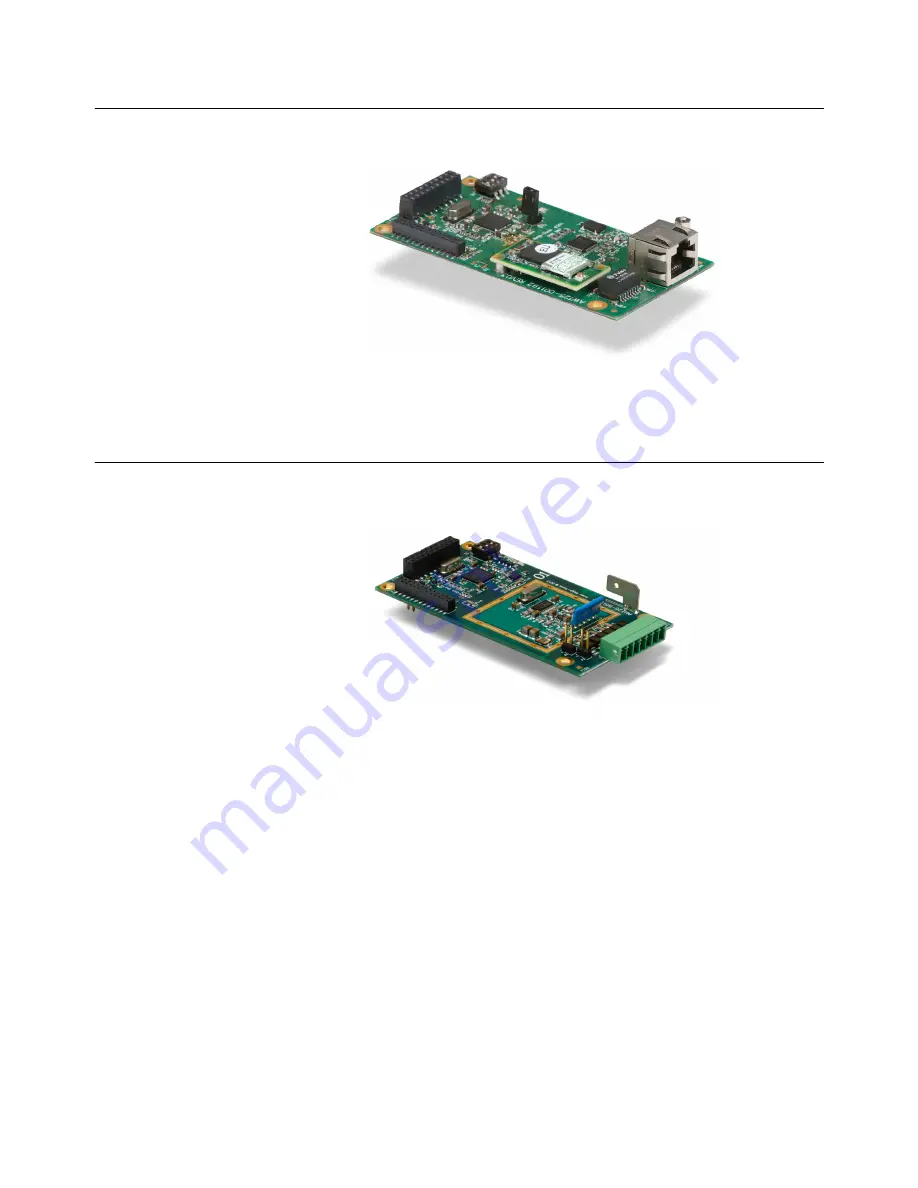
7.11  802 wireless option card

The 802 wireless option card allows the ZK830 to communicate wirelessly to many 
peripheral devices. This must be installed by a qualified technician.

7.12  Remote base analog card

The 5V remote base analog card allows the connection of second analog scale to the 
ZK830 for remote weighing. This must be installed by a qualified technician.

Содержание ZK830

Страница 1: ...ZK830 User Instructions AWT35 501609 Issue AE...

Страница 2: ...wo dimensional work and the making of a copy in two dimensions of a three dimensional work stored in any medium by electronic means or transmitted in any form or by any means including electronic mech...

Страница 3: ...ting 15 Chapter 3 Indicator applications 16 First time power up 16 Counting application 16 Sampling methods 16 Remote base switching optional keypad required 17 Entering known tare weights and piece w...

Страница 4: ...pad 37 Light stack 37 Debris shield 38 Desk wall mount 38 Columns 39 Draft shield 39 Underhook 40 Ball top 40 Batteries 41 Clamp down plate 41 802 wireless option card 42 Remote base analog card 42 Pr...

Страница 5: ...d reflect the case of the key being described If a key has a dual function it may be referred to by its alternate function Displayed messages appear in bold italic type and reflect the case of the dis...

Страница 6: ...e of protection provided by the socket is suitable for the environment N O U SER SER V I C EA B LE PA R TS R EFER TO Q U A LI FI ED SER V I C E PER SO N N EL FO R SER V I C E Equipment to be powered b...

Страница 7: ...user Take frequent breaks during prolonged usage 1 6 Sharp objects Do not use sharp objects such as screwdrivers or long fingernails to operate the keys IMPORTANT This equipment must be routinely che...

Страница 8: ...an have a remote base attached which can be analog or digital For information on the BSQ bases please refer to the manuals for BSQ line 2 1 Basic counting principles There are several things which aff...

Страница 9: ...function Press the PRINT to send information to a peripheral device through a configured communications port Press and hold the PRINT key to print accumulated totals if enabled Acts as a left arrow ke...

Страница 10: ...unted on the rear of the base you can expect approximately 16 hours of operation between charges Recharge time is four hours using the in line PSU The battery pack requires 24 to 36V to charge See Bat...

Страница 11: ...ou choose One is for AC power only and the other is for use with the optional battery pack or AC power These two panels and their connections are shown in Figure 2 3 Figure 2 3 BSQ connections Power c...

Страница 12: ...power supply unit PSU is attached by a bracket to the back of the scale base The DC output barrel jack plugs into the 12 36 VDC input as shown in Figure 2 4 Figure 2 4 AC power block Plug the power c...

Страница 13: ...ly charged the red CHARGING light will go out and the power supply can be unplugged to work on battery power only The standby power button pointed out in Figure 2 6 can be used to turn the ZK830 indic...

Страница 14: ...e right Repeatedly press the TARE or SELECT key until 7 appears on the display Press the ZERO key to enter or accept the value Press the PRINT key to move the entry function one digit to the left This...

Страница 15: ...is used to change the active application To display active application name You can display the active application name by doing one of the following l Press and hold SAMPLE F1 until the numeric entr...

Страница 16: ...3 2 3 Entering known tare weights and piece weights optional keypad required If you know a tare or piece weight you can quickly enter those values using these steps Entering a known tare weight only...

Страница 17: ...press the SAMPLE key The display will show SAMPLinG briefly and then Add XX where XX is the size you keyed in 3 2 7 Counting in dribble mode With the count application in dribble mode active follow t...

Страница 18: ...page 22 3 Press the SAMPLE key SAMPLinG is briefly displayed This means the indicator is zeroing itself A message Add XX is then displayed XX is the current sample size 4a Place XX number of items on...

Страница 19: ...the 3 7 digit part number and press PLU The stored piece weight tare weight and units are now active Repeat this process for other PLUs Updating PLU stored tare and piece weights If enabled in the pas...

Страница 20: ...k counting You can fill boxes within a specific upper and lower count limit The bar graph will show when you are under over or at the accept number Or if you have the optional light stack the lights c...

Страница 21: ...percent display and high resolution values by repeatedly pressing SELECT 3 3 2 Gross weighing To perform gross weighing power up the unit and follow these steps 1 Empty the scale and press ZERO to zer...

Страница 22: ...as described in step 2 and 3 Using Entered Tare with optional keypad only If enabled you can enter in a tare value using the optional keypad and this procedure 1 Key in a tare weight using the keypad...

Страница 23: ...and be sure there is no active tare and press ZERO to zero the scale if necessary Press the SELECT key repeatedly until the annunciator is lit Place the target weight on the scale and press SAMPLE F1...

Страница 24: ...r Instructions 25 3 3 General weighing application 3 3 7 Printing To print the current weight information press PRINT The configured print format will be output through the configured port to the conn...

Страница 25: ...a quick visual check of the acceptability or unacceptability of an item s weight Figure 3 1 shows the checkweighing bargraph at the top of the display Figure 3 1 Checkweighing bargraph Checkweighing c...

Страница 26: ...items The current target weight will be active until you repeat steps 1 through 3 with a new item of a different weight 3 4 5 Checkweighing using PLUs with optional keypad only The PLU database contai...

Страница 27: ...ctions Indicator applications 3 4 6 Accumulating gross and net weights If enabled you can press the PRINT key to accumulate gross and net weights You can then press the SELECT key to scroll through th...

Страница 28: ...from which you choose one item To help you know where you are in the menu the bargraph at the top of the display is on while the indicator is in the menus and will change appearance according to the f...

Страница 29: ...to accept the displayed choice If you choose SAVE no or SAVEYES the indicator exits the menu and returns to normal weighing mode OR If you choose CAnCEL the indicator remains in the menu 4 4 USER lev...

Страница 30: ...s explained below tiME Use this to set the time and clock style Two items appear below tiME Set Use this to set the hour minute and second h x This is the entry screen for the hour m x This is the ent...

Страница 31: ...YLE Use this to set the style of clock for printouts Choices are MMDD2Y MMDD4Y DDMM2Y and DDMM4Y SitE id Use this to key in a site ID number SEAL Use this to view the Seal status This is the status of...

Страница 32: ...he first four digits are displayed Press UNITS to view the last five digits EnEt Use this item to view the values for the IP Subnet Gateway and MAC addresses Press the ENTER key successively to see al...

Страница 33: ...s must match or you will see a BSQ error displayed This completes the About menu To exit the menu see Exiting the menus on page 30 4 7 Audit menu The Audit menu is shown in Figure 4 4 Figure 4 4 Audit...

Страница 34: ...dition Bounds Entry not in valid range Invalid Password entry failed Z error Power up zero error Error 252 Scale not communicating check interface cable from scale to indicator contact scale service p...

Страница 35: ...to edit or add delete a character String Index number Character ASCII characters are entered as decimal values Table 1 Key Action When In The String Index Select Mode Action TARE SELECT ZERO PRINT UNI...

Страница 36: ...asy number entry access to the function of a second scale a PLU database and easy piece weight entry 7 2 Light stack The light stack provides quick visual feedback on the status of checkweighing and c...

Страница 37: ...ield The debris shield fills the gap between the BSQ base and the ZK830 to prevent debris from falling behind the indicator 7 4 Desk wall mount The desk wall mount bracket attaches easily to the indic...

Страница 38: ...or can be mounted one of two columns available as options one is 15 38cm and the other is 23 58 5cm tall 7 6 Draft shield The draft shield offers protection from drafts which can adversely affect the...

Страница 39: ...ptions 7 7 Underhook An underhook kit allows weights to be suspended beneath the BSQ base 7 8 Ball top The ball top allows easy movement of heavier objects especially in assembly line situations Only...

Страница 40: ...nd the ZQ BAT which can be used in combination with the column option The first can give approximately 16 hours of operation and the second can give 25 hours of continuous use or 1 2 weeks of occasion...

Страница 41: ...d allows the ZK830 to communicate wirelessly to many peripheral devices This must be installed by a qualified technician 7 12 Remote base analog card The 5V remote base analog card allows the connecti...

Страница 42: ...h the ZK830 A range of compatible printers can be used with the ZK830 One style available through Avery Weigh Tronix is shown below 7 14 Scanner A barcode scanner can help speed up inventory processes...

Страница 43: ...n page 48 l Checkweighing application supervisor menu on page 52 Wherever there is an option to print information in the any of the supervisor s menus the information will print out of Port 1 or Port...

Страница 44: ...ges The Setpoint menu is the same for all the applications so will only be explained once here Exceptions are noted in the text Super Plu Battery Setpnt Totals App Pwr Off On Print Off On Prnft Clr To...

Страница 45: ...the indicator will automatically shut off EnAbLE Choose bSq or otHEr to enable battery usage If you pick otHEr setpoint 3 will be disabled Choose off to disable battery usage A setpoint value can be...

Страница 46: ...PLU the user can get a new tare weight and press the PLU key once to view the current PLU number then quickly press the PLU key twice more to update the tare weight in the PLU 8 1 4 Totals menu item T...

Страница 47: ...f On Update Number Units TareSc1 lbs kg g Off Off 1 2 5 10 25 50 100 Pce Wt Tare All None Pc Wt Sample Lo Limi Hi Limi Under Latchou TareSc2 1 2 Off On Other Over Lo Limi Hi Limi Bold boxes and text d...

Страница 48: ...ay of the count Increase the sample weight to more then the minimum to maintain accuracy at lower accuracy settings in less stable environments Min SAmP If you want to count very small parts and the e...

Страница 49: ...like checkweighing except counts are used instead of weight If you enable this function these menu items appear Lo LiMi This stands for Low Limit Enter the lowest acceptable count Hi LiMi This stands...

Страница 50: ...r to update the piece weight with an active PLU the user can take a new sample get a new piece weight and press the PLU key once to view the current PLU number then quickly press the PLU key twice mor...

Страница 51: ...Divisions Enter the number of divisions below your low tolerance which will cause the first under segment to appear Super Plu Battery Setpnt Totals App Pwr Off On Print Off On Prnft Clr Tot Off On In...

Страница 52: ...two under segments illuminate Below 89 7 three under segments would be shown At 120 2 one over segment illuminates At 120 4 two over segments illuminate LAtcHou This stands for Latch Output If On onc...

Страница 53: ...54 ZK830 Counting Scale User Instructions Supervisor menu...

Страница 54: ......

Страница 55: ...A Tel 507 238 4461 Fax 507 238 4195 Email usinfo awtxglobal com www averyweigh tronix com Avery Weigh Tronix UK Foundry Lane Smethwick West Midlands England B66 2LP Tel 44 0 8453 66 77 88 Fax 44 0 121...

Отзывы: