32
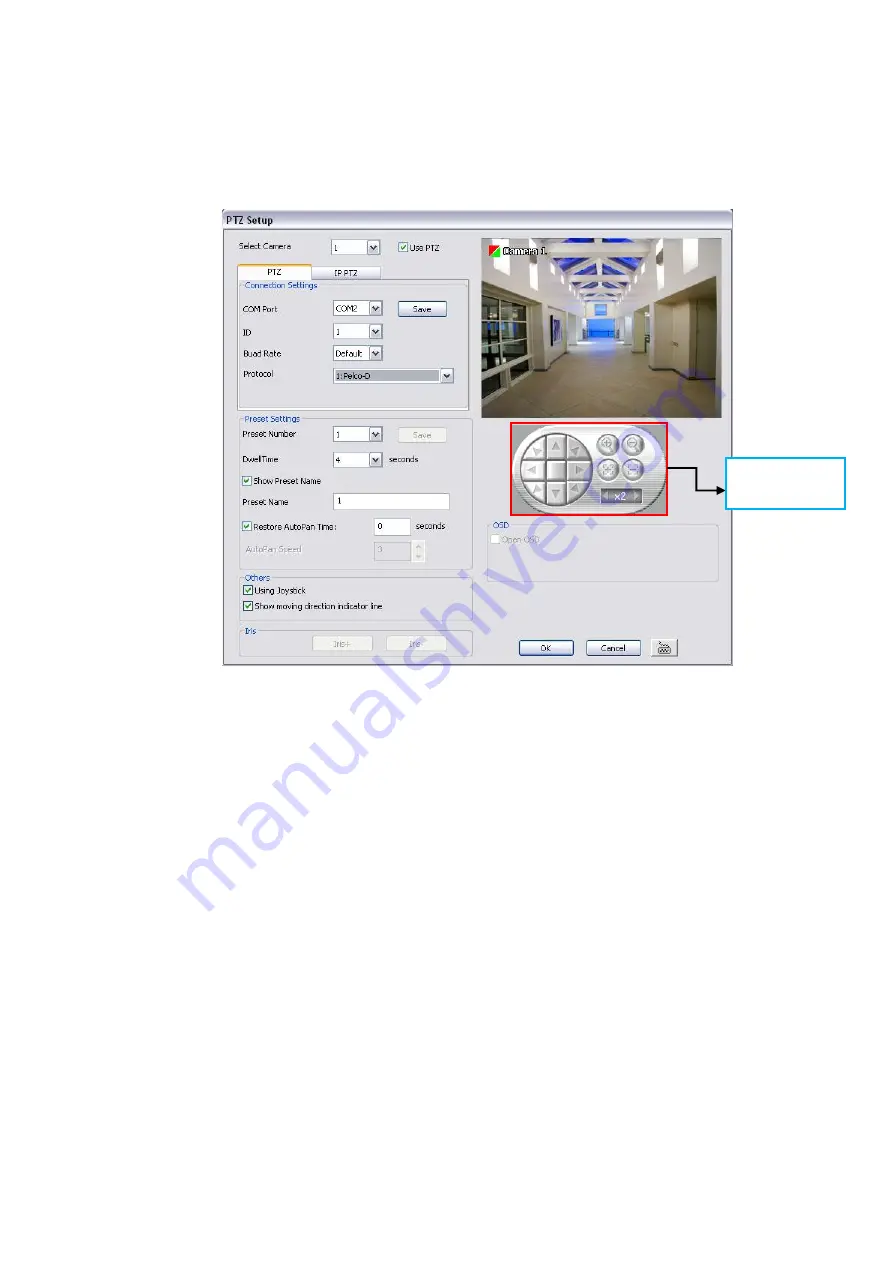
3.7 To Setup the PTZ/IP PTZ Camera
3.7.1 Setup the PTZ Camera
1. In the PTZ control panel, click
Setup
.
2. When the PTZ Setup dialog box appears, select the camera number and check the
Use PTZ
box.
3. In the
Connection Settings
section, select the
COMPort
where the PTZ camera is connected, PTZ
ID
number,
BaudRate
, and
Protocol
. Then, click
Save
to keep the settings.
4. Use the PTZ control panel and adjust the position of the PTZ camera.
5. In the
Preset Setting
section, select the preset number to assign a number for the PTZ camera current
position. Set the
DwellTime
(1-60 sec) for how long the PTZ camera stays in that position before it
moves to the next one. If you want to add description, check the
Show Preset Name
box and in the
Preset Name
text box, type the word. When done, click
Save
to keep the settings.
6. Repeat step 4 & 5, if you want to save another PTZ camera position.
7.
Restore AutoPan Time:
set a time period for restoring auto path function after the PTZ camera has
been moved. Mark the check box and set the time period in second.
8.
Using Joystick:
Mark to enable for joystick device.
9.
Show moving direction indicator line:
enable/disable to show the direction line when uses mouse
drag on screen in PTZ mode.
10.
Iris:
To adjust the iris of PTZ camera. It may not support that depends on brand of the PTZ camera.
11.
OSD:
To allow call out PTZ camera factory’s OSD setup menu. The OSD setup menu may vary that
depends on the brand of PTZ camera.
12. When is done, click
OK
to save the setting or Click
Cancel
, to leave without saving the new setting.
13. When PTZ camera is enabling, user can control PTZ camera by using the mouse and on screen PTZ
control bar.
14. Click on screen PTZ control icon to call out the control bar.
Using this control
panel to set the
preset position
Содержание IWH3216 Touch
Страница 1: ...AVerMedia IWH3216 Touch User Manual June 2010...
Страница 51: ...45 Power Management To setup UPS configuration Device Management To manage the DVR system devices...
Страница 153: ...147 10 To switch back to iEnhance interface click iEnhance button...
Страница 176: ...170 11 If user wants to burn the back file into DVD disk click Burn button and select the file to burn...
Страница 180: ...174 4 When the below screen show up press CTRL I 5 Select Create RAID Volume...


