


25
4.0 Installation
1.
Check and ensu
re all the external system power supplies are turned off.
2.
Install
NVIDIA
®
Jetson Nano/ Xavier NX module
onto
260-pin SODIMM connector
(J5). Check and be
sure to follow the manufacturer’s instructions for the proper installation of the mounting hardware,
heat sink or heat spreader
, fan, and any other applicable requirements from the associated
manufacturers.
3.
Install the necessary cables for the application. The cables can include the following ones. For
the additional information of these mentioned cables, please refer to 8.0 Cable Assembly in this
manual.
Power cable to the input power connector (J13) on the carrier board.
HDMI video display cable to HDMI video output connector (J10).
Mouse and keyboard cables to USB connectors (J9).
4.
Connect the power cable to the power adapter.
5.
Turn on the power adapter. (Please be reminded NOT to power on the system by plugging in the
live power.)
5.0 Software
For L4T (Linux for Tegra) BSP and the software support associated with NVIDIA
®
Jetson Nano/ Xavier NX module,
please chec
https://www.avermedia.com/professional/download/en713_aae9#ans_part /
https://www.avermedia.com/professional/download/nx213b#ans_part
, to download the file from AVerMedia
website.
Содержание AVerAI EN713
Страница 5: ...5 AVerMedia Global Offices https www avermedia com professional contact ...
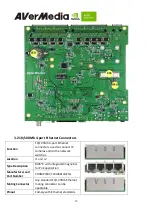
Страница 10: ...10 2 0 Product Overview 2 1 Block Diagram ...
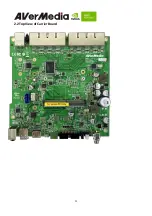
Страница 11: ...11 2 2 Top View of Carrier Board ...
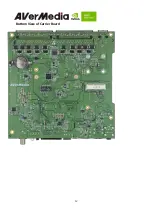
Страница 12: ...12 Bottom View of Carrier Board ...
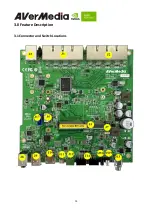
Страница 14: ...14 3 0 Feature Description 3 1 Connector and Switch Locations ...


