background image


Getting Started      


2.1 

TV 


Watching External Video 

After you connect the device with external video sources (camcorder, video games, VCR/VCD/DVD 
players), you can enjoy watching them on your PC.   

1

1

.

.


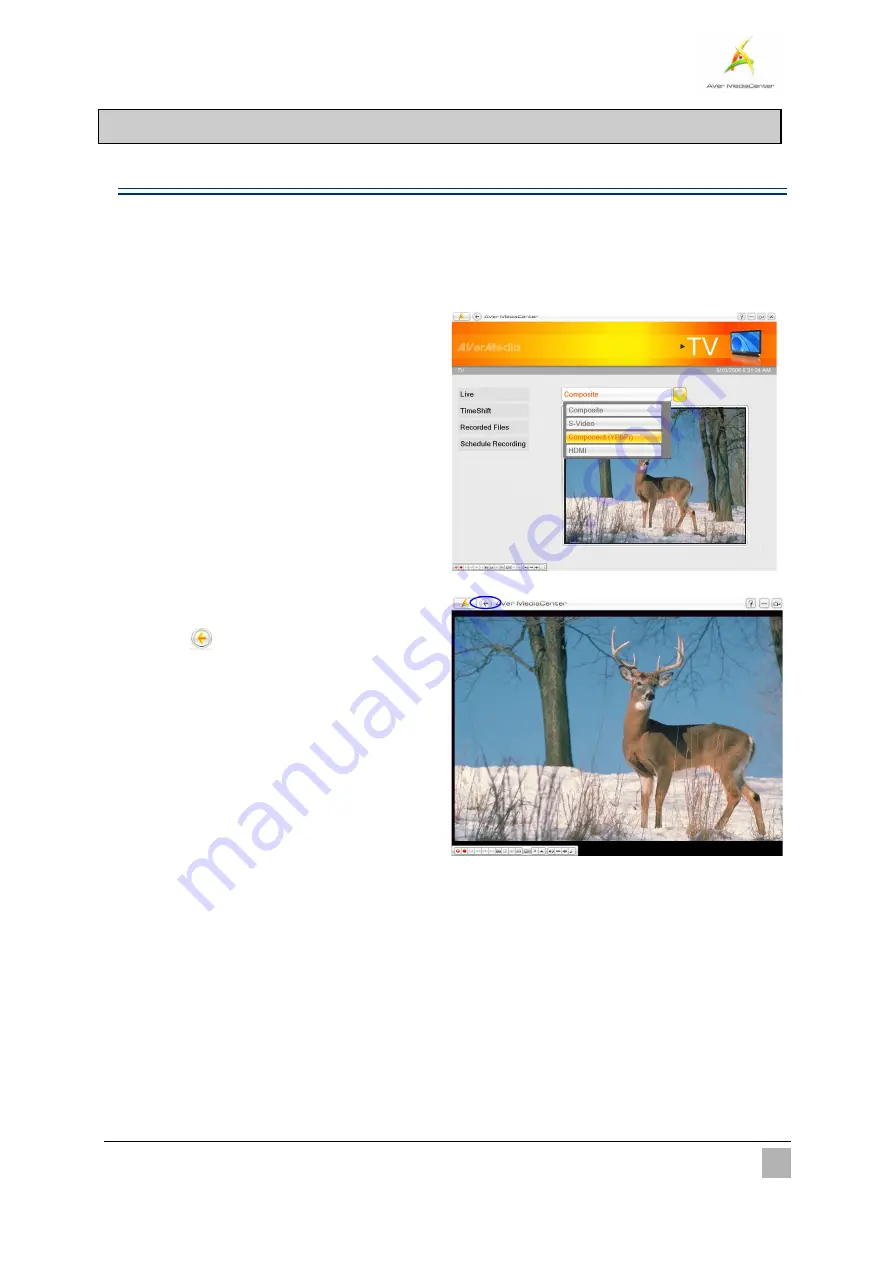
Go to the 

TV

 page and you can see a 

preview window in the right-hand section of 

the screen. 

2

2

.

.


To switch the preview mode to the 

full-screen mode, select 

Live


3

3

.

.


If you want to go back to the preview mode, 

select 

  in the top-left corner of the 

screen. 


Содержание AVer MediaCenter

Страница 1: ...AVer MediaCenter User Manual...

Страница 2: ...ever no responsibility is assumed for inaccuracies The information contained in this documentation is subject to change without notice COPYRIGHT 2010 by AVerMedia TECHNOLOGIES Inc All rights reserved...

Страница 3: ...ecorded Video 10 2 2 Video 11 Playing Video Files 11 2 3 Music 12 Adding Music to your Playlist 12 Playing Music 13 2 4 Pictures 14 Viewing the Captured Images 14 Playing Slide Show 14 Chapter 3 Advan...

Страница 4: ...V Configure Recording 28 Configure HD Input Source Configure Recording 31 Configure HD Input Source Configure Timeshift 33 More TV Options 34 4 3 Video Settings 35 4 4 Picture Settings 36 4 5 About 37...

Страница 5: ...real multimedia entertainment center This Chapter will guide you through the essential information of AVer MediaCenter Please do read this chapter before using this application Please be noted the fun...

Страница 6: ...32 64 Bit Standalone graphics card is recommended for HD video capturing 2GB RAM is recommended for HD video capturing 1 2 Activating AVer MediaCenter To run the application click Start point to Progr...

Страница 7: ...MediaCenter appears which includes TV Video Music Pictures and Settings This section briefly introduces main menu sub menus and setting items For more details please refer to Chapter 2 The Main Scree...

Страница 8: ...elected file Record the current program Play the previous next file in the playlist Move backward or skip forward in intervals Capture a single image or a sequence of images Enable the PIP or multiple...

Страница 9: ...Introduction 5 Note Some functions may not be available depending on the product model Navigation Tree Note The items may vary depending on the product you use and the area you live...

Страница 10: ...Choose the primary device or tuner and then select Next as shown on the right Then choose Next again to continue 3 3 Choose the country where you located 4 4 Choose the type of video signal 5 5 Selec...

Страница 11: ...start with the basic usage of AVer MediaCenter including playing music recording a video program and so on Before using the application it is necessary to understand all the basic operations in this...

Страница 12: ...o games VCR VCD DVD players you can enjoy watching them on your PC 1 1 Go to the TV page and you can see a preview window in the right hand section of the screen 2 2 To switch the preview mode to the...

Страница 13: ...ick on the control panel To disable the sound of the program click on the control panel Press the same button again to turn on the sound Capturing Images While you watch recorded video from your PC mo...

Страница 14: ...be recorded Playing A Recorded Video 1 1 Select TV Recorded Files 2 2 All the recorded files are listed here 3 3 You can view those file by date title or status 4 4 Choose the desired file 5 5 If you...

Страница 15: ...may see some recorded video files are listed on the right hand section of the screen Or you can select More Videos to choose other folders on your computer 3 3 Select the file you want 4 4 Select to...

Страница 16: ...music from the playlist next time 1 1 Select Music Add Music and then select the desired folder 2 2 Choose the tracks you wish to play Press Space button on your keyboard to confirm the selected file...

Страница 17: ...3 To continue playing all the tracks select Loop check box 4 4 Use to determine the order of the tracks in your playlist 5 5 Then select to start to listen to the music 6 6 Use the following buttons...

Страница 18: ...clicking on the thumbnails you can view images in a full screen window 4 4 Select More Pictures to find the folder that contains the desired pictures if your images are not saved in the default folder...

Страница 19: ...pter 3 Advanced Operations Beyond basic usage what else you can do with AVer MediaCenter In this chapter we take you to the next level and explain the advanced features of this application TV 16 Video...

Страница 20: ...t of the recorded program and display the background recording time and the current show time 4 4 Select to move backward in fixed intervals until reaching the part where you left off 5 5 To advance f...

Страница 21: ...omposite at the same time To do so please do the followings 1 1 Select TV 2 2 From the drop down list choose the type of video source 3 3 On this page use on the control panel You can see TV icons on...

Страница 22: ...ve 8 8 Select repeatedly to switch between Full screen mode PIP mode and PBP mode as shown on the right Full Screen Mode PIP Mode PBP Mode 9 9 To change the video source right click on the selected sc...

Страница 23: ...oup source and Composite and S Video is another group source In PIP PBP mode one window displays one group source HDMI or YPbPr Component video and the other window displays the other group source Com...

Страница 24: ...n the bottom right corner of the screen In this example two TV icons appearing indicate two devices are installed in this computer 3 3 You can choose either or to switch between different video source...

Страница 25: ...Advanced Operations 21 PBP Mode 7 7 Under PIP mode you can change size of the PIP screen with your mouse...

Страница 26: ...h between Full screen mode PIP mode and PBP mode as shown on the right 5 5 To switch and listen to the sound of live video simply use the arrow button to select the PIP PBP screen 6 6 By default the p...

Страница 27: ...grams or capturing images check the settings page to see if they meet your needs With our explanation in this chapter you can easily customize all the settings of AVer MediaCenter General Settings 24...

Страница 28: ...other hard drives 5 5 Then Choose OK to confirm the selection 6 6 Determine the length of recording time otherwise the system will record the largest clip that your hard drive can accommodate 7 7 Thi...

Страница 29: ...will be captured every 10 seconds 4 4 Choose the format you want for saving the captured images 5 5 Use the default folder for saving images 6 6 Or select to look for your desired folder 7 7 On the ne...

Страница 30: ...s 1 1 Select Settings General Video Device 2 2 Choose the primary device from the drop down list 3 3 To use Multi Channel Display function you need to select the secondary devices For more details on...

Страница 31: ...he sleep function and choose the desired power saving settings including Exit Stand By Hibernate and Power Off 6 6 Select the Keep Sleep function after TV application closed check box to enable the fu...

Страница 32: ...st MPEG 2 AVI DVD WAV WMA WMV H 264 iPod 3 3 If you want to record program in MPEG 4 format you need to download codec from the website first We recommend downloading the DivX codec from www divx com...

Страница 33: ...ws Media Formation 7 7 H 264 1G Profile Level Video Size Entropy Mode Video Bitrate Audio Sample Rate Audio Bitrate 8 8 iPod 350MB None Note The above estimated file size is calculated based on the de...

Страница 34: ...s Level The level specifies a limit for a variable such as the maximum resolutions and data rates Windows Media Format Windows Media Format means the compression type developed by Microsoft Audio Enco...

Страница 35: ...m HDMI and Component input sources 1 1 Select Settings TV Configure HD Input Source Configure Recording 2 2 Choose the default file format MPEG 2 H 264 iPod from the Record Format drop down list 3 3 T...

Страница 36: ...advanced users Option Description Video Encoder A tool of video compression A better video encoder produces higher video resolutions with less video distortion and smaller file size Video Size Here y...

Страница 37: ...channels and a quantization level Audio Sample Rate Audio Sample Rate refers to the numbers of times the analog audio signal is sampled per second when being converted to digital one Higher numbers m...

Страница 38: ...2 2 Make sure that your country or region is correct if you cannot get any channels after scanning 3 3 If you connect to an external video device you need to select the correct video standard 4 4 If y...

Страница 39: ...to look for your desired folder 4 4 On the next page you can use to go up one level to find other folders or select Change Disk to choose other hard drives 5 5 Then Choose OK to confirm your selectio...

Страница 40: ...t to use from the Transition Effect drop down list 5 5 Select to look for your desired folder 6 6 On the next page you can use to go up one level to find other folders or select Change Disk to choose...

Страница 41: ...o access the product information webpage Or you can click Technical Support to connect to our technical support webpage Global page 3 3 For North American users select North America English from the S...

Страница 42: ...Appendix More tips and explanations are included in this chapter Hot Keys 39 Glossary 40...

Страница 43: ...playlist Ctrl O View the recorded file list Ctrl P Freeze the playback temporarily Ctrl Shift P Play the selected file Ctrl S Stop the playback recording TimeShift etc Ctrl Shift S Enable the TimeShi...

Страница 44: ...efficient than MPEG 2 This format can be applied to a wide variety of applications or networks and systems like HD DVD Digital TV Broadcast and Streaming applications Hibernate Hibernation is a state...

Страница 45: ...SVCD frame size and frame rate are 480 x 480 pixels at 29 97 fps for NTSC and 480 x 576 at 25 fps for PAL VCD When you choose this format the recorded video file will be saved in MPEG 1 format that i...

Отзывы: