15
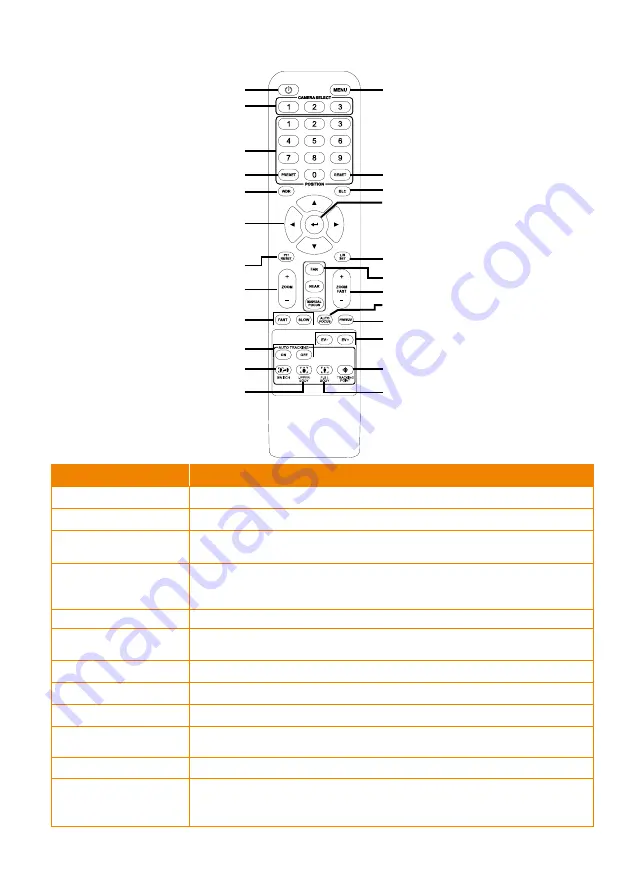
Remote Control
Name
Function
(1) Power
Turn the unit on/standby.
(2) Menu
Open and exit the OSD menu.
(3) Camera Select
CAM1 to CAM3 button
Select a camera to operate.
(4) Numeric Pad
◼
Use for setting the preset position 0~9.
◼
Press number button (0~9) to move the camera to pre-configured
preset position 0~9.
(5) Preset
Press “
Preset
” + “
Number button (0~9)
” to set the preset position.
(6) Reset
Press “
Reset
” + “
Number button (0~9)
” to cancel pre-configured preset
position.
(7) WDR
Turn on/off WDR function.
(8) BLC
Turn on/off backlight compensation.
(9)
Pan and tilt the camera.
(10) Enter
Access the OSD menu, confirm the selection or make a selection in OSD
menu.
(
11) PT Reset
Reset the Pan-Tilt position.
(12) L/R DIR
Left and right orientation setting.
-
Press “
L/R DIR
” + “
1
” button to reset setting.
-
Press “
L/R DIR
” + “
2
” button to move to opposite direction.
(1)
(2)
(6)
(8)
(10)
(12)
(15)
(19)
(17)
(20)
(22)
(24)
(14)
(3)
(4)
(5)
(7)
(9)
(11)
(13)
(16)
(18)
(21)
(23)
▲,▼,◄, & ►
Содержание TR313V2
Страница 1: ...AI Auto Tracking PTZ Camera TR311V2 TR313V2 User Manual ...
Страница 8: ...Specification 50 TR311V2 50 TR313V2 54 ...
Страница 11: ...3 Pan and Tilt Angle Dimension 191 9mm 180 0mm 161 3mm 145 1mm ...
Страница 16: ...8 Din8 to D Sub9 Cable Pin Definition 6 7 8 3 4 5 1 2 1 5 6 9 ...
Страница 33: ...25 After connecting to the camera enter the user account and password default is admin admin to log in Web ...
Страница 50: ...42 ...
Страница 61: ...53 Warranty Camera 3 Years Accessories 1 Year Specifications are subject to change without prior notice ...
Страница 66: ...V1 ...


