

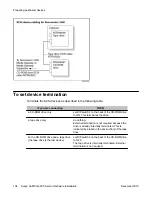


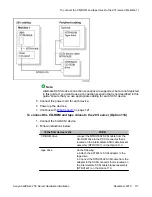


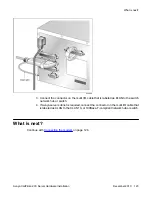

3. Insert the card into the slot, and gently push it until it is firmly in place and the ejector
button pops back out.
Note:
Populate MPC slots in numerical order as listed on the 201i server faceplate.
What is next?
Continue with
Installing the monitor, keyboard, and mouse
on page 113.
Connecting peripheral devices to the 201i server
112 Avaya CallPilot
®
201i Server Hardware Installation
December 2010
Содержание CallPilot 201i
Страница 1: ...Avaya CallPilot 201i Server Hardware Installation 5 0 NN44200 301 01 03 December 2010 ...
Страница 8: ...8 Avaya CallPilot 201i Server Hardware Installation December 2010 ...
Страница 28: ...About the 201i server 28 Avaya CallPilot 201i Server Hardware Installation December 2010 ...
Страница 106: ...Preparing peripheral devices 106 Avaya CallPilot 201i Server Hardware Installation December 2010 ...
Страница 128: ...Connecting peripheral devices to the 201i server 128 Avaya CallPilot 201i Server Hardware Installation December 2010 ...