


Job Aid: Installing the upgrade memory kit in the G450 / G430 Media Gateway
6 Job Aid: Installing the upgrade memory kit in the G450 / G430 Media Gateway
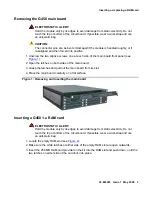
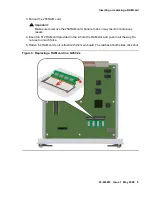
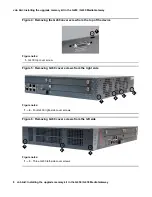
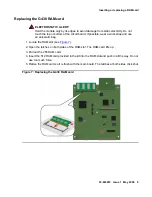
Reinserting the G450 main board
1. Verify that the latches on both sides of the main board are open.
2. Insert the main board into the slot.
3. Push the main board in until the latches begin to close.
4. Close the latches.
5. Close and tighten the two captive screws on the front panel.
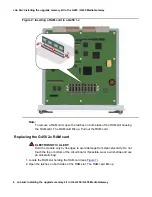
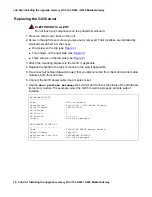
6. Use the
show platform mainboard
CLI command to check the memory modules
status. In the command output, the lower RAM slot is referred to as Memory socket #1, and
the upper RAM slot is Memory socket #2.
●
A G450 1.x with increased memory displays, for example:
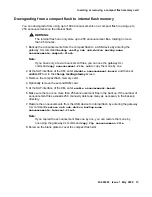
●
A G450 2.x with increased memory displays, for example:
MEMORY SOCKET #1
------------------
Type : 256MB DDR SDRAM memory module with ECC
Serial Number : 749f5c9f
Manufacture Part Num : 9VDDT3272AY-335G4
Faults : No Fault Messages
MEMORY SOCKET #2
------------------
Type : 256MB DDR SDRAM memory module with ECC
Serial Number : 749f5cb4
Manufacture Part Num : 9VDDT3272AY-335G4
Faults : No Fault Messages
MEMORY SOCKET #1
------------------
Type
: 512MB DDR SDRAM memory module
Serial Number
: 0550749f
Manufacture Part Num
: 9VDDT3272AY-335G4
Faults
: No Fault Messages
MEMORY SOCKET #2
------------------
Type : UNKNOWN
Serial Number : UNKNOWN
Manufacture Part Num : UNKNOWN
Faults : UNKNOWN