编号:Z-PKQG-HT381-V2
材质:80g书纸 四色双面模切成品
尺寸:展开尺寸: 560x440mm 成品尺寸: 140x220mm
Product Overview
Wireless Hearing-
Enhancing System
Model No.: WSHT-381
Please visit
www.avantree.com/product-support/WSHT-381-BLK
for detailed step-by-step setup guide
BASS
TREBLE
BALANCED
TRANSMIT
E
D
O
M
Avantree® HT381
Quick Start Guide
Schnellanleitung
Guide de démarrage rapide
Guida Rapida all’uso
Guía de iniciorápido
DE:
HINWEIS: Die rot-weißen Cinch-Anschlüsse müssen mit "AUDIO OUT" gekenn-
zeichnet sein, damit sie funktionieren.
FR:
REMARQUE: Les ports RCA rouge et blanc doivent être étiquetés «SORTIE
AUDIO» pour fonctionner.
IT:
NOTA: le porte RCA Red & White devono essere etichettate "AUDIO OUT" per
funzionare.
ES:
NOTA: Los puertos RCA rojo y blanco deben estar etiquetados como "SALIDA
DE AUDIO" para que funcionen.
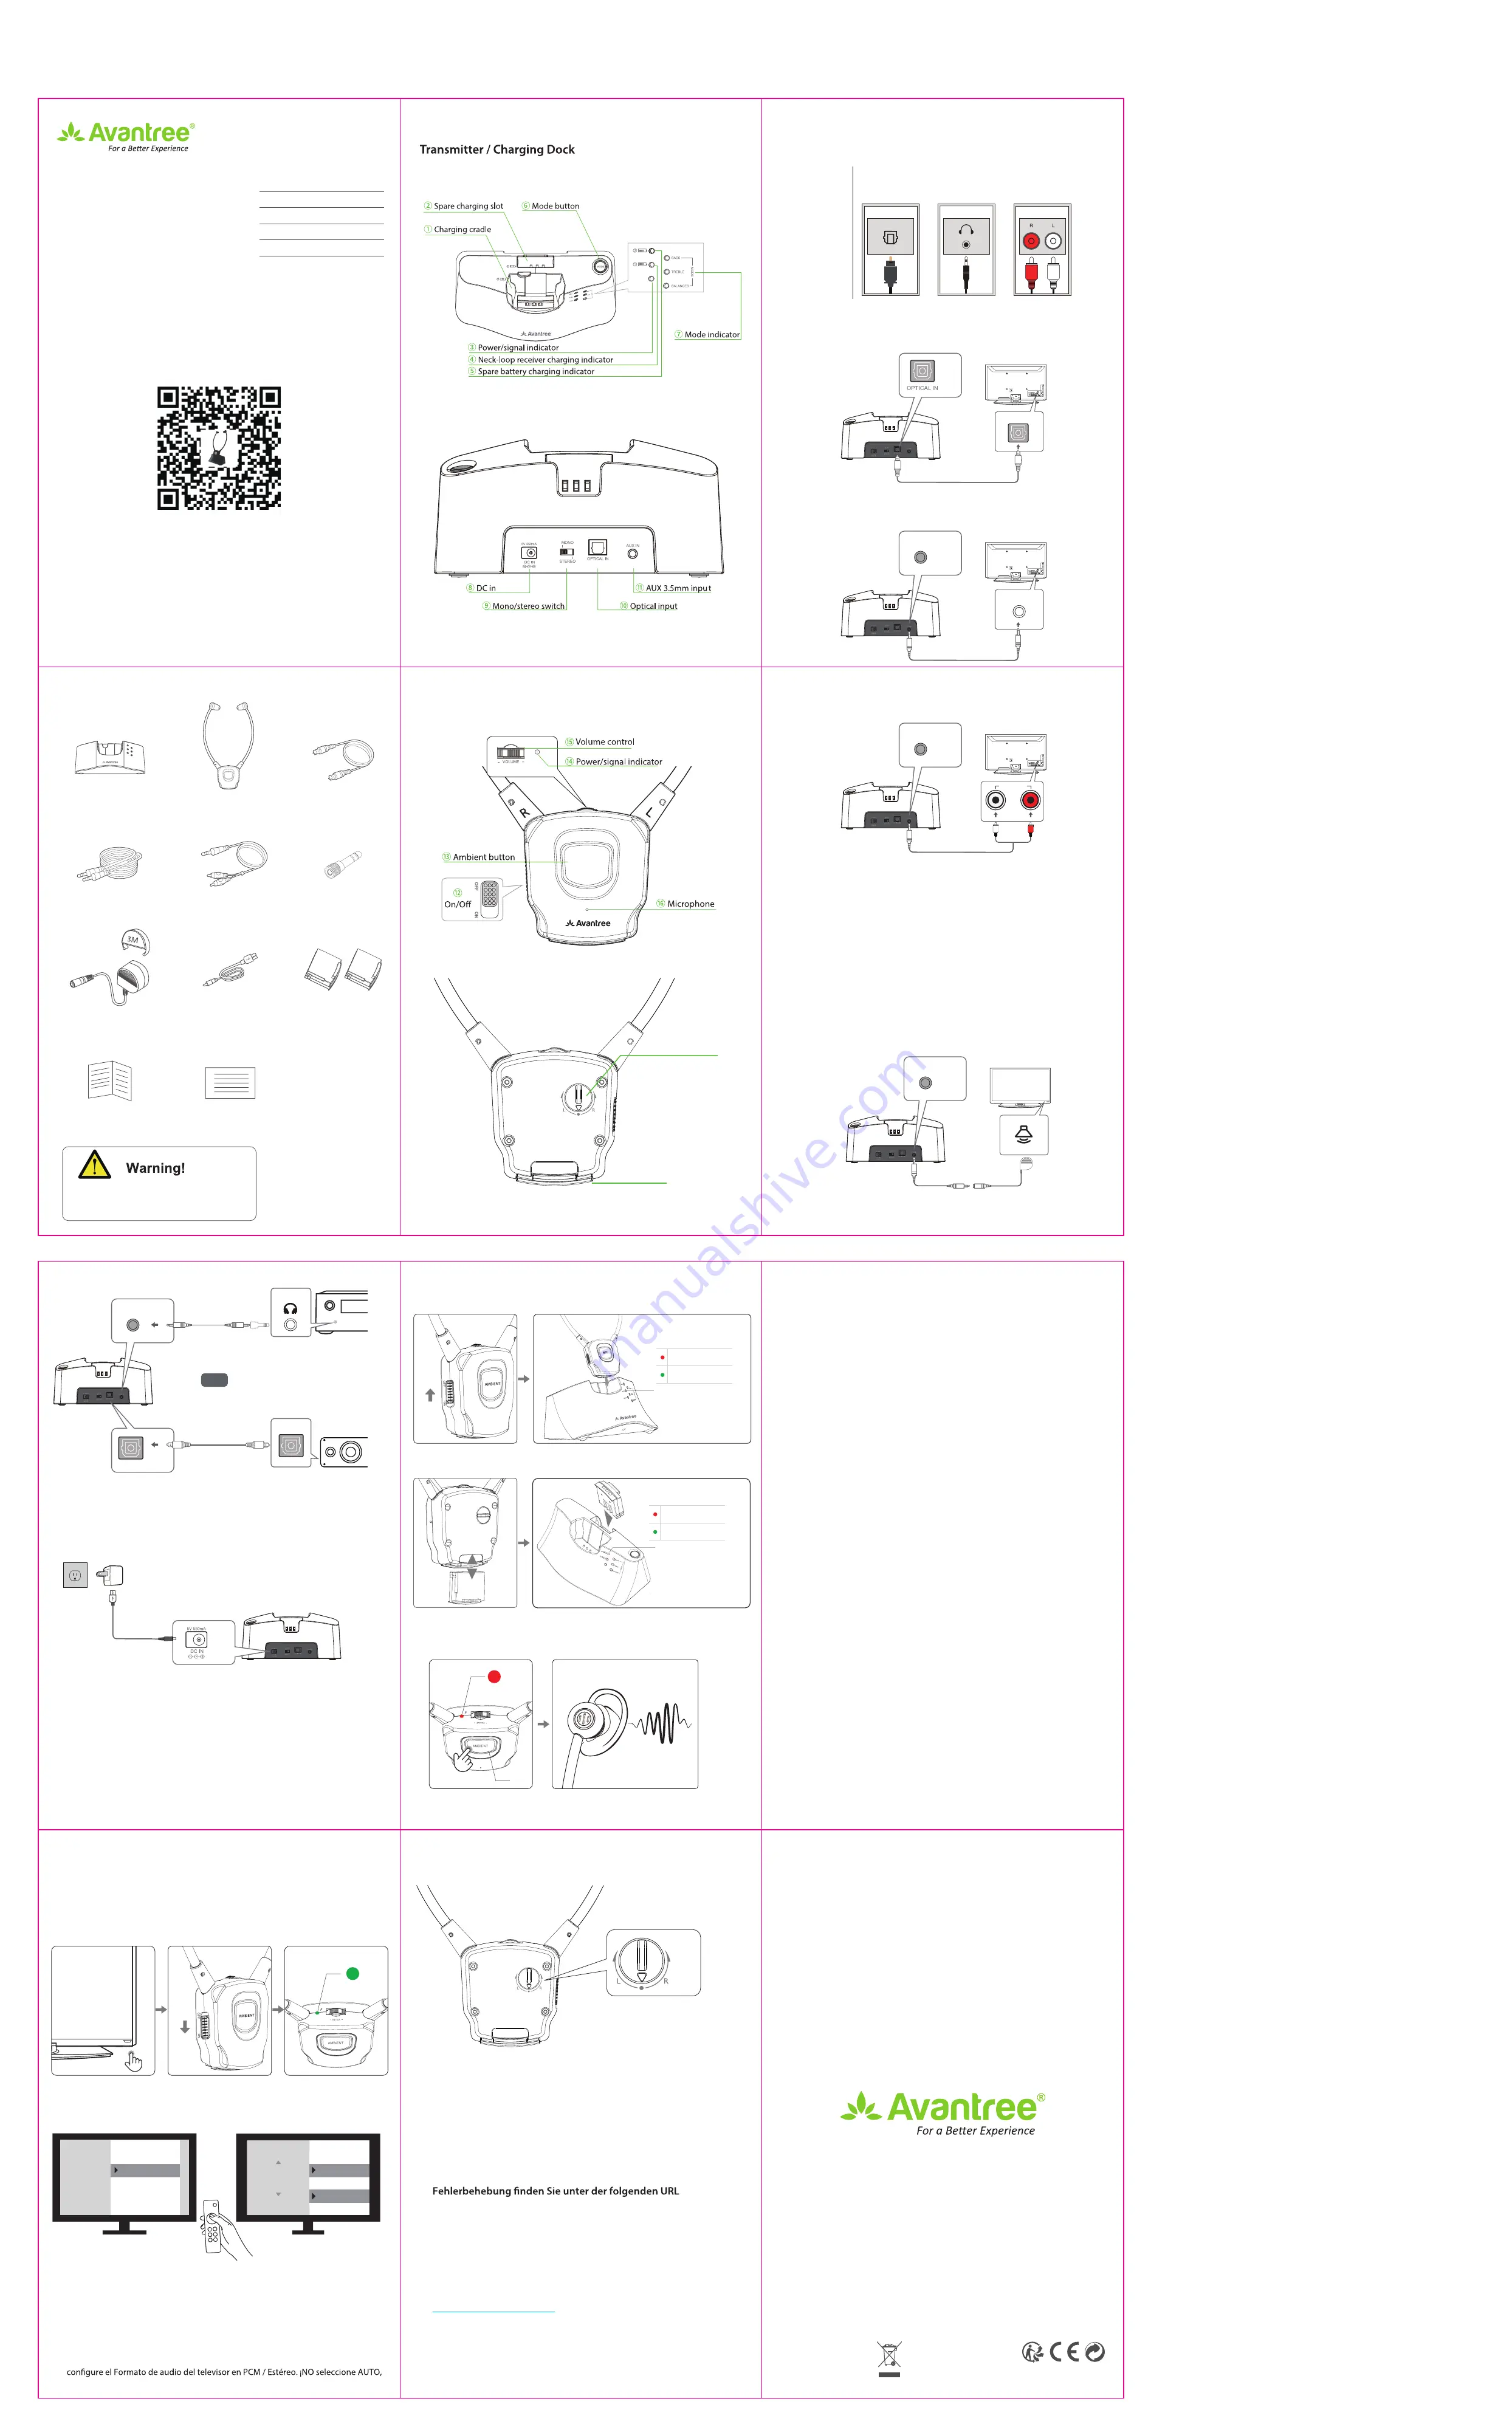
Transmitter/charging dock
Ⓐ
Earphone
Ⓑ
Ⓒ
Optical audio cable
Ⓓ
AUX 3.5mm audio cable
Ⓔ
AUX 3.5mm to
RCA audio cable
Ⓕ
6.35mm to 3.5mm
audio cable
Ⓖ
External microphone
Ⓗ
USB to DC
charging cable
Ⓘ
Polymer lithium
rechargeable battery X 2
Ⓙ
User manual
Ⓚ
Contact card
For safety precautions, please avoid using
batteries other than the ones included in
the package.
What’s in the box.
AMBIENT
⑰
Left-Right audio
balance control
⑱
Battery
Earphone
⑰
Step 1 – Connecting the DOCK to your TV
Determine what types of audio ports you have.
Do NOT turn anything on.
OPTION 1: Digital OPTICAL/TOSLINK/SPDIF –
Recommended!
OPTION 2: AUX 3.5mm/ Headphone Out
OPTION 3: Red/White RCA Audio Out
*
NOTE: The Red & White RCA ports must be labeled "AUDIO OUT" to work.
OPTION 4: Can’t Reach / Do Not Have Output Ports on TV?
OPTION 5: If You Have a Soundbar or AV Receiver
RGB IN
COMPONENT IN
AUDIO
(RGB /DVI)
RGB(PC )
ANTENNA/
CABLE IN
1
2
RS-232C I N
(CONTROL & SE RVICE )
VIDEO
AUDIO
VIDEO
AUDIO OUT
OPTICA L COAXIAL
MONO
(
)
AUDIO
S-V
ID
EO
DIGITAL AUDIO OUT
AV
IN 1
HDMI/DVI IN
3
2
1
REMOTE
CONTRO L IN
AV IN 2
L/
M
ON
O
R
AUDIO
VIDEO
USB
IN
HD
MI
IN
4
DIGITAL OUT
Ⓒ
⑩
RGB IN
COMPONENT IN
AUDIO
(RGB /DVI)
RGB(PC )
ANTENNA/
CABLE IN
1
2
RS-232C I N
(CONTROL & SE RVICE )
VIDEO
AUDIO
VIDEO
AUDIO OUT
OPTICA L COAXIAL
MONO
(
)
AUDIO
S-V
ID
EO
DIGITAL AUDIO OUT
AV
IN 1
HDMI/DVI IN
3
2
1
REMOTE
CONTRO L IN
AV IN 2
L/
M
ON
O
R
AUDIO
VIDEO
USB
IN
HD
MI
IN
4
Ⓓ
⑪
AUX IN
AUX/3.5mm
RGB IN
COMPONENT IN
AUDIO
(RGB /DVI)
RGB(PC )
ANTENNA/
CABLE IN
1
2
RS-232C I N
(CONTROL & SE RVICE )
VIDEO
AUDIO
VIDEO
AUDIO OUT
OPTICA L COAXIAL
MONO
(
)
AUDIO
S-V
ID
EO
DIGITAL AUDIO OUT
AV
IN 1
HDMI/DVI IN
3
2
1
REMOTE
CONTRO L IN
AV IN 2
L/
M
ON
O
R
AUDIO
VIDEO
USB
IN
HD
MI
IN
4
Ⓔ
⑪
AUX IN
Audio Out
Ⓓ
⑪
AUX IN
Ⓖ
⑪
AUX IN
DIGITAL OUT
Ⓕ
Ⓓ
Ⓒ
OR
⑩
OPTICAL IN
Phone
TV Audio Out
Options
Ⓒ
Ⓓ
Ⓔ
Optical/Toslink/
SPDIF OUT
AUX/3.5mm
RCA jacks
labeled
“AUDIO OUT”
5V/500mA - 2A
④
Charging
Ambient Function
L/R Volume Control
Part 2 – Follow instructions below to power everything on.
OPTION 1
OPTION 2
Ⓗ
⑧
⑫
VOLUME
+
-
GR
EEN
- Connec
ted
to
base
RED - AMBIEN
T mode ON
⑭
VOLUME
+
-
GR
EEN
- Connec
ted
to
base
RED - AMBIEN
T mode ON
⑭
⑬
⑫
Charging
Charging Complete
E
D
O
M
TRANSMIT
Step 2 Connecting the Earphone to the Transmitter Dock
Part 1. Connect the transmitter dock to a power source. We recommend
connecting it to a wall outlet using a USB wall adapter (not included).
DE: Teil 1: Schließen Sie das Senderdock an eine Stromquelle an. Wir empfehlen, es mit
einem USB-Wandadapter (nicht im Lieferumfang enthalten) an eine Steckdose
anzuschließen.
FR: Partie 1: Connectez la station d'accueil de l'émetteur à une source d'alimentation.
Nous vous recommandons de le connecter à une prise murale à l'aide d'un adapta-
teur mural USB (non inclus).
IT: Parte 1: Collegare il dock del trasmettitore a una fonte di alimentazione. Si consiglia
di collegarlo a una presa a muro utilizzando un adattatore da parete USB (non incluso).
ES: Parte 1: Conecte la base del transmisor a una fuente de alimentación. Recomenda
-
mos conectarlo a una toma de corriente mediante un adaptador de pared USB (no
incluido).
Part 3 – TV Setting
DE: Verwenden Sie Ihre TV-Fernbedienung, um in Ihr TV-EINSTELLUNGSMENÜ zu
gelangen. Stellen Sie das TV-Audioformat auf PCM / Stereo ein. Wählen Sie NICHT
AUTO, DOLBY oder BITSTREAM!
FR: Utilisez la télécommande de votre téléviseur pour accéder au MENU RÉGLAGES TV,
réglez le format audio TV sur PCM / Stéréo. Ne sélectionnez PAS AUTO, DOLBY ou
BITSTREAM!
IT: Usa il telecomando della TV per accedere al MENU IMPOSTAZIONI TV, Imposta
formato audio TV su PCM / Stereo. NON selezionare AUTO, DOLBY o BITSTREAM!
ES: Use el control remoto de su televisor para ir al MENÚ DE CONFIGURACIÓN DE TV,
DOLBY o BITSTREAM!
Audio Out
Sound
Optical Out
Digital
Audio Format
PCM / Stereo
or
Dolby - Off
Use your TV remote to go into your TV's SETTINGS MENU, Set TV Audio Format to
PCM/Stereo. Do NOT select AUTO, DOLBY, or BITSTREAM !
⑤
Charging
Charging Complete
Earphone fail to reconnect to the transmitter dock?
No sound/not working?
……
For problems connecting or other troubleshooting tips go to the URL
below.
DE: Informationen zu Verbindungsproblemen oder anderen Tipps zur
FR: Pour les problèmes de connexion ou d'autres conseils de dépan-
nage, accédez à l'URL ci-dessous
IT: Per problemi di connessione o altri suggerimenti per la risoluzione
dei problemi, vai all'URL di seguito
ES: Para problemas de conexión u otros consejos para la resolución de
problemas, vaya a la siguiente URL.
support.avantree.com
Z-PKQG-HT381-V2
Dispose of the packaging and
this product in accordance with
the latest provisions.
Note: Contact us at [email protected] for a FREE USB wall charger (for US / UK / EU ) if
you need one.
Hinweis: Kontaktieren Sie uns unter [email protected] für ein KOSTENLOSES
USB-Ladegerät (für USA / UK / EU), wenn Sie eines benötigen.
Note:Si besoin, contactez-nous via [email protected] obtenir unchargeur
mural USB GRATUIT (Pour les US / UK / EU ).
Nota: Contattateci a : [email protected] per ottenere un caricabatterie da muro
( per UK / US / EU) gratuito se lo necessitate.
Nota: Contáctenos en [email protected] obtener un cargador de pared USB
GRATIS (para UK / US / EU) si lo necesita.


