14
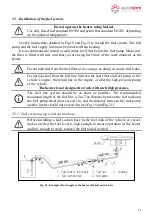
Fig. 10 - Installation of the air intake pipe
1 – Air intake pipe;
4 – Gasket;
2 – Flange of the air intake pipe;
5 – Fastener assembly;
3 – Hull of the vessel;
6 – Clamp.
3.4
Installation of the exhaust pipe.
When installing the exhaust pipe, take into
consideration the high temperature (up to 500°С) of the
exhaust pipe when the heater is in operation. Cut the
exhaust pipe (flexible crinkled metal hose, maximum
length – 2 meters) to the necessary length. It is advised to
use a two-layer exhaust pipe when installing the heater.
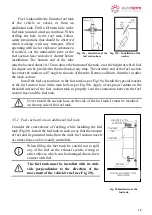
Attach the exhaust pipe (Fig.11) using clamps and install
it so that it is slightly inclined to the bottom, in the
direction of the exhaust. Install heat insulation on the
exhaust pipe to protect individual sections of the vessel
(wiring or other heat-sensitive objects).
Fig. 11 - Attachment of the metal pipe
to the heater
Install the exhaust pipe to avoid the possibility of repeated intake of exhaust
gases by the air intake pipe, and make sure that no exhaust gases enter the interior
or are drawn in by the fan through the cab heater radiator.
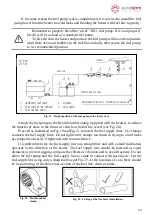
At the end of the exhaust pipe, a shield is installed, which is necessary for stable
operation at low heating modes (Fig.13).
In the absence of the shield, air will be blown back
into the exhaust pipe. This leads to increased heater
sooting and impairs heat capacity. Exhaust gases must be
expelled outside of the vehicle.
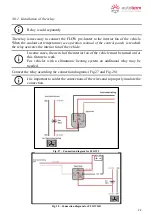
An airtight exhaust silencer is provided with the
heater. This means it can be mounted in small vessels
and confined spaces. When mounting the exhaust
silencer on the outside of the vehicle, a Ø5mm hole
needs to be drilled at the bottom of the silencer (see Fig.
14a).
Cut 15 mm
Shield
Heat
insulation
Fig. 13 – Exhaust pipe shield
Clamp
Heater
Metal exhaust pipe


