Automated Logic UNI/32 Скачать руководство пользователя страница 3

Revised 11/26/01 • UNI/32

3

© 2001 Automated Logic Corporation

Real Time Clock

A battery-backed real 

time clock that keeps track of time in the 
event of a power failure.

Protection

Voltage, current, and ESD 

protection on incoming power and 
CMnet.

Battery

Lithium 3V Primary Battery, Type 

BR2330 (not replaceable). Provides a 
minimum of 10,000 hours of data 
retention during power outages. 

Listed by

UL 916 (PAZX), cUL C22.2 No. 

205-M1983 (PAZX7), FCC Part 15 - 
Subpart B - Class A.

Mounting

Screw the UNI/32 into an enclosed panel 
using the mounting holes provided on the 
cover plate. Be sure to leave about 2 inches (5 
centimeters) on each side for wiring.

Power Wiring

CAUTION

The UNI/32 module is a Class 2 

device (less than 30VAC, 100VA maximum). 
Take appropriate isolation measures when 
mounting the UNI/32 module in a control 
panel where non-Class 2 devices (for 
example, 120VAC) or wiring are present.

You can power several modules from the 
same transformer if you maintain the same 
polarity.

The UNI/32 has an operating range of 
21.6VAC to 26.4VAC. If voltage measured at 
the module’s power input terminals is outside 
this range, the module may not work 
properly.

1. Turn the module’s power off. This 

prevents the module from being powered 
up before the proper voltage is verified.

2. Make sure the 24VAC power source is off.

3. Connect the power wires to the module’s 

power terminals labeled Ground and 
24VAC.

4. Apply power to the transformer.

5. Make sure that 24VAC is present at the 

module’s power input terminals.

6. Set the module’s address. Refer to 

“Addressing” on page 5 for details about 
setting the address.

7. Turn the module’s power switch on.


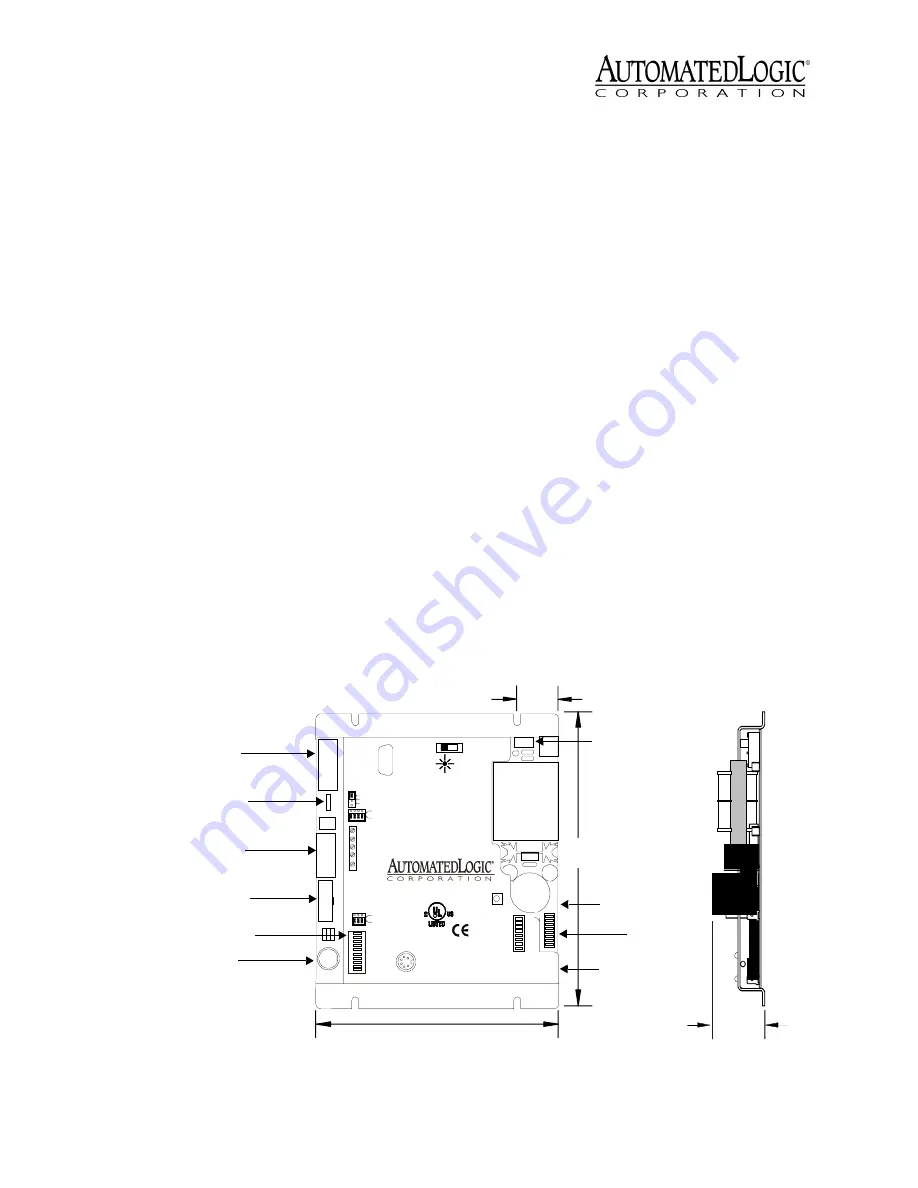
 Figure 2. Module Dimensions and Layout

TYPE: COM32

E143900

Open Energy

Management Equipment

88FO

R

Net +

Net -

O p t i o n a l s h i e l d

38.4K

On

1

2

4

8

16

32

64

9600

CMnet baud

Diag transmit

Diag receive

Unet transmit

Unet receive

CMnet transmit

CMnet receive

Error

Run

9600/38.4k

ARC156

port

Access

connection

CMnet

(Module)

Address

CMnet

button

Format

CMnet Mode

Unet 1 Connection

Optional Shield

-

+

-

+

EIA-485

N/C

N/C

N/C

UNI

24 Vac

Ground

Only

Conductors

Use Copper

0.3A

7.2VA

50-60 Hz

24 Vac

Class 2

Use Single Class 2 Only

Off

On

Connector

Power

Indicator

Power

Switch

Power

Port

Diag

gnd

dtr

tx

rx

dcd

5

4

3

2

1

9

8

7

6

n/c

n/c

+10v

n/c

EIA-232

Unet 2 Connection

Auxiliary

device

port

Over ARCNET156 KBaud

BACNet

6 1 /4 "

15 .9 cm

1 1/8"

2.9 cm

7 1/8 "

1 8.1 c m

1 5/8 "

4 .1 cm

Power Switch

Format Button

Addressing 
DIP Switches

Diag Port

Keypad Display Port

LED Indicators

Access Port

UNI/32               

2M

Unet Connection Port
Configuration Jumpers

Unet Connection Port

Connection

Port

CMnet

Содержание UNI/32

Страница 1: ...and and product names are trademarked by their respective companies Technical Instructions UNI 32 Using the UNI 32 2 Specifications 2 Mounting 3 Power Wiring 3 Communicating with the UNI 32 4 Connecting the UNI 32 to the U cards 4 Connecting the UNI 32 to an ARC156 MS TP or Legacy CMnet network segment 5 Addressing 5 Transferring Memory 6 Transferring Memory in WebCTRL 6 Transferring Memory in Sup...

Страница 2: ...pursuant to Part 15 of the FCC Rules These limits are designed to provide reasonable protection against harmful interference when the equipment is operated in a commercial environment This equipment generates uses and can radiate radio frequency energy and if not installed and used in accordance with the instruction manual may cause harmful interference to radio communications Operation of this eq...

Страница 3: ... from being powered up before the proper voltage is verified 2 Make sure the 24VAC power source is off 3 Connect the power wires to the module s power terminals labeled Ground and 24VAC 4 Apply power to the transformer 5 Make sure that 24VAC is present at the module s power input terminals 6 Set the module s address Refer to Addressing on page 5 for details about setting the address 7 Turn the mod...

Страница 4: ...odule driver Properties page in WebCTRL or Parameter page in SuperVision Refer to the appropriate module driver document for more information Automated Logic Corporation recommends a specific wire for both power and communications on the Unet This wire which contains a pair of 14AWG wires for power and a pair of 22AWG wires for communication is available from Magnum Cable Corporation Cleveland OH ...

Страница 5: ...18AWG twisted pair wire for legacy CMnet EIA 485 wiring For more information about CMnet wiring refer to the Technical Handbook or to the ARC156 CMnet Wiring Technical Instructions To set the baud rate at 156 kbps when using an ARC156 CMnet set the baud rate jumper to Arc156 see Figure 5 To set the baud rate at 38 4 kbps set the baud rate jumper to 9600 38 4K and set the first switch on the eight ...

Страница 6: ...formation NOTE This type of download should be performed with caution When the module is automatically restarted before and after transferring memory any equipment controlled by the module is shut down and restarted Downloading memory also overwrites all Function Blocks in the module causing the module to lose any stored data Transferring Memory in WebCTRL If you are using WebCTRL to transfer memo...

Страница 7: ...oad Memory for This Module 4 When the memory transfer is finished check the module status report again Make sure the FB List on this page shows all the FBs you intended to transfer Using Flow Sensors The UNI 32 supports U cards that use flow sensors You must calibrate each sensor to ensure accurate readings You must also set the type of U cards and flow sensors that are being used by each FB on th...

Страница 8: ...IA 232 port of the APT using a standard straight through serial cable 2 Set the APT s Mode Select switch On an ARC156 network segment use the TTL setting On a legacy CMnet use the 485 setting 3 Connect the Access port of the APT to the Access port of the module 4 In SuperVision define the connection type using Table 1 Formatting the Module If you are unable to communicate with a module after trans...

Страница 9: ... normal Production Date To determine when a module was manufactured check the module status report for the module in SuperVision Refer to the WebCTRL User s Guide or the SuperVision User s Guide for more information about the module status report Table 2 LED Signals Run LED Error LED Condition 2 flashes per second Off Normal 2 flashes per second 1 flash then pause Normal but module is alone on the...

Страница 10: ...ation A sticker on the back of the module also shows the date the module was manufactured The first three characters on the sticker indicate the type of module The next two characters show the year and month of manufacture The month digit is in hexadecimal ...

Отзывы: