background image

*Please set the sensor away from water outlet and direct light to 
  avoid bubble interference or malfunctions.
**If there is still water dripping, please lower the level of reservoir, or
    adjust the tube outlet higher, or purchase an Anti-Siphon Valve to
    connect it to the tube outlet. 

Installation

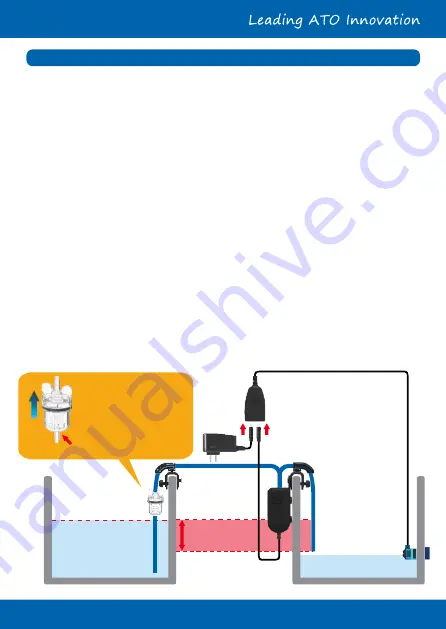
1. Mount the square dual sensor on the tank/sump with the magnet,  
     and adjust the lower sensor to the desired water level.

*

2.


Fix the AQUA Lifter Pump Holder on the tank/sump and mount the 

     AQUA Lifter Pump.
 3. Plug the pre lter into the tubes and keep it higher than the max. 
     level of the reservoir. Fix the tube with the AQUA Lifter Pump 
     Holder and connect it to the inlet of pump.
4.


Connect the water outlet tube and  x it with the AQUA Lifter Pump

     Holder.
5.


Connect the pump and the power adapter with the controller.

6.


Connect power and do one-time  lling to check there is no water

     dripping from reservoir to tank/sump (forward siphon) after the
     pump stops.

**

7.


Unplug and plug the power adapter back in for reset.

Tank/Sump

Pre lter 

Pre lter :

The Pre lter must 
be installed before 
the inlet of the 
diaphragm pump.

Water Inlet

Reservoir

Optical Level Sensor

Power

 Anti-Siphon 
Pressure 1 feet

max. level

Содержание SATO-272D

Страница 1: ...SATO 272D Smart ATO Lifter ...

Страница 2: ...ter x1 Tubing 6 5 feet 200 cm x1 Replaceable Diaphragm Pump with Built In Anti Siphon Valve AQUA Lifter Pump x1 1 Used with AQUA Lifter Pump 2 For rimmed or rimless aquariums up to 1 2 inch 12 7 mm AQUA Lifter Pump Holder x2 1 Auto Top Off with Square Dual Sensor 2 Mounting Thickness 1 2 inch 12 7 mm Smart ATO Lifter Controller x1 Used with Diaphragm Pump and Pre lter I D 5 32 inch 4 mm O D 1 4 inc...

Страница 3: ...ole Failsafe Sensor ATO Level Sensor 1 2 3 4 5 1 2 3 Specifications 1 Power Input 100 240 VAC 50 60 Hz 2 Diaphragm Pump Suction Head 6 5 feet 200 cm Flow Rate 3 2 gph 12 lph Built In Anti Siphon Pressure 1 feet 30 cm max height from water level of reservoir to tube outlet Power 2 W 12 VDC Cable Length 6 feet 180 cm Pump Connector DC 5 5 x 2 5 mm Male ...

Страница 4: ...ump 3 Plug the pre lter into the tubes and keep it higher than the max level of the reservoir Fix the tube with the AQUA Lifter Pump Holder and connect it to the inlet of pump 4 Connect the water outlet tube and x it with the AQUA Lifter Pump Holder 5 Connect the pump and the power adapter with the controller 6 Connect power and do one time lling to check there is no water dripping from reservoir ...

Страница 5: ...fter xing the issues please unplug the power adapter and plug it back in to reset the device For very small aquariums the top sensor may be triggered after each top off This is normal and no action is required Quick Security Technology QST Smart ATO Lifter uses QST for real time protection against any failure situation The controller will give a visual and audible alert when it senses any other re ...

Страница 6: ...lter every 3 to 6 months for best lter performance 4 Please visit AUTOAQUA s website to know how to replace the pump Notice 1 Limited warranty is provided by AUTOAQUA only if your AUTOAQUA Product Product was purchased from an authorized distributor or an authorized reseller 2 All warranty repairs or replacement are performed by the authorized distributor or authorized reseller in the region where...

Отзывы: