background image


23 

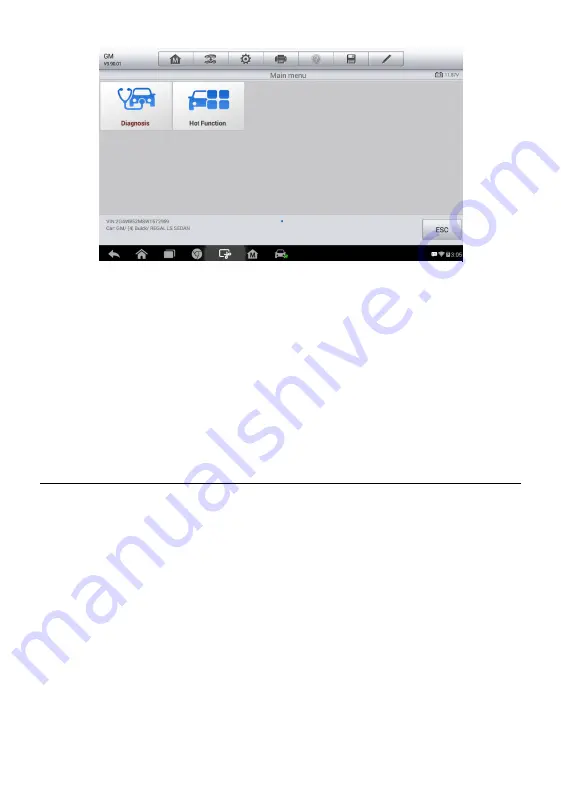
1.  Diagnosis 

–  a  comprehensive  section  which  includes  all  available 

functions: reading, clearing, saving and printing diagnostic information, 
as well as performing active tests and special functions. 

2.  Hot Function


– a separate section designed to perform vehicle scheduled 

service and maintenance, such as to reset the service lights and perform 
calibration for various systems. 

After a section is selected and the tablet establishes communication with the 
vehicle, the corresponding function menu or selection menu displays. 

Diagnosis 

There are two options available when accessing the Diagnosis section:   

1.  Auto  Scan 

–  starts auto  scanning  for  all  the  available  systems  on  the 

vehicle. 

2.  Control Units 

– displays a selection menu of all available control units of 

the test vehicle. 

After a section is selected and the tablet establishes communication with the 
vehicle, the corresponding function menu or selection menu displays. 

Figure 4-9 

Sample Main Menu 

Содержание MaxiDAS DS808

Страница 1: ...information available at the time of printing Autel reserves the right to make changes at any time without notice While information of this manual has been carefully checked for accuracy no guarantee is given for the completeness and correctness of the contents including but not limited to the product specifications functions and illustrations Autel will not be liable for any direct special incide...

Страница 2: ...ods and test procedures It is essential to perform tests in an appropriate and acceptable manner that does not endanger your safety the safety of others in the work area the device being used or the vehicle being tested Before using the device always refer to and follow the safety messages and applicable test procedures provided by the manufacturer of the vehicle or equipment being tested Use the ...

Страница 3: ... moving or hot engine parts Operate the vehicle in a well ventilated work area for exhaust gases are poisonous Put the transmission in PARK for automatic transmission or NEUTRAL for manual transmission and make sure the parking brake is engaged Put blocks in front of the drive wheels and never leave the vehicle unattended while testing Be extra cautious when working around the ignition coil distri...

Страница 4: ... in personal injury or damage to the test equipment To avoid damaging the test equipment or generating false data make sure the vehicle battery is fully charged and the connection to the vehicle DLC is clean and secure Do not place the test equipment on the distributor of the vehicle Strong electro magnetic interference can damage the equipment ...

Страница 5: ...WERING DOWN 11 4 DIAGNOSTICS 12 GETTING STARTED 12 VEHICLE IDENTIFICATION 13 NAVIGATION 19 MAIN MENU 22 DIAGNOSIS 23 HOT FUNCTIONS 37 GENERIC OBD II OPERATIONS 39 EXITING DIAGNOSTICS 43 5 MAXIFIX 45 NAVIGATION 45 OPERATIONS 48 6 SHOP MANAGER 55 VEHICLE HISTORY 56 WORKSHOP INFORMATION 58 CUSTOMER MANAGER 59 7 DATA MANAGER 63 OPERATIONS 63 8 SETTINGS 68 UNIT 68 ...

Страница 6: ...0 MY ACCOUNT 80 USER COMPLAINT 81 DATA LOGGING 84 COMMUNITIES 85 USER PROFILE 86 TRAINING CHANNELS 87 FAQ DATABASE 87 11 ACADEMY 88 12 REMOTE DESK 89 13 QUICK LINK 91 14 FUNCTION VIEWER 92 15 MAINTENANCE AND SERVICE 95 MAINTENANCE INSTRUCTIONS 95 TROUBLESHOOTING CHECKLIST 96 ABOUT BATTERY USAGE 96 SERVICE PROCEDURES 97 16 COMPLIANCE INFORMATION 100 17 WARRANTY 103 LIMITED ONE YEAR WARRANTY 103 ...

Страница 7: ...ility of other modules and optional tools or accessories Conventions The following conventions are used Bold Text Bold text is used to highlight selectable items such as buttons and menu options Example Tap OK Notes and Important Messages Notes A NOTE provides helpful information such as additional explanations tips and comments Example NOTE New batteries reach full capacity after approximately 3 ...

Страница 8: ...nks or links that take you to other related articles procedures and illustrations are available in electronic documents Blue italic text indicates a selectable hyperlink and blue underlined text indicates a website link or an email address link Illustrations Illustrations used in this manual are samples the actual testing screen may vary for each vehicle being tested Observe the menu titles and on...

Страница 9: ...iagnosis and analysis The intuitive user interface makes using the device effortless through a 7 inch LCD touchscreen that displays at 1024 x 600 quality This manual describes the construction and operation of the device and how it works to deliver diagnostic solutions MaxiDAS DS808 Display Tablet Functional Description Figure 2 1 Display Tablet Front View 1 7 0 LCD Capacitive Touchscreen 2 Ambien...

Страница 10: ...splay Tablet is charging and the battery level is above 90 Illuminates green when the Display Tablet is powered on and the battery level is above 15 B Yellow Illuminates yellow when the Display Tablet is charging and the battery level is below 90 C Red Illuminates red when the Display Tablet is powered on and the battery level is below 15 Figure 2 2 Display Tablet Back View 5 Collapsible Stand ext...

Страница 11: ...wer External Power Supply Internal Battery Pack The Display Tablet can be powered with the internal rechargeable battery which if fully charged can provide sufficient power for about 4 5 hours of continuous operation Vehicle Power When the Display Tablet is connected to the test vehicle via the main cable the Display Tablet automatically receives power from the vehicle External Power Supply The Di...

Страница 12: ... SD card supports up to 32GB Sensors Ambient light sensor for brightness auto changing Audio Input Output Input N A Output buzzer Power and Battery 3 7 V 3200 mAh lithium polymer battery Charges via 5 VDC power supply Tested Battery Life Around 4 5 hours of continuous use Battery Charging Input 5 V 1 5 A Power Consumption 500 mA LCD on with default brightness Wi Fi on 3 7 V Operating Temp 10 to 60...

Страница 13: ...ault tolerant CAN SAE J2610 GM UART UART Echo Byte Protocol Honda Diag H Protocol TP2 0 TP1 6 Other Accessories Main Cable The Main Cable connects the Display Tablet to the vehicle s data link connector DLC Other Accessories Mini USB Cable Connects the Display Tablet to the PC or USB external power adapter USB External Power Adapter Together with the mini USB cable connects the Display Tablet to t...

Страница 14: ...6 User Manual Instructions on tool operations Quick Guide Instructions on devices connection and diagnostic software update etc ...

Страница 15: ...Display Tablet to switch the unit on The power LED light will illuminate green The system boots up and shows the lock screen Slide the Lock icon to the left to enter the MaxiDAS Job Menu or slide to the right to unlock 1 Application Buttons 2 Locator and Navigation Buttons 3 Status Icons NOTE The screen is locked by default when you turn on the display tablet It is recommended to lock the screen t...

Страница 16: ...tool See Diagnostics on page 12 for details MaxiFix Launches the MaxiFix platform which provides the most compatible and abundant repair techniques and diagnostics database See MaxiFix on page 45 for details Shop Manager Allows you to edit and save workshop information and customer data as well as review test vehicle history records See Shop Manager on page 55 for details Data Manager Opens the or...

Страница 17: ...k Provides associated website bookmarks to allow quick access to product update service support and other information See Quick Link on page 91 for details Function Viewer Provides quick search for the supported functions and vehicles of Autel diagnostic tools See Function Viewer on page 92 for details Locator and Navigation Buttons Operations of the Navigation buttons at the bottom of the screen ...

Страница 18: ...s As the Display Tablet is working with the Android operating system you may refer to Android documents for more information By tapping the bottom right corner a Shortcuts Panel will be displayed on which you are allowed to set various system settings of the tablet Operations of each button on the panel are described in the table below NOTE The shortcuts buttons will be highlighted when enabled an...

Страница 19: ... Display Tablet when it is communicating with the vehicle Forcing a shut down while communicating may lead to ECM problems on some vehicles Please exit the Diagnostics application before powering down To power down the display tablet 1 Long press the Lock Power Button 2 Tap Power off option 3 Tap OK and the tablet will turn off in a few seconds Reboot System In case of system crash long press the ...

Страница 20: ...us vehicle control systems such as engine transmission antilock brake system ABS airbag system SRS and more Getting Started The Diagnostics operations require connecting the MaxiDAS DS808 Display Tablet to the test vehicle s DLC using the main cable Vehicle Menu Layout When the Display Tablet device is properly connected to the vehicle the platform is ready to start vehicle diagnosis Tap the Diagn...

Страница 21: ...ory Displays the stored test vehicle history records See Vehicle History on page 56 USA Displays the USA vehicle menu Europe Displays the European vehicle menu Asia Displays the Asian vehicle menu Search Searches for a specific vehicle make Cancel Exits the search screen or cancels an operation Vehicle Manufacturer Buttons The Manufacturer buttons display the various vehicle logos and the brand na...

Страница 22: ...e and run diagnostics on the selected system To perform Auto VIN Scan 1 Tap the Diagnostics application button from the MaxiDAS Job Menu The Vehicle Menu displays 2 Tap the VIN Scan button on the top toolbar to open the dropdown list 3 Select Auto Detect Once the test vehicle is successfully identified the screen will show you the vehicle VIN Tap OK at the bottom to confirm If the VIN does not mat...

Страница 23: ...rect 5 The tool would start establishing vehicle communication and reading control unit information You can choose Auto Scan to scan all the available systems of the test vehicle or tap Control Unit to access the desired system that you want to diagnose Figure 4 4 Sample Vehicle Profile Screen Table 4 3 Sample Auto Detect Screen ...

Страница 24: ...o enter the vehicle VIN manually To perform Manual VIN Input 1 Tap the Diagnostics application button from the MaxiDAS Job Menu The Vehicle Menu displays 2 Tap the VIN Scan button on the top toolbar to open the dropdown list 3 Select Manual Input 4 Tap the input box and enter the correct VIN Figure 4 5 Sample Diagnostic Screen ...

Страница 25: ...icle Diagnostics screen directly 6 Tap Cancel to exit Manual Input Automatic Selection In some cases when users have selected the vehicle brand instead of performing Auto VIN Scan in the first place the system still provides an option for vehicle VIN scan Figure 4 6 Sample Manual VIN Input Screen Figure 4 7 Sample Selection Screen ...

Страница 26: ...s VIN is not automatically retrievable through the vehicle s ECU or the specific VIN is unknown you can choose to select the vehicle manually This mode of vehicle selection is menu driven repeat the first two steps from the automatic selection operation and tap Manual Selection Then you can follow the on screen prompts and make a series of choices Each selection you make advances you to the next s...

Страница 27: ...ections 1 Diagnostics Toolbar 2 Status Information Bar 3 Main Section 4 Functional Buttons Diagnostics Toolbar The Diagnostics Toolbar contains a number of buttons that allow you to print or save the displayed data and make other controls The table below provides a brief description for the operations of the Diagnostics Toolbar buttons Figure 4 8 Sample Diagnostics Screen ...

Страница 28: ...nformation of the test vehicle See Data Logging on page 84 for details To print data in Diagnostics 1 Tap the Diagnostics application button from the MaxiDAS Job Menu The Print button on the diagnostic toolbar is available throughout the whole Diagnostics operations 2 Tap Print whenever you want to make a printing A drop down menu appears Tap Print This Page to print a screenshot copy of the curre...

Страница 29: ...cation selections the main menu test data messages instructions and other diagnostic information Functional Buttons The displayed Functional Buttons at this section of the screen vary according to the stage of operations They can be used to navigate save or clear the diagnostic data exit scanning as well as make other functional controls The functions of these buttons will be introduced respective...

Страница 30: ...asons Making Selections The Diagnostics application is a menu driven program that presents a series of choices one at a time As you select from a menu the next menu in the series displays Each selection narrows the focus and leads to the desired test Use your fingertip to make menu selections Main Menu The Diagnostics application allows you to establish a data link to the electronic control system...

Страница 31: ...ms After a section is selected and the tablet establishes communication with the vehicle the corresponding function menu or selection menu displays Diagnosis There are two options available when accessing the Diagnosis section 1 Auto Scan starts auto scanning for all the available systems on the vehicle 2 Control Units displays a selection menu of all available control units of the test vehicle Af...

Страница 32: ...gress Main Section Column 1 displays the sequence numbers Column 2 displays the scanned systems Column 3 displays the diagnostic marks indicating different conditions of the test result Indicates that the scanned system may not support the code reading function or there is a communication error between the Display Tablet and the control system Indicates that the vehicle control system has been det...

Страница 33: ...al Buttons operations in Auto Scan Table 4 3 Functional Buttons in Auto Scan Name Description Report Displays the diagnostic data in the report form Quick Erase Deletes codes A warning message screen will display to inform you of possible data loss when this function is selected OK Confirms the test result and continues system diagnosis after selecting the required system by tapping the item in th...

Страница 34: ...mation in detail Tap to open an information screen Trouble Codes includes Read codes and Erase codes functions Displays detailed information of DTC records retrieved from the test vehicle s ECU and erases DTC records and other data from the test vehicle s ECU Freeze Frame displays the freeze frame data of the DCTs Live Data retrieves and displays live data and parameters from the test vehicle s EC...

Страница 35: ...e required system for testing by Auto Scan or through menu driven selections in Control Units 5 Select the desired diagnostic function from the Function Menu ECU Information This function retrieves and displays the specific information for the tested control unit including unit type version numbers and other specifications The sample ECU Information screen displays as below 1 Diagnostics Toolbar B...

Страница 36: ...f the operations for each button 2 Main Section Code Column displays the retrieved codes from the vehicle Status Column indicates the status of the retrieved codes Description Column detailed descriptions for the retrieved codes Snowflake Icon only displays when freeze frame data is available for viewing selecting this icon will display a data screen which looks very similar to the Read Codes scre...

Страница 37: ...hen this function is applied a Tap Yes to continue A confirming screen displays when the operation is successfully done b Tap No to exit 3 Tap ESC on the confirming screen to exit Erase Codes 4 Perform the Read Codes function again to check if the code erasing is successful Live Data When this function is selected the screen displays the data list for the selected module The items available for an...

Страница 38: ...n button on the right side of the parameter name opens a submenu which provides various choices for data display mode Value Column displays the values of the parameter items Unit Column displays the unit for the parameters To change the unit mode tap the Setting button on the top toolbar and select a required mode See Unit on page 68 for more information Display Mode There are 4 types of display m...

Страница 39: ...e of the parameter item allowing you to manipulate the display status Text Button resumes Text Display Mode Scale Button changes the scale values which are displayed below the waveform graph There are 4 scales available x1 x2 x4 and x8 Zoom in Button tap to display the selected data graph in full screen Edit Button tap this button to open an edit window on which you can set the waveform color and ...

Страница 40: ...s a video clip in the Data Manager application for future reviews This function could be triggered automatically at preset threshold value or manually as you choose and the triggering mode and record duration can be configured in the Setting mode of Live Data Freeze displays the retrieved data in freeze mode Previous Frame moves to the previous frame in the freeze data Next Frame moves to the next...

Страница 41: ...can set the threshold values an upper limit and a lower limit for triggering the buzzer alarm This function is only applied to the Waveform Graph display mode a MIN tap to open a virtual keyboard allowing you to enter the required lower limit value b MAX tap to open a virtual keyboard allowing you to enter the required upper limit value c Buzzer Alarm switches the alarm on and off The alarm functi...

Страница 42: ...ecord Setting on which you can set the trigger type duration and trigger point for the data recording function a Trigger Type sets the trigger mode for data recording mainly of two kinds Manual and Auto There are four options available 1 Manual allows you to manually start and stop data recording 2 DTC auto triggers data recording when any DTC is detected 3 DTC Check Mode auto triggers data record...

Страница 43: ...ts Available tests vary depending on the manufacturer year and model and only the available tests display in the menu During an active test the tester outputs commands to the ECU in order to drive the actuators This test determines the integrity of the system or parts by reading the engine ECU data or by monitoring the operation of the actuators such as switching a solenoid relay or switch between...

Страница 44: ...ful or something similar displays Tap the ESC functional button to exit the test when finished Special Functions These functions perform various component adaptations allowing you to recalibrate or configure certain components after making repairs or replacement The main menu displays the supported special functions for the test vehicle Follow the on screen instructions to complete the desired fun...

Страница 45: ... necessary actions the system will guide you through the complete performance for various service operations The most commonly performed service functions include Oil Reset Service TPMS Programming Service EPB Service ABS SRS Services SAS Calibration Service DPF Regeneration Service Oil Reset Service This function allows you to perform reset for the Engine Oil Life system which calculates an optim...

Страница 46: ... operating conditions of both the Anti lock Braking System and the Supplemental Restraint System such as Automated Bleeding Pump Motor Test and checking Module information etc Steering Angle Sensor SAS Service This service function allows you to perform calibration for the Steering Angle Sensor which permanently stores the current steering wheel position as the straight ahead position in the steer...

Страница 47: ...same as those available for specific vehicle diagnostics See Table 4 2 Diagnostics Toolbar Buttons on page 20 for details General Procedure To access the OBD II EOBD diagnostics functions 1 Tap the Diagnostics application button from the MaxiDAS Job Menu The Vehicle Menu displays 2 Tap the EOBD button There are two options to establish communication with the vehicle Auto Scan when this option is s...

Страница 48: ...additional function information 4 Select a function option to continue DTC FFD I M Readiness Live Data O2 Sensor Monitor On Board Monitor Component Test Vehicle Information Vehicle Status NOTE Some functions are supported only on certain vehicle makes Function Descriptions This section describes the various functions of each diagnostic option Figure 4 18 Sample OBD II Diagnostic Menu ...

Страница 49: ...rity of the code determines the illumination of the MIL and the codes erase procedure Manufacturers rank codes differently so expect to see differences between makes Pending Codes These are codes whose setting conditions were met during the last drive cycle but need to be met on two or more consecutive drive cycles before the DTC actually sets The intended use of this service is to assist the serv...

Страница 50: ...data from the vehicle s ECM A confirmation screen displays when the clear codes option is selected to prevent accidental loss of data Select Yes on the confirmation screen to continue or No to exit I M Readiness This function is used to check the readiness of the monitoring system It is an excellent function to use prior to having a vehicle inspected for compliance to a state emissions program Sel...

Страница 51: ...nostic tool is able to transmit control commands to operate the vehicle systems This function is useful in determining whether the ECM responds to a command well Vehicle Information The option displays the vehicle identification number VIN the calibration identification and the calibration verification number CVN and other information of the test vehicle Vehicle Status This item is used to check t...

Страница 52: ...o exit a diagnostic session step by step 2 Or tap the Vehicle Swap button on the diagnostics toolbar to return to the Vehicle Menu screen 3 From the Vehicle Menu screen tap the Home button on the top toolbar or tap the Back button on the navigation bar at the bottom of the screen 4 Or tap the Home button on the diagnostics toolbar to exit the application directly and go back to the MaxiDAS Job Men...

Страница 53: ...n available the database keeps growing with daily troubleshooting resources by recording the reported solution cases and the advisory reports of the MaxiDAS users from all over the world Information in the MaxiFix database is organized into a series of diagnostic tips that are designed to quickly lead you to the root cause of a particular problem on the test vehicle which will help you quickly fin...

Страница 54: ...n the vehicle identification window and vehicle information bar for example 2014 Hyundai Accord Coupe L4 2 4L K24W1 A search field to find relevant information by entering keywords codes or problems Select Vehicle Button The Select Vehicle button on the Header allows you to specify the vehicle which you want to reference on MaxiFix by selecting each of the vehicle attribute from a sequence of opti...

Страница 55: ...r solutions On MaxiFix community you can find Tips or share your own Tip to help other community members solve vehicle issues To search for a MaxiFix Tip 1 Select a Vehicle a Click the Select Vehicle button on the Header at the top of the page b Select the year of the vehicle from the list c Select the make of the vehicle from the list d Select the model of the vehicle from the list e Select the s...

Страница 56: ...ian in the community If a tip has helped you to solve a repair problem you are encouraged to give an Adopted count to the tip Each member is allowed to click the Adopted once for a tip and each click will add 1 count to the total number of Adopted The Adopted count helps you easily identify which tips are really helpful for repairing vehicle issues You can also post a comment about how the tip has...

Страница 57: ...ed in by clicking the Filter button on the main page of Home and select the desired vehicle makes This filter can be canceled anytime by clicking the Remove All Filters button and the default setting will be restored to display questions about all vehicle makes Search Fix Search Fix the second option on the Navigation Menu at the bottom of the screen presents search results for the specified vehic...

Страница 58: ...sure to be descriptive and concise when asking your question Problem Description describe how the vehicle is behaving Repair History include any previous diagnostic tests that you performed including the results of the tests Also list any parts that were replaced during previous diagnostic work Tap the Cancel to cancel your question and return to the Ask page Tap the Submit to post your question t...

Страница 59: ...referred makes will also be displayed in the Filter option on the Home page Share a Tip allows you to share your personal repair experience with the community Click My MaxiFix on the Navigation Menu at the bottom of the screen to display all questions and tips that you have contributed to the community Create a Tip A Tip is a concise and complete description of the fix for a particular vehicle rep...

Страница 60: ...ion Menu at the bottom of the screen shows a list of message notification which is relevant to your activities in the Question section A notification icon will appear on the top right corner of My Messages if there is any new or unread message in the Question section The number on the notification icon indicates the total number of the new and unread messages The displayed number will be reduced c...

Страница 61: ...u need to select the question s response message from the message list on My Messages page first then tap Adopted Answer and select Close Question Tap the Cancel button to cancel your submission and return to My Messages page It is strongly recommended to share your repair solutions before closing a question Your question will be converted to a MaxiFix Community Tip after closing Score Rewarding S...

Страница 62: ...y Asked Questions FAQ link that answers the most frequent questions we hear from MaxiFix community members If you wish to contact the administrator of this site please use the contact form Select Support from the Navigation Menu to open the comment window To allow the administrator to respond to your question or issue the following information should be provided Your name A contact email address A...

Страница 63: ...ns of the Shop Manager application are mainly manipulated by the toolbar buttons which are listed and described in the table below Table 6 1 Top Toolbar Buttons in Shop Manager Button Name Description Back Returns to the previous screen Diagnostics Directs you to the vehicle s Diagnostics screen to activate a direct test session Enter Edit Shows the editing toolbar to print or delete the selected ...

Страница 64: ...saves the file Vehicle History This function stores records of test vehicle history including vehicle information and the retrieved DTCs from previous diagnostic sessions and displays all information in an easy to check table list on which you can view summarized details and manually input other information about the test vehicle and diagnostic loggings etc The Vehicle History also provides direct...

Страница 65: ...screen displays Now a new diagnostic session is activated see Diagnosis on page 23 for detailed instructions on vehicle diagnostic operations Historical Test Record The Historical Test record sheet of the tested vehicle is a detailed data form which includes all general information of the vehicle such as vehicle year make and model etc and the diagnostic trouble codes retrieved from the previous t...

Страница 66: ...one exists 6 Tap Add to Customer to correlate the Historical Test record sheet to an existing customer account or add a new associating account to be correlated with the test vehicle record See Customer Manager on page 59 for more information 7 Tap Done to save the updated record sheet or tap Cancel to exit without saving Workshop Information The Workshop Information form allows you to edit input ...

Страница 67: ...lect Customer Manager 3 Tap the Add Account button An empty information form displays tap each field to input the appropriate information NOTE The items that must be filled are indicated as required fields 4 Tap the photo frame beside the Name chart to add a photo A sub menu displays select Take Photo to take a new photo for the account or select Choose Photo to choose from the existing files 5 So...

Страница 68: ...eted Tap Cancel to cancel the request History Notes The History Notes function allows you to add audio and video records text notes and photos to keep multi media work logs for the associated customer account which can be very helpful when dealing with repeat customers Keeping notes for each vehicle serviced for each customer will keep you always on track and well organized in business To access H...

Страница 69: ...column Table 6 2 Function Buttons in History Notes Button Name Description Back Returns to the previous screen Delete Deletes the selected note Search Quickly locates the required note by entering the note title Cancel Cancels edit or file search Edit Opens an edit window allowing you to edit notes and attach files Add Notes Adds new note in History Notes Figure 6 4 Sample History Notes Screen ...

Страница 70: ...ote in History Notes 1 Access History Notes 2 Tap the Add Notes button An edit window displays 3 Tap on the Title bar to input a note title 4 Tap on the blank space below to edit a text note or remark 5 Select a function button on the top to add files in any form you choose 6 Tap Save to save the note tap Discard or Cancel to exit without saving ...

Страница 71: ...opens the file system menu Different file types are sorted separately under different options there are five types of information files to be viewed or played back Operations Data Manager Operations are based on toolbar controls Details are explained in the following sections Image Files The Image section contains all captured screenshot images Figure 7 1 Sample Data Manager Main Screen ...

Страница 72: ...ck Returns to the previous screen Enter Edit Shows the editing toolbar to print delete or view image information Cancel Close the editing toolbar or cancels file search Search Quickly locates the image file by entering the vehicle name test path file name or file info Info Opens a window displaying the details of the image Print Prints the selected image Delete Deletes the selected image Figure 7 ...

Страница 73: ...install the printer driver program To install the printer driver program 1 Please download the Maxi PC Suite from www autel com Support Updates Firmware Downloads UPDATE CLIENT and install to your PC The Maxi PC Suite consists of Autel Printer MaxiSys Pinter and PC Suite 2 Double click on Setup exe item 3 Select the installation language and the printer driver installation wizard will load momenta...

Страница 74: ...s all PDF files of saved data After entering the PDF database select a PDF file to view the stored information This section uses the standard Adobe Reader application for file viewing and editing Please refer to the associated Adobe Reader manual for more detailed instructions Review Data The Review Data section allows you to playback the recorded data frames of live data streams On the Review Dat...

Страница 75: ...the MaxiDAS Diagnostics System Selecting this section opens a managing screen on which you can check all the available vehicle diagnostic applications Select the vehicle firmware you want to delete by tapping on the car brand icon the selected item will display a blue tick at the upper right corner Tap the Delete button on the top bar to delete the firmware from the system database Data Logging Th...

Страница 76: ...t This section describes the operation procedures for the settings Unit This option allows you to adjust the measurement unit for the diagnostic system To adjust the unit setting 1 Tap the Settings application on the MaxiDAS Job Menu 2 Tap the Unit option on the left column 3 Select the required measurement unit Metric or English A tick icon will display to the right of the selected unit 4 Tap the...

Страница 77: ...xiDAS Job Menu 2 Tap the Language option on the left column 3 Select the required language A tick icon will display to the right of the selected language 4 Tap the Home button on the top left corner to return to the MaxiDAS Job Menu Or select another setting option for system setup Figure 8 1 Sample Unit Setting Screen Figure 8 2 Sample Language Setting Screen ...

Страница 78: ... the printer through the PC via Wi Fi connection 4 Tap the Home button on the top left corner to return to the MaxiDAS Job Menu Or select another setting option for system setup Printing via APP DS808 provides the most convenient printing method printing via APP To realize this function please make sure a Wi Fi printer is available and then purchase a Wi Fi printer APP and install it onto your Dis...

Страница 79: ...ing make sure the Display Tablet is connected to the same network with the computer either via WiFi or LAN And the computer is connected to a printer To perform printing through the computer 1 Run the MaxiSys Printer program on the computer 2 Click Test Print to make sure the printer is working successfully 3 Tap the Print button on the toolbar A temporary document will be created and sent to the ...

Страница 80: ... or off The Notification Center function configures the MaxiDAS tablet to receive regular on line messages from the server for system update notifications or other service information via the Internet It is highly recommended to keep this function on all the time so you won t miss out any new update for MaxiDAS or event from Autel Internet access is required for receiving on line messages To enabl...

Страница 81: ... and drag it down and the received messages are shown in the list slide the list up or down to view all if the message list covers more than one screen Tapping a specific message launches the corresponding application For example if you tap on an Update notification message the Update application will be launched Auto Update The Auto Update allows the tool to automatically update the OS the MaxiDA...

Страница 82: ...t time you can use the and button or tap on the numbers then the manual input screen will pop up Tap Done to complete the time setting NOTE Internet connection is necessary for auto update otherwise it would not work even if you have already switch it on Make sure the tool is connected to the Internet for the time you have set Figure 8 6 Sample Auto Update Screen Figure 8 7 Sample Set Time Screen ...

Страница 83: ...nu 2 Tap the System settings option on the left column 3 Tap the App Switcher option on the left column 4 Mark the checkbox beside Always show the App Switcher on the right side of the screen then the App Switcher icon shows Short pressing the App Switcher icon opens a control panel Tapping a specific app shortcut button enables you to switch directly to the selected application screen Long pressi...

Страница 84: ...n hardware and serial number etc To check the MaxiDAS product information in About 1 Tap the Settings application on the MaxiDAS Job Menu 2 Tap the About option on the left column The product information screen displays on the right 3 Tap the Home button on the top left corner to return to the MaxiDAS Job Menu or select another setting option for the system setup after viewing Figure 8 9 Sample Ab...

Страница 85: ...be downloaded and installed on the device This section describes installing an update to the MaxiDAS System A notification message displays if an update is available when the Notifications Center function is enabled in the Settings application See Notification Center page 72 for details 1 Navigation and Controls Home Button returns to the MaxiDAS Job Menu Update All updates all available updates S...

Страница 86: ... update To update the software 1 Make sure the Display Tablet is connected to a power source with stable access to the internet 2 Tap the Update application button from the MaxiDAS Job Menu or tap the update notification message when received one or tap the Update icon on Vehicle Menu in Diagnostics application The Update application screen displays 3 Check all available updates If you decide to u...

Страница 87: ...nostic device 1 Visit the website http pro autel com 2 On the Sign In page input your account ID and other information to log in if you already have an account 3 If you are a new member to Autel and do not have an account yet click the Create Autel ID button on the left side 4 Enter the required information in the input fields read through Autel s Terms and Conditions and tick on Agree and then cl...

Страница 88: ...ad and update the screen The main section of the Support screen is divided into two sections The narrow column on the left is the main menu selecting one subject from the main menu displays the corresponding functional screen on the right My Account The My Account screen displays the comprehensive information of the user and the product which is synchronized with the on line registered account inc...

Страница 89: ...e update time Service Info The Service Info section displays a detailed record list of the device s service history information Every time the device has been sent back to Autel for repair the device s serial number and the detailed repair information such as the fault type changed components or system reinstallation etc will be recorded and updated to the associated online product account which w...

Страница 90: ...ustomer Reply indicates the complaint has been replied by the service personnel and requires feedback from the customer Closed indicates the complaint case has been processed solved and ended To view the detailed complaint session tap the button on the right side of the case item To establish a new complaint session 1 Register the product online 2 Tap the Support application on the MaxiDAS Job Men...

Страница 91: ...sing time you ve required To make a reply in a complaint session 1 Register the product online 2 Tap the Support application on the MaxiDAS Job Menu The device information is automatically synchronized with the online account 3 Tap Complaint on the Main Menu 4 Select an existing complaint case item on the record list by tapping the button on its right side The screen displays the complaint session...

Страница 92: ...rresponding Data Logging session on which you are also allowed to have a direct conversation with the support personnel To make a reply in a Data Logging session 1 Tap on the Sent tag to view a list of submitted data loggings 2 Select a specific item to view the latest update of the processing progress 3 Tap on the input field at the bottom of the screen and enter the texts 4 Tap Send to deliver y...

Страница 93: ...re about to discuss For example if you are going to ask a question about the MaxiDAS tablet tap MaxiDAS to start a discussion 3 Enter your topic and the discussion content in the appropriate input field 4 Select a category or edit tags for the discussed post This will help other members with similar interest to find your post 5 Tap OK to submit the post To join and reply to a discussion post 1 Sel...

Страница 94: ... Profile section allows you to set personal Avatar check your member status and other information as well as to review your personal posts in the communities Tap the Avatar image on the Communities screen to open the User Profile Profile displays the user s personal information and member status The Related links allow you to check the Top Users ranked according to their points and levels in the c...

Страница 95: ...agnostics practice etc may be available for your interests FAQ Database The FAQ section provides you comprehensive and abundant references for all kinds of questions frequently asked and answered about the use of Autel s online member account and shopping and payment procedures Account displays questions and answers about the use of Autel s online user account Shopping Payment displays questions a...

Страница 96: ...les and technical bulletins produced by top notch technicians and product experts Please view the materials that are saved on the Display Tablet or view more technical articles from our online forum by clicking the links displayed under this application ...

Страница 97: ...ch all TeamViewer Clients can be reached separately Computers and mobile devices that run TeamViewer are identified by a globally unique ID The first time the Remote Desk application is started this ID is generated automatically based on the hardware characteristics and will not change later on Make sure the Display Tablet is connected to the Internet before launching the Remote Desk application s...

Страница 98: ...d then start the software on his her computer at the same time in order to provide support and take control of the Display Tablet remotely 4 Provide your ID to the partner and wait for him her to send you a remote control request 5 A popup displays to ask for your confirmation to allow remote control on your device 6 Tap Allow to accept or tap Deny to reject Refer to the associated TeamViewer docu...

Страница 99: ...urces such as technical help knowledge base forums training and expertise consultations etc To open a quick link 1 Tap the Quick Link application on the MaxiDAS Job Menu The Quick Link application screen displays 2 Select a website thumbnail from the main section The Chrome browser is launched and the selected website is opened 3 Now you can start exploring the website Figure 13 1 Sample Quick Lin...

Страница 100: ...vehicle 1 Tap the Function Viewer application on the MaxiDAS Job Menu The Function Viewer application screen displays 2 Tap the tool name on the top left to drop down the tool list tap the one you want to search 3 Tap the vehicle brand model and year you want to search 4 All the functions supported by the selected tool for the selected vehicle display with three columns function sub function and v...

Страница 101: ...ou want to search 3 Type in the function you want to search to the top right search column All the vehicles with this function will be listed with 8 columns the Brand Model Year System Sub system Function Sub function and Version NOTE Fuzzy search is supported typing in part of the function you want to search can also find you all the related vehicle and tool information Figure 14 2 Sample Functio...

Страница 102: ...94 Figure 14 3 Sample Function Viewer Screen 3 ...

Страница 103: ...n with wet hands Do not store the devices in humid dusty or dirty areas Check the housing wiring and connectors for dirt and damage before and after each use At the end of each work day wipe the device housing wiring and connectors clean with a damp cloth Do not attempt to disassemble your tablet Do not drop or cause severe impact to the devices Use only authorized battery chargers and accessories...

Страница 104: ...cted to a power source or the battery is charged D When you are unable to charge the tablet Your charger maybe out of order Contact your nearest dealer You may be attempting to use the device in an overly hot cold temperature Try changing the charging environment Your device may have not been connected to the charger properly Check the connector NOTE If your problems persist please contact Autel s...

Страница 105: ...osion leakage or other hazard Avoid dropping the tablet If the tablet is dropped especially on a hard surface and the user suspects damage take it to a service center for inspection The closer you are to your network s base station the longer your tablet usage time because less battery power is consumed for the connection The battery recharging time varies depending on the remaining battery capaci...

Страница 106: ...UTEL US 855 288 3587 Monday Friday 9am 6pm EST Website www autel com Email ussupport autel com Address Suite 200 175 Central Avenue Farmingdale New York USA 11735 AUTEL EUROPE Phone 0049 0 61032000522 Website www autel eu Email sales eu autel com support eu autel com Address Robert Bosch Strasse 25 63225 Langen Germany AUTEL SOUTH AMERICA Phone 507 308 7566 Website www autel com es Email sales lat...

Страница 107: ...urchase for warranty repairs Preferred method of payment for non warranty repairs NOTE For non warranty repairs payment can be made with Visa Master Card or with approved credit terms Send the device to your local agent or to the below address 8th Floor Building B1 Zhiyuan Xueyuan Road Xili Nanshan Shenzhen 518055 China Other Services You can purchase the optional accessories directly from Autel s...

Страница 108: ...ressly approved by the party responsible for compliance could void the user s authority to operate the equipment NOTE This equipment has been tested and found to comply with the limits for a Class B digital device pursuant to Part 15 of the FCC Rules These limits are designed to provide reasonable protection against harmful interference in a residential installation This equipment generates uses a...

Страница 109: ...sts for SAR are conducted using standard operating positions accepted by the FCC with the device transmitting at its highest certified power level in all tested frequency bands Although the SAR is determined at the highest certified power level the actual SAR level of the device while operating can be well below the maximum value This is because the device is designed to operate at multiple power ...

Страница 110: ...CE This product is declared to conform to the essential requirements of the following Directives and carries the CE mark accordingly EMC Directive 2014 30 EU R TTE Directive 1999 5 EC Low Voltage Directive 2014 35 EU ...

Страница 111: ...g of the device Some states do not allow limitation on how long an implied warranty lasts so the above limitations may not apply to you This warranty does not apply to a Products subjected to abnormal use or conditions accident mishandling neglect unauthorized alteration misuse improper installation or repair or improper storage b Products whose mechanical serial number or electronic serial number...

Страница 112: ...104 IMPORTANT All contents of the product may be deleted during the process of repair You should create a back up copy of any contents of your product before delivering the product for warranty service ...

Отзывы: