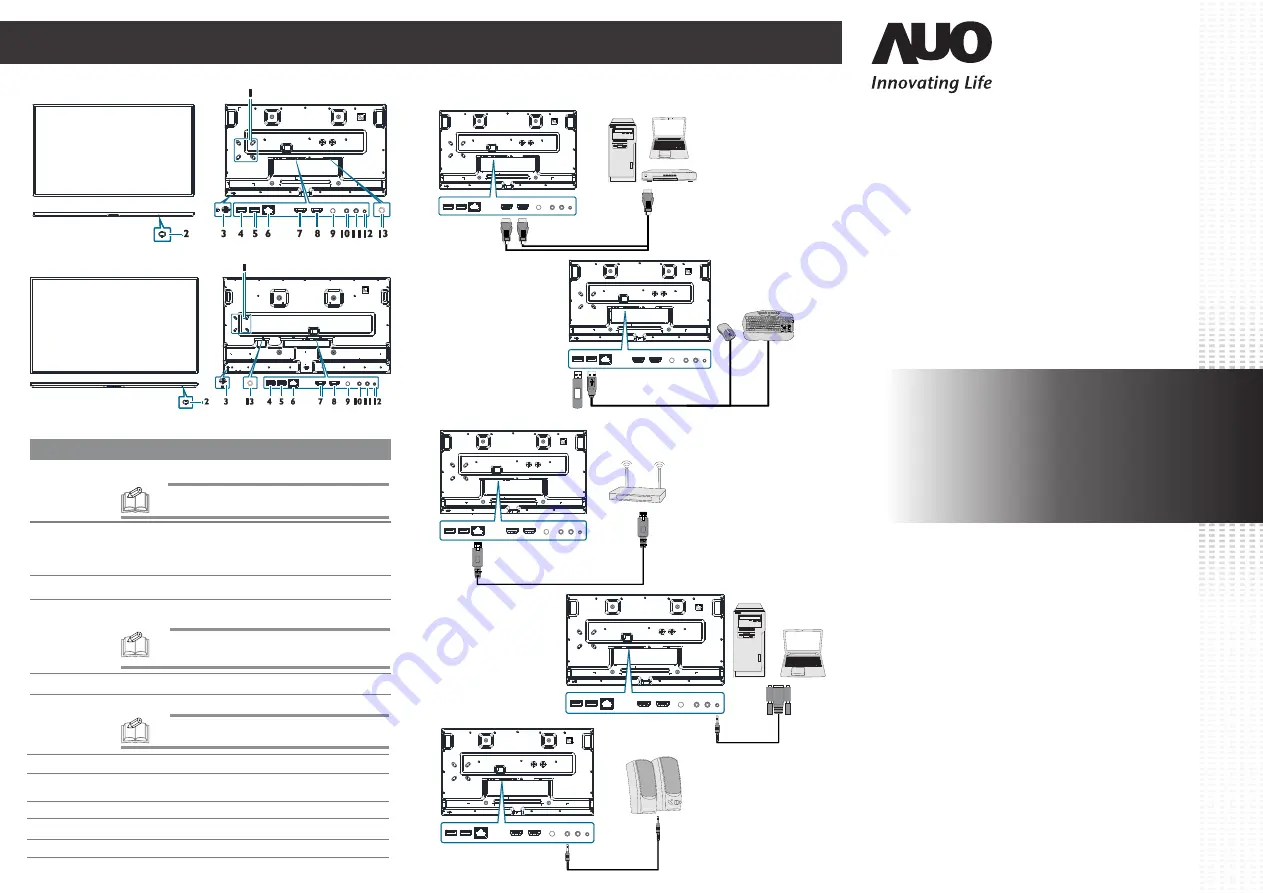
Connecting To The Display
Inputs/Outputs
Quick Start Guide
AUO PID Display
http://pid.auo.com/
PUS43A (SN43UNA01.0)
PUS50A (SN50UNA01.0)
PUS55A (SN55UNA01.0)
PUS65A (SN65UNA01.0)
Item
Description
9
SERVICE PORT
11
IR IN
Connects with the supplied IR extender.
12
RS232
Connects with the serial I/O connector of a host device.
13
DC IN
Connects with the supplied power adapter.
6
RJ45
Connects with a local network using a standard Ethernet cable.
2
Power Button
Turns the display on/off. When the display is turned on:
Connects with external speakers to output the audio that is supplied by
the video source.
10
LINE OUT
7
HDMI 1
Connects with devices transmitting audio/video using the HDMI interface.
8
HDMI 2
NOTE:
The HDMI port complies with the HDMI 2.0
specifications and supports the CEC function.
1
Screw Slots for
Intel NUC Mount
Bracket
Allows installation of a mount bracket compatible with Intel NUC specifications.
NOTE:
For details regarding the specifications of the
mount bracket, you may refer to Intel’s official website.
5
USB
Digital Connection
RS232
LAN RJ45
USB
Connects with USB 2.0 devices such as keyboards, pointing devices, or
flash drives.
4
3
Connects to Kensington-compatible security locks.
Kensington
Lock Slot
HDMI
USB 2.0
External Speakers
50"/55
"
/65"
43"
•
Press the power button to turn off the display backlight.
•
Press and hold the power button for three seconds, the display will
be put into standby mode.
NOTE:
For details regarding the specifications of the
mount bracket, you may refer to Intel’s official website.
NOTE:
If you need to connect a USB flash drive to each of
the USB ports on the display at the same time, use the
supplied USB-A male-to-female cable for one of the USB ports.
For debugging purposes by the manufacturer only.
49.S5001.003


